Audi Q3: Overview - Belt Pulley, Valeo A/C Compressor
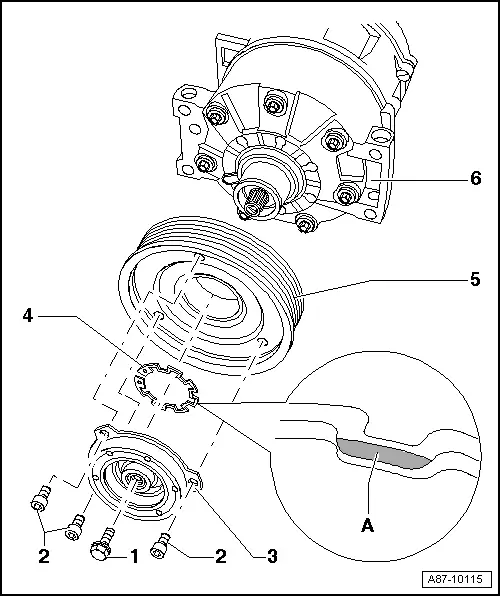
1 - Bolt
- 17 Nm
- Replacing
- The threaded bolt holes, into which the self-locking bolts or bolts with locking compound were installed, must be cleaned (for example with a thread tap). Otherwise, there is a danger that the bolts break off during assembly.
- Clean the thread of the bolts, which are screwed in with locking compound, with a wire brush. Then insert the bolts with locking compound. For the locking compound, refer to the Parts Catalog.
2 - Bolt
- 7 Nm
- The threaded bolt holes, into which the self-locking bolts or bolts with locking compound were installed, must be cleaned (for example with a thread tap). Otherwise, there is a danger that the bolts break off during assembly.
- Clean the thread of the bolts, which are screwed in with locking compound, with a wire brush. Then insert the bolts with locking compound. For the locking compound, refer to the Parts Catalog.
3 - Drive Plate
- Removing and installing. Refer to → Chapter "Belt Pulley, Removing and Installing, Valeo A/C Compressor".
- The overload protection takes over when the torque is excessive (for example, if the A/C compressor runs with resistance) and the belt pulley runs freely without driving the A/C compressor
- With rubber element for decoupling belt pulley from A/C compressor driveshaft, dampens vibrations and noise
4 - Circlip
- Replacing
- Install on proper side, beveled insertion edge -A- faces away from A/C compressor - install flat side faces the A/C compressor
5 - Belt Pulley
- Removing and installing. Refer to → Chapter "Belt Pulley, Removing and Installing, Valeo A/C Compressor".
- The threaded bolt holes, into which the self-locking bolts or bolts with locking compound were installed, must be cleaned (for example with a thread tap). Otherwise, there is a danger that the bolts break off during assembly.
6 - Air Conditioning (A/C) Compressor
- Clean the A/C compressor driveshaft before setting the belt pulley on it
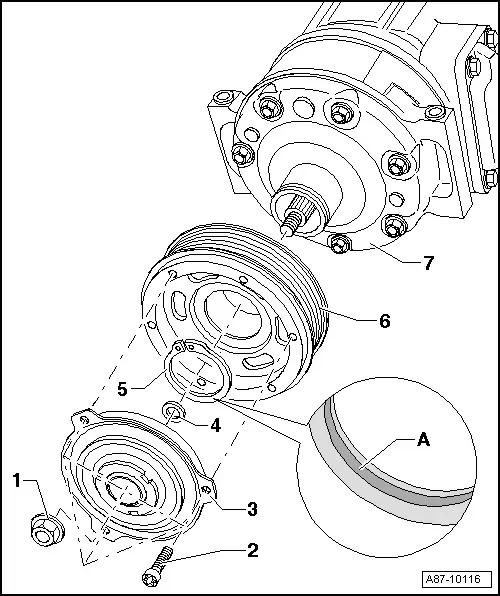
Overview - Belt Pulley, Sanden A/C Compressor, Version 1
 Note
Note
- Installed on vehicles with a 4-cylinder engine
- If the belt pulley overload protection is triggered, check the Air Conditioning (A/C) compressor for ease of movement before replacing the belt pulley. If the A/C compressor creates friction, replace it completely.
- The function of overload protection for pulley is described in, for example, the Self Study Program 240 Audi A2 Technical Information.
- The A/C compressor can be removed and installed at the bracket on engine without opening the refrigerant lines.
1 - Nut
- 25 Nm
- To loosen and tighten hex nut, hold the belt pulley firmly in place using a commercially available strap wrench (with cloth tape).
- The thread of the nut, which was installed with locking compound, must be cleaned (for example, using a thread tap). Otherwise, there is a danger that the input shaft breaks off during assembly.
- Clean the thread of the A/C compressor input shaft with a wire brush.
- Insert the nut with locking compound. For the locking compound, refer to the Parts Catalog.
2 - Bolt
- 4.5 Nm
- Hold the belt pulley securely with a commercially available strap wrench (with cloth tape) to loosen and tighten the bolts.
- The threaded bolt holes, into which the self-locking bolts or bolts with locking compound were installed, must be cleaned (for example with a thread tap). Otherwise, there is a danger that the bolts break off during assembly.
- Clean the thread of the bolts, which are screwed in with locking compound, with a wire brush. Then insert the bolts with locking compound. For the locking compound, refer to the Parts Catalog.
3 - Drive Plate
- The overload protection takes over when the torque is excessive (for example, if the A/C compressor runs with resistance) and the belt pulley runs freely without driving the A/C compressor
- With rubber element for decoupling belt pulley from A/C compressor driveshaft, dampens vibrations and noise
4 - Washer
5 - Circlip
- Replacing
- Install on proper side, beveled insertion edge -A- faces away from A/C compressor - install flat side faces the A/C compressor
6 - Belt Pulley
7 - Air Conditioning (A/C) Compressor
- Clean the A/C compressor driveshaft before setting the belt pulley on it
Overview - Belt Pulley, Sanden A/C Compressor, Version 2
 Note
Note
- Installed on vehicles with a 4-cylinder engine
- If the belt pulley overload protection is triggered, check the Air Conditioning (A/C) compressor for ease of movement before replacing the belt pulley. If the A/C compressor creates friction, replace it completely.
- The function of overload protection for pulley is described in, for example, the Self Study Program 240 Audi A2 Technical Information.
- The A/C compressor can be removed and installed at the bracket on engine without opening the refrigerant lines.
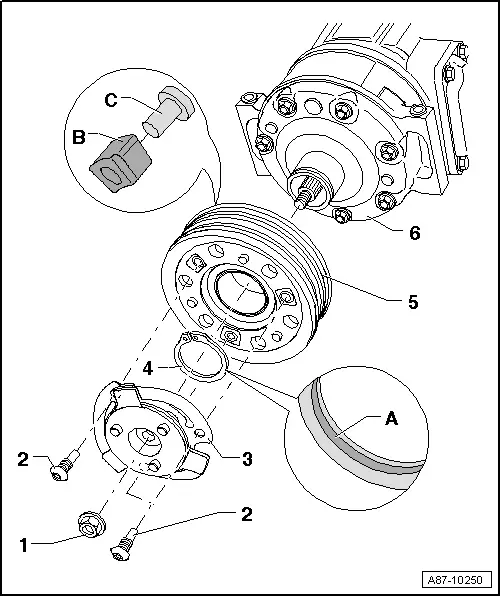
1 - Nut
- 25 Nm
 Note
Note
The Air Conditioning (A/C) compressor input shaft may be covered with a plastic cap to protect the threads on it (the plastic cap is not illustrated).
- Hold the belt pulley securely with a commercially available strap wrench (with cloth tape) to loosen and tighten the hex nut.
- The thread of the nut, which was installed with locking compound, must be cleaned (for example, using a thread tap). Otherwise, there is a danger that the input shaft breaks off during assembly.
- Clean the thread of the A/C compressor input shaft with a wire brush.
- Insert the nut with locking compound. For the locking compound, refer to the Parts Catalog.
2 - Bolt
- 12 Nm
- Hold the belt pulley securely with a commercially available strap wrench (with cloth tape) to loosen and tighten the bolts.
- The threaded bolt holes, into which the self-locking bolts or bolts with locking compound were installed, must be cleaned (for example with a thread tap). Otherwise, there is a danger that the bolts break off during assembly.
- Clean the thread of the bolts, which are screwed in with locking compound, with a wire brush. Then insert the bolts with locking compound. For the locking compound, refer to the Parts Catalog.
3 - Drive Plate
- The overload protection (securing spring elements); takes over when the torque is excessive (for example, if the A/C compressor runs with resistance) and the belt pulley runs freely without driving the A/C compressor.
- Drive plate spring elements dampen vibrations and noise
4 - Circlip
- Replacing
- Install on proper side, beveled insertion edge -A- faces away from A/C compressor - install flat side faces the A/C compressor
5 - Belt Pulley
- With rubber elements -B- and threaded plates -C- for decoupling belt pulley from A/C compressor input shaft, dampens vibrations and noise
 Note
Note
- The threaded plates can also be connected to each other by a ring, depending on the version.
- For "cold climate" vehicles (for example, central and northern Europe), A/C compressors with a smaller displacement are installed. On these A/C compressors, the belt pulley is slightly different from the one illustrated here (the rubber elements -B- are, for example, as a vibration damper not present). Refer to the Parts Catalog.
6 - A/C Compressor
- Clean the A/C compressor driveshaft before setting the belt pulley on it
Overview - Belt Pulley, Sanden A/C Compressor, Version 3
 Note
Note
- Installed on vehicles with a 5-cylinder engine
- If the belt pulley overload protection is triggered, check the Air Conditioning (A/C) compressor for ease of movement before replacing the belt pulley. If the A/C compressor creates friction, replace it completely.
- The function of overload protection for pulley is described in, for example, the Self Study Program 240 Audi A2 Technical Information.
- The A/C compressor can be removed and installed at the bracket on engine without opening the refrigerant lines.
1 - Nut
 Note
Note
The A/C compressor shaft may be covered with a plastic cap to protect the threads on it (the plastic cap is not illustrated).
- To loosen and tighten hex nut, hold belt pulley firmly in place using a standard band wrench (with webbing).
- Clean threads of hex nut and threads of A/C compressor shaft of old thread locking compound before screwing on.
- Install the hex nut with thread locking compound (for example, with D 000 600 A2). Refer to the Parts Catalog.
- Nut tightening specification: 25 Nm
2 - Bolt
- To loosen and tighten bolts, hold belt pulley firmly in place using a standard band wrench (with webbing).
- Tightening specification 12 Nm
- Clean old bolt locking compound from thread of bolts and threads of belt pulley before screwing on.
- Install the bolts with thread locking compound (for example, D 000 600 A2). Refer to the Parts Catalog.
3 - Drive Plate
- the overload protection (securing spring elements), takes over when the torque is excessive (for example, if the A/C compressor runs with resistance) and the belt pulley runs freely without driving the A/C compressor.
- Drive plate spring elements damp vibrations and noise.
4 - Spacer
5 - Circlip
- Replace
- Install on proper side, beveled insertion edge -A- faces away from A/C compressor (install flat side facing the A/C compressor)
- When installing the circlip, note that it cannot be bent open more than is necessary for installation.
6 - Belt pulley with double belt guide
- Clean A/C compressor flange before sliding on pulley.
- With rubber elements -B- and threaded plates -C- for decoupling belt pulley from A/C compressor input shaft (rubber elements damp vibrations and noise).
 Note
Note
- The threaded plates -C- can also be connected to each other by a ring, depending on the version.
- On 5-cylinder vehicles (Audi RS Q3), 2 belts are guided over the belt pulley.
7 - A/C Compressor
- There are different versions depending on engine installed and the market. Refer to the Parts Catalog.
- Clean A/C compressor flange before sliding on pulley.
READ NEXT:
 A/C Compressor, Removing and Installing on Bracket
A/C Compressor, Removing and Installing from Bracket, 4-Cylinder Engine
Note
The Air Conditioning (A/C) compressor can be removed and
installed at the bracket without opening the refri
Refrigerant Lines, Disconnecting and Connecting at A/C Compressor
Special tools and workshop equipment
required
Wrench - Door Adjusting - Joint -3320/1-
Engine Bung Set -VAS6122-
WARNING
Danger due to refrigerant coming out under pressure.
Dan
Belt Pulley, Removing and Installing
Belt Pulley, Removing and Installing, Denso A/C Compressor, Version 1
Note
Belt pulley is sensitive to impact. Handle it with special
care
If the belt pulley overload protection actiSEE MORE:
Water Drain Hoses
Overview - Water Drain Hoses
1 - Front Water Drain Hose
Removing and installing. Refer to
→ Chapter "Water Drain Hoses, Removing and Installing".
Cleaning, refer to
→ Chapter "Water Drain Hoses, Cleaning"
2 - Panorama Sunroof
3 - Rear Wate
Roof Railing, Removing and Installing
Roof Railing, Removing and Installing
WARNING
Follow all Safety Precautions when working with
pyrotechnic components. Refer to
→ Body Interior; Rep. Gr.00; Safety Precautions; when
working with Pyrotechnic Components.
Removing
- Lower the headliner. Refer to