Audi Q3: Overview - Rear Brakes
Overview - Rear Brakes, Brakes 1KU
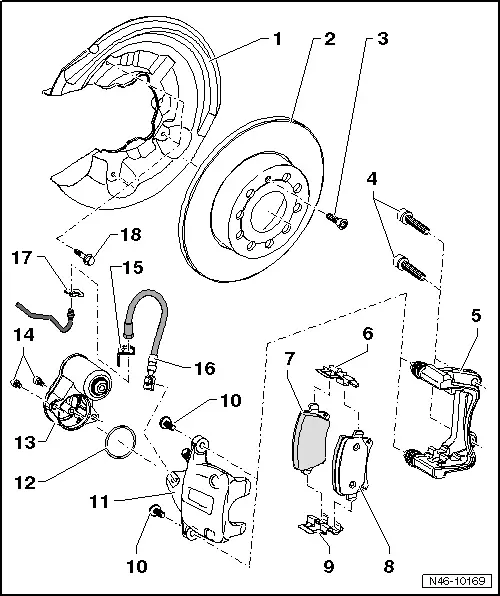
1 - Brake Shield
- Removing and installing, refer to → Chapter "Brake Shield, Removing and Installing, Brakes 1KU".
2 - Brake Rotor
- Allocation, refer to the Parts Catalog.
- Dimensions → Chapter "Brakes Technical Data".
- Wear limit.
- Must always be replaced together on both sides of the axle.
- Do not use excessive force to separate the brake rotor from the wheel hub. If necessary, use rust penetrant, otherwise the brake rotors could be damaged.
- Removing and installing, refer to → Chapter "Brake Rotor, Removing and Installing, Brake 1KU".
3 - Bolt
- 4 Nm
4 - Bolt
- 90 Nm + an additional 90º turn
- Replace after removing
5 - Brake Carrier
- With guide pins and protective cap
- Supplied as an assembled replacement part with sufficient grease on guide pins.
- If the protective caps are damaged, install repair kit; use included grease packet to grease the guide pins.
6 - Brake Pad Retaining Plate
- Replace when pads are replaced.
7 - Brake Pad
- Check the brake pad thickness.
- Wear limit.
- Must always be replaced together on both sides of the axle.
- Removing and installing, refer to → Chapter "Brake Pads, Removing and Installing, Brakes 1KU".
8 - Brake Pad
- Check the brake pad thickness.
- Wear limit.
- Must always be replaced together on both sides of the axle.
- Removing and installing, refer to → Chapter "Brake Pads, Removing and Installing, Brakes 1KU".
9 - Brake Pad Retaining Plate
- Replace when pads are replaced.
10 - Bolt
- 35 Nm
- Replacing
- Self-locking
11 - Brake Caliper
- Do not remove the brake hose when changing the brake pads.
- Removing and installing, refer to → Chapter "Brake Caliper, Removing and Installing, Brake 1KU".
- Replacing, refer to → Chapter "Brake Caliper, Replacing, Brakes 1KU".
- Servicing, refer to → Chapter "Overview - Rear Brake Caliper".
12 - Seal
13 - Electro-Mechanical Parking Brake Motor
- Left Parking Brake Motor -V282-, Right Parking Brake Motor -V283-
- Removing and installing, refer to → Chapter "Left/Right Parking Brake Motor -V282-/-V283-, Removing and Installing".
14 - Bolt
- 12 Nm
15 - Bracket
- To the subframe
16 - Brake Hose
- With ring connection and banjo bolt
- To the brake caliper: 35 Nm
- To the brake line: 14 Nm
17 - Clip
18 - Bolt
- 12 Nm
Overview - Rear Brakes, Brakes 2EA, 2EJ, GP1
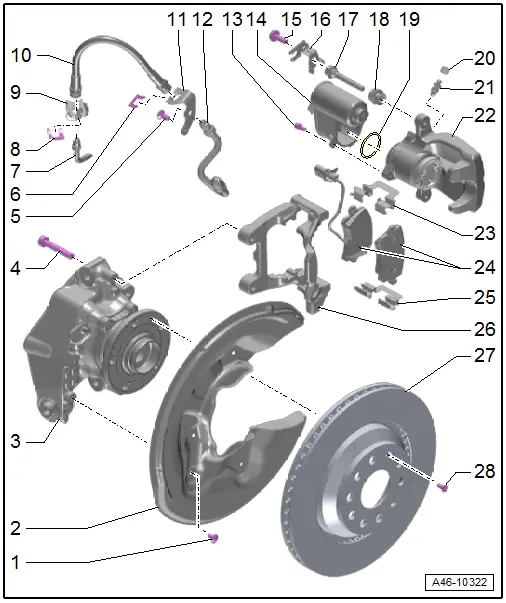
1 - Bolt
- 12 Nm
2 - Brake Shield
- Removing and installing, refer to → Chapter "Brake Shield, Removing and Installing, 2EA, 2EJ, GP1 Brakes".
3 - Stub Axle Carrier
4 - Bolt
- 90 Nm + an additional 90º turn
- Replace after removing
5 - Bolt
- 8 Nm
6 - Clip
7 - Brake Line
- Tightening specification, brake line to brake hose, 14 Nm
8 - Clip
9 - Bracket
- For brake hose
10 - Brake Hose
- Make sure the brake hose is routed correctly. Make sure the brake hose is not blocked, bent or rubbing against the vehicle.
- Replace if damaged
- Make sure that lugs are properly seated in grooves in bracket.
11 - Bracket
- For brake hose
12 - Brake Line
- Tightening specification, brake line to brake hose, 14 Nm
- Tightening specification, brake line to brake caliper, 14 Nm
13 - Bolt
- 12 Nm
14 - Electro-Mechanical Parking Brake Motor
- Left Parking Brake Motor -V282-, Right Parking Brake Motor -V283-
- Parking brake motor, removing and installing, refer to → Chapter "Left/Right Parking Brake Motor -V282-/-V283-, Removing and Installing".
- Electromechanical Parking Brake Control Module -J540-, removing and installing, refer to → Chapter "Electromechanical Parking Brake Control Module -J540-, Removing and Installing".
15 - Bolt
- 35 Nm
- Replace after removing
- Self-locking
- When loosening and tightening, counter-hold at guide pin
16 - Bracket
- For the connector
17 - Guide Pin
- Check ease of movement
- Install the repair kit if the caps or guide pins are damaged. Use supplied grease packet to lubricate guide pins
18 - Protective Cap
19 - Seal
- Replace after removing
20 - Protective Cap
21 - Bleeder Screw
- 13 Nm
22 - Brake Caliper
- Removing and installing, refer to → Chapter "Brake Caliper, Removing and Installing, 2EA, 2EJ, GP1 Brakes".
- Replacing, refer to → Chapter "Brake Caliper, Replacing, Brakes 2EA, 2EJ, GP1".
- Servicing, refer to → Chapter "Brake Caliper Piston, Removing and Installing".
23 - Brake Pad Retaining Plate
- Replace when pads are replaced.
24 - Brake Pads
- Check the brake pad thickness.
- Must always be replaced together on both sides of the axle.
- Allocation, refer to the Parts Catalog.
- Removing and installing, refer to → Chapter "Brake Pads, Removing and Installing, Brakes 2EA, 2EJ, GP1".
- Inner pad with mount for brake pad wear indicator
25 - Brake Pad Retaining Plate
- Replace when pads are replaced.
26 - Brake Carrier
- With guide pins and protective cap
- Supplied as an assembled replacement part with sufficient grease on guide pins.
- If the protective caps are damaged, install repair kit; use included grease packet to grease the guide pins.
27 - Brake Rotor
- For the correct wear limit, refer to → Chapter "Brakes Technical Data".
- Must always be replaced together on both sides of the axle
- Allocation, refer to the Parts Catalog.
- Removing and installing, refer to → Chapter "Brake Rotor, Removing and Installing, 2EA, 2EJ, GP1 Brakes".
28 - Bolt
- 4 Nm
READ NEXT:
 Rear Brake Pads, Removing and Installing
Brake Pads, Removing and Installing, Brakes 1KU
If old brake pads are being replaced with new ones, then it
is necessary to check the brake rotor thickness for wear. Pay
attention to the wear spe
Rear Brake Caliper, Removing and Installing
Brake Caliper, Removing and Installing, Brake 1KU
Note
In the following description the brake caliper is removed
with the brake carrier and pads. The brake hose remains
connected.
Spec
Rear Brake Caliper, Replacing
Brake Caliper, Replacing, Brakes 1KU
Note
In the following description the brake caliper is removed
and replaced without the brake carrier and pads. The brake hose
is removed.
Shou
SEE MORE:
Passenger Compartment Forced Air Extraction, Checking
Ventilation Slots in Luggage Compartment, Checking
Test Sequence
- Check the left and right air guides through the vent
openings -arrow- built into the
luggage compartment side trim panel -1-.
Note
Closed or blocked air ducts to the forced air extraction
vent frames can cause
Windshield Wiper/Washer System
Washer Fluid Hoses
Washer Fluid Line Hose Connections, Disconnecting and Connecting
Various hose couplings are used to connect the hoses to the
washer fluid pumps and spray jets or as coupling points.
Unsecured Hose Coupling
- To disconnect the connection, pull both parts of the
couplin
