Audi Q3: Rear Brake Caliper, Replacing
Brake Caliper, Replacing, Brakes 1KU
 Note
Note
- In the following description the brake caliper is removed and replaced without the brake carrier and pads. The brake hose is removed.
- Should the brake pads also be replaced, the parking brake must be adjusted back, refer to → Chapter "Brake Pads, Removing and Installing".
Special tools and workshop equipment required
- Vehicle Diagnostic Tester
- Torque Wrench 1331 5-50Nm -VAG1331-
- Brake Pedal Actuator -VAG1869/2-.
- Container -1- from the Brake Charger/Bleeder Unit -VAS5234-
Removing
- The parking brake is released.
 Note
Note
- When removing, mark brake pads that will be used again. Install in the same position, otherwise braking effect will be uneven.
- Do not disconnect the connectors from the parking brake motors.
- Remove the affected rear wheel, refer to → Suspension, Wheels, Steering; Rep. Gr.44; Wheels and Tires.
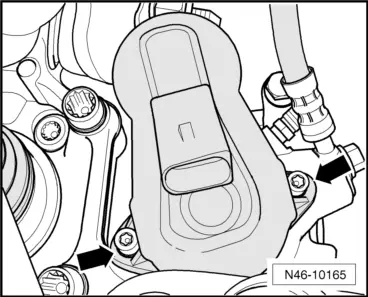
- Remove the bolts -arrows- for the parking brake motor.
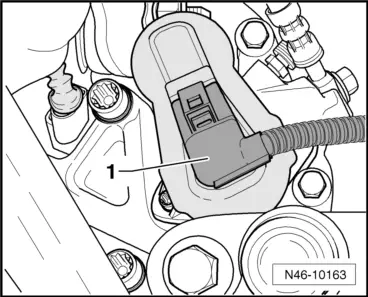
- Remove the parking brake motor from the brake caliper and set it aside without disconnecting the connector.
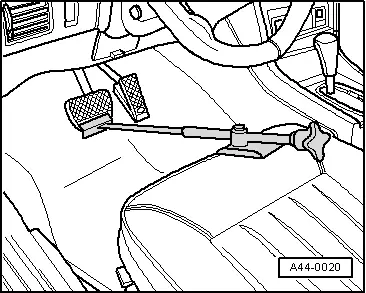
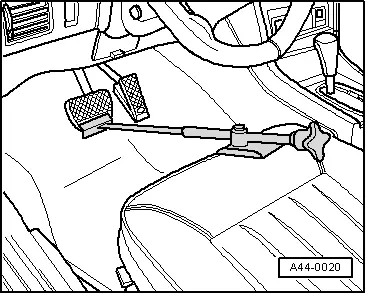
- Insert the Brake Pedal Actuator -VAG1869/2- between the brake pedal and driver seat. Preload the brake pedal at least 60 mm.
 Note
Note
By doing this, the valves in the brake master cylinder are closed and the brake fluid reservoir does not run empty.
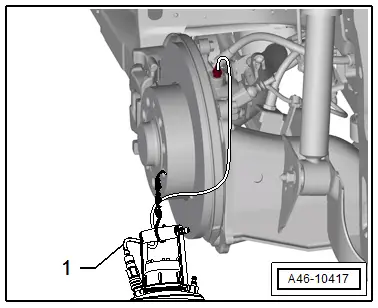
- Remove the protective cap on brake caliper bleeder screw.
- Place the container bleeder hose -1- on the bleeder screw.
- Open the bleeder screw to reduce the pressure in the hydraulic system.
- Close the bleeder screw and remove the container.
 Note
Note
Do not remove the Brake Pedal Actuator -VAG1869/2-.
- Remove the brake line from the brake hose and brake caliper.
- Remove the brake caliper bolts while counterholding at the guide pins.
- Remove the brake caliper from the brake carrier.
Installing
Only bleed the brakes on the wheel which the brake caliper and the brake line was separated.
Install in reverse order of removal. Note the following:
 Note
Note
- Replace the brake caliper bolts.
- Replace the parking brake motor seal.
- New brake calipers are filled with brake fluid and are pre-bled.
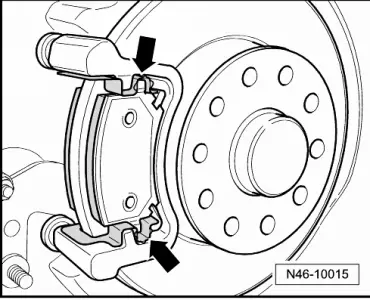
- The brake pads must sit in the brake pad retaining plates -arrows-.
- Push the brake caliper over the installed brake pads.
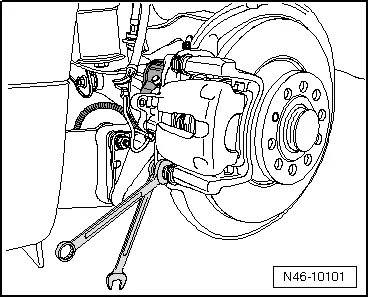
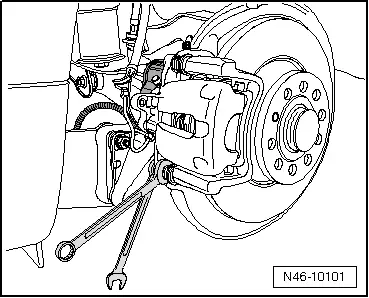
- Tighten the new brake caliper bolts by counterholding at the guide pins.
- Install the parking brake motor, refer to → Chapter "Left/Right Parking Brake Motor -V282-/-V283-, Removing and Installing".
- Remove the Brake Pedal Actuator -VAG1869/2-.
- Only bleed the brakes on the wheel which the brake caliper and the brake line was separated, refer to → Chapter "Hydraulic System, Bleeding".
 Note
Note
Only bleed the brakes on the wheel which the brake caliper and the brake line was separated. If the brake pedal still feels "soft", completely bleed the brakes, refer to → Chapter "Hydraulic System, Bleeding".
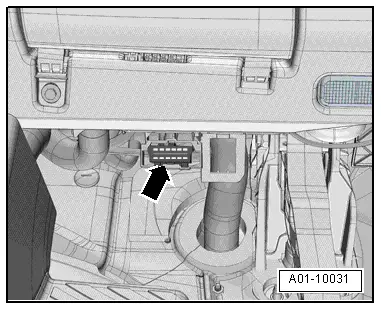
- Connect the Vehicle Diagnostic Tester to the vehicle Data Link Connector (DLC) with the ignition switched off -arrow-.
- Turn on the ignition.
- After entering the VIN, select Guided Functions.
- Basic Setting, Performing
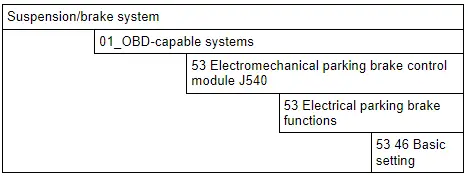
- Continue to follow the instructions in the vehicle diagnostic tester display.
- Install the rear wheels, refer to → Suspension, Wheels, Steering; Rep. Gr.44; Wheels and Tires.
 WARNING
Risk of accident!
- Before moving vehicle, depress brake pedal several times firmly to properly seat brake pads in their normal operating position.
- Make sure the brakes are working correctly before driving the vehicle.
Brake Caliper, Replacing, Brakes 2EA, 2EJ, GP1
 Note
Note
In the following description the brake caliper is removed and replaced without the brake carrier and pads. The brake hose is removed.
Special tools and workshop equipment required
- Torque Wrench 1331 5-50Nm -VAG1331-
- Brake Pedal Actuator -VAG1869/2-.
- Container -1- from the Brake Charger/Bleeder Unit -VAS5234-
Removing
- Turn off the ignition.
- The parking brake is released.
- Remove the affected rear wheel, refer to → Suspension, Wheels, Steering; Rep. Gr.44; Wheels and Tires.
- Insert the Brake Pedal Actuator -VAG1869/2- between the brake pedal and driver seat. Preload the brake pedal at least 60 mm.
 Note
Note
By doing this, the valves in the brake master cylinder are closed and the brake fluid reservoir does not run empty.
 WARNING
Risk of skin irritation.
To prevent skin contact with brake fluid, wear chemical resistant protective gloves.
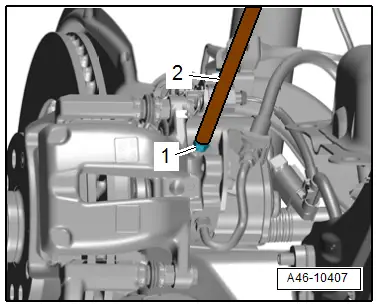
- Remove the protective cap from the bleeder screw -1-.
- Attach the container bleeder hose -2- to the bleeder screw.
- Open the bleeder screw to reduce the pressure in the hydraulic system.
- Close the bleeder screw and remove the container.
 Note
Note
Do not remove the Brake Pedal Actuator -VAG1869/2-.
 Note
Note
Place a cloth underneath to catch any brake fluid leaking out.
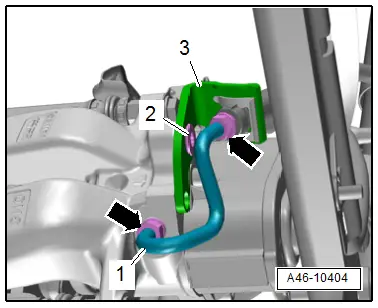
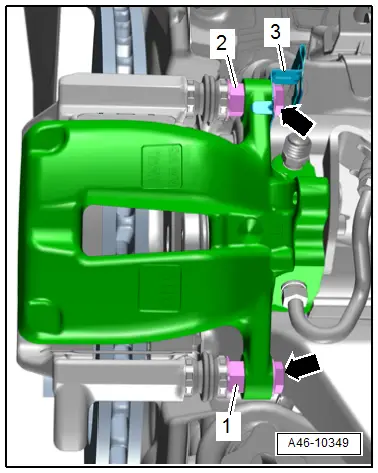
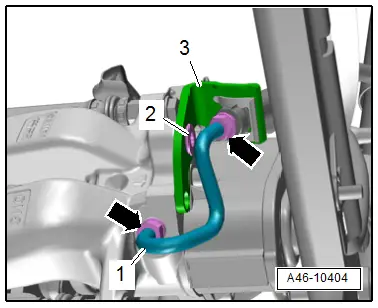
- Remove the union bolts -arrows- and then remove the brake line -1-.
- Remove the bolt -2-, then remove the bracket -3- and move it with the brake hose to the side.
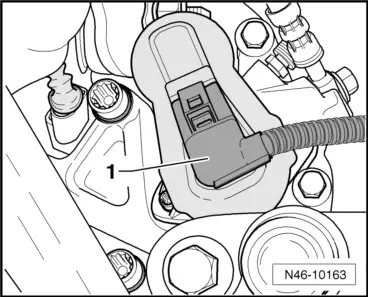
- Disconnect the connector -1- from the parking brake motor.
- Remove the bolts -arrows- by counterholding the guide pins -1 and 2-.
- Move the bracket with the connector to the side.
- Remove the brake caliper.
- Remove the electro-mechanical parking brake motor, refer to → Chapter "Left/Right Parking Brake Motor -V282-/-V283-, Removing and Installing".
- Remove the brake pads and brake pad springs.
Installing
Only bleed the brakes on the wheel which the brake caliper and the brake line was separated.
Install in reverse order of removal. Note the following:
 Note
Note
Replace the brake caliper bolts.
- Clean the brake caliper carrier on the brake pad spring contact surfaces -arrow- and thinly coat them with Lithium grease.
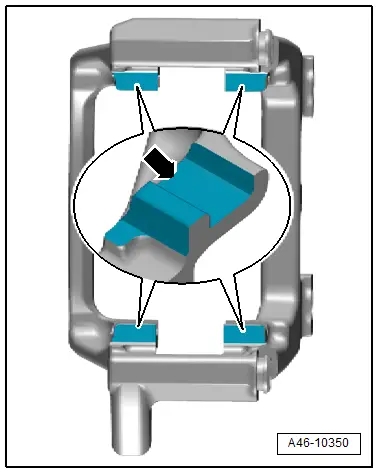
- Install the brake pad springs while paying attention to the installed position.
- Insert brake pads in brake carrier.
 Note
Note
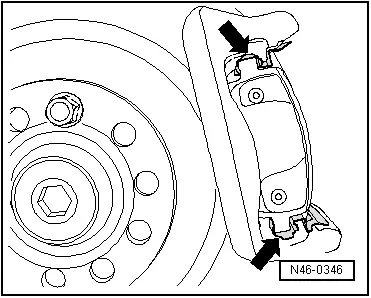
Make sure the brake pads are seated in the brake pad springs -arrows-.
- Bring the bracket -3- with the connector into its installation position.
 Note
Note
- Make sure the brake hose is routed correctly.
- Make sure the brake hose is not blocked, bent or rubbing against the vehicle.
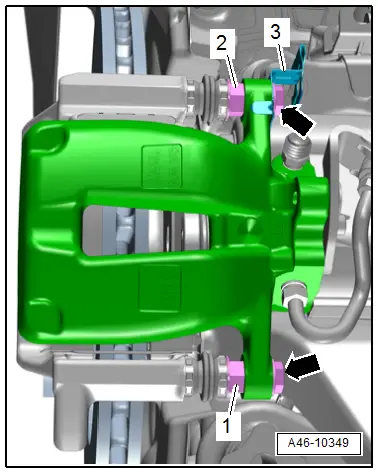
- Tighten the bracket -3- with the brake hose with the bolt -2-.
- Bring the brake line -1- into its installation position and tighten the union bolts -arrows-.
- Connect the connector -1- for the parking brake motor.
- Remove the Brake Pedal Actuator -VAG1869/2-.
- Only bleed the brakes on the wheel which the brake caliper and the brake line was separated, refer to → Chapter "Hydraulic System, Bleeding".
 Note
Note
Only bleed the brakes on the wheel which the brake caliper and the brake line was separated. If the brake pedal still feels "soft", completely bleed the brakes, refer to → Chapter "Hydraulic System, Bleeding".
- Install the rear wheel, refer to → Suspension, Wheels, Steering; Rep. Gr.44; Wheels and Tires.
- Depress brake pedal firmly several times with vehicle stationary so that the brake piston reaches its operating position.
- Drive the parking brake motor out using the Vehicle Diagnostic Tester by following the directions on the display.
 WARNING
Risk of accident!
- Before moving vehicle, depress brake pedal several times firmly to properly seat brake pads in their normal operating position.
- Make sure the brakes are working correctly before driving the vehicle.
