Audi Q3: Passenger Compartment Forced Air Extraction, Checking
Ventilation Slots in Luggage Compartment, Checking
Test Sequence
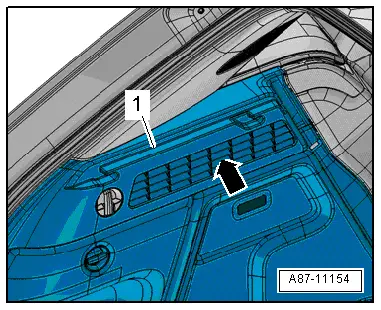
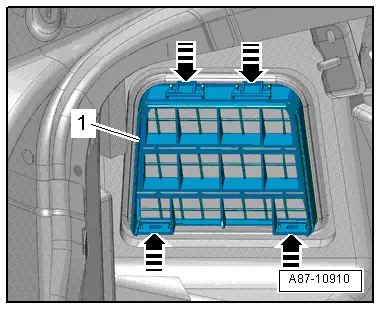
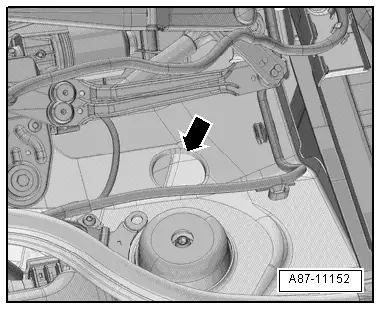
- Check the left and right air guides through the vent openings -arrow- built into the luggage compartment side trim panel -1-.
 Note
Note
Closed or blocked air ducts to the forced air extraction vent frames can cause the windows to fog up.
Forced Air Extraction Vent Frames, Checking from Inside
Test Sequence
 Note
Note
- Sticky sealing lips can cause the windows to fog.
- The sealing lips in the ventilation frames must move freely and close by themselves.
- Closed or blocked air ducts to the vent frames can cause the windows to fog up.
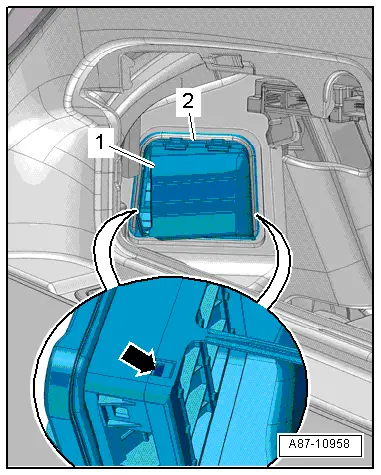
- Open the luggage compartment side trim panel cover.
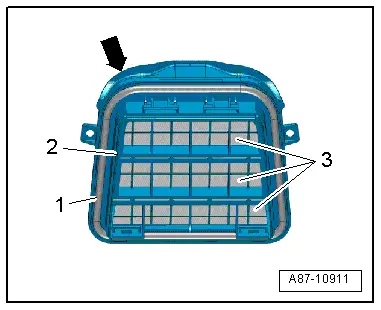
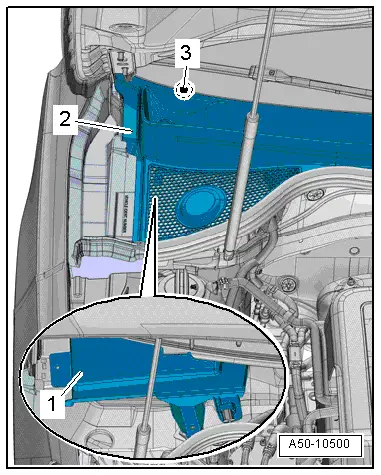
- If equipped, remove the upper cover -1- from the vent frame -2-.
- Release the cover on the side -arrow- and remove it.
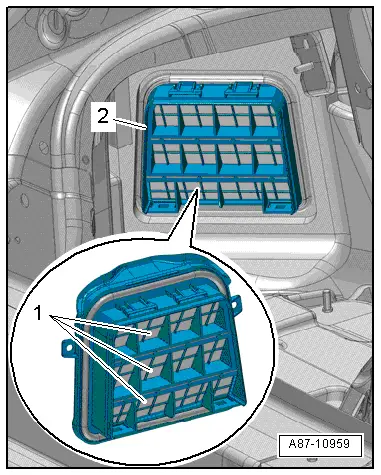
- Check the vent frames -2- for flow and check the sealing lips -1- for functionality.
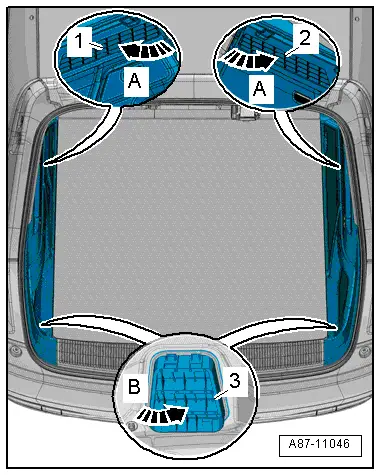
- To ensure proper passenger compartment ventilation, the vent openings in the luggage compartment must not be blocked.
- The air -A arrows- must be able to flow outward via the vent openings -1 and 2- in the luggage compartment side trim panel to the forced air extraction ventilation frames -3--arrow B-.
Passenger Compartment Forced Air Extraction, Removing and Installing
Removing
- Remove the rear bumper cover. Refer to → Body Exterior; Rep. Gr.63; Rear Bumper; Bumper Cover, Removing and Installing.
- Open the luggage compartment side trim panel cover.
- If equipped, remove the upper cover -1- from the vent frame -2-.
- Release the cover on the side -arrow- and remove it.

- Open the clips -arrows- and push the forced air extraction vent frame -1- outward.
Installing
Installation is done is reverse order, observe the following:
- Check the seal -1- for damages.
- The ventilation frames -2- can only be installed in one position to ensure the sealing lips -3- close correctly.
- The larger radius -arrow- is at the top.
- When installing, press the ventilation frame into the opening on the body until all the retaining tabs engage securely.
- Reattach the cover on the vent frames.
- Install the rear bumper cover. Refer to → Body Exterior; Rep. Gr.63; Rear Bumper; Bumper Cover, Removing and Installing.
If the bumper cover was removed, then the Lane Change Assistance Control Module -J769-/ Lane Change Assistance Control Module 2 -J770- must be recalibrated. Refer to → Electrical Equipment; Rep. Gr.96; Lane Change Assistance; Lane Change Assistance, Calibrating.
Fresh Air Intake Cover, Removing and Installing
Removing
- Remove the plenum chamber cover. Refer to → Body Exterior; Rep. Gr.50; Bulkhead; Plenum Chamber Cover, Removing and Installing.
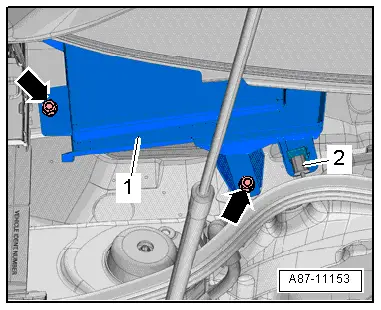
- If equipped, disconnect the connector -2- from the Air Quality Sensor -G238-.
- Remove the bolts -arrows-.
- Remove the cover -1-.
 Note
Note
- If the cover is damaged or incorrectly installed, water can flow into the fresh air intake duct. Complaints due to odor problems coming from the heater/A/C system and/or there is moisture in the passenger compartment may result.
- If the plenum chamber cover is damaged or is installed incorrectly, water can flow into the fresh air intake duct via the cover.
Installing
Installation is done is reverse order, observe the following:
- Install the plenum chamber cover. Refer to → Body Exterior; Rep. Gr.50; Bulkhead; Plenum Chamber Cover, Removing and Installing.
Fresh Air Intake, Removing and Installing
Removing
- Remove the fresh air intake cover. Refer to → Chapter "Fresh Air Intake Cover, Removing and Installing".
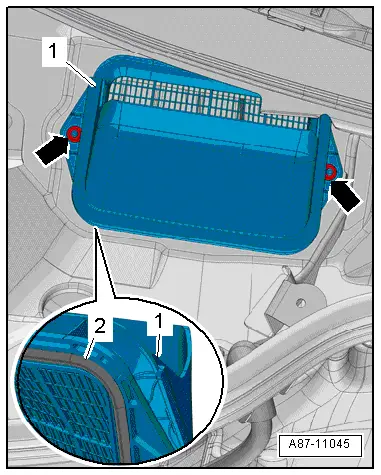
- Remove the nuts -arrows-.
- Remove the fresh air intake -1- from the plenum chamber.
 Note
Note
- If the fresh air intake grille is damaged or incorrectly installed, water can flow into the fresh air intake duct. Complaints due to odor problems coming from the heater/A/C system and/or there is moisture in the passenger compartment may result.
- Check the seal attached at the bottom on the air intake grille for damage and replace it if necessary.
Installing
Installation is done is reverse order, observe the following:
- Check the bonded seal -2- between the fresh air intake and the body for damages.
- Install the fresh air intake cover. Refer to → Chapter "Fresh Air Intake Cover, Removing and Installing".
Plenum Chamber Water Drain, Checking
 Note
Note
- Due to plenum chamber deposits (leaves, various tree needles, etc.), which accumulate in the water drain -arrow-, the drainage of water from the plenum chamber may be impaired. The water level in the plenum chamber then rises if the vehicle is taken to an automatic car wash or in the event of heavy rain, water enters via intake housing into the heating and Air Conditioning (A/C) unit and is blown by the fresh-air blower onto the evaporator together with the air conveyed.
- If the water drains -arrow- on the left and right are dirty with leaves and tree needles, the drains may freeze in the winter and water can no longer drain. After a short drive, heat emitted from engine and exhaust system melts the ice in the drains again and water may drain off again before vehicle arrives at the workshop.

- If the plenum chamber cover -2- is damaged or is installed incorrectly, water can flow into the fresh air intake duct via the rain water drain channel -1-. Complaints due to odor problems coming from the heater/A/C system and/or there is moisture in the passenger compartment may result.
Plenum Chamber Water Drain, Cleaning
Procedure
- Remove the plenum chamber cover. Refer to → Body Exterior; Rep. Gr.50; Bulkhead; Plenum Chamber Cover, Removing and Installing.
- Check the water drains -arrow- for debris.
 Note
Note
- To check the water drains that are difficult to reach, use a commercially available and illuminated endoscope, for example. It is best to use one that has a flexible waterproof head.
- Use a commercially available flexible gripping tool to clean, for example coarse dirt from difficult to reach water drains. Then wash out the any remaining contaminates.
- The water must be able to be drained.
- Remove the water drain debris.
- Install the plenum chamber cover. Refer to → Body Exterior; Rep. Gr.50; Bulkhead; Plenum Chamber Cover, Removing and Installing.
READ NEXT:
 Overview - Display and Control Head
Overview - Display and Control Head, Manual Climate Control System (Heater
without A/C System)
A/C Control Module -J301- (Heater Control Module -J65-)
Note
The following illustration
Display and Control Head, Removing and Installing
Display and Control Head, Removing and Installing, A/C Control Module
-J301- (Heater Control Module -J65-)
Note
Only for vehicles with a manual climate control system
(heater without
SEE MORE:
Audi pre sense
Function overview
Applies to: vehicles with Audi pre sense
Within the limits of the system, the Audi pre
sense functions can initiate measures in certain
driving situations to protect the vehicle occupants
and other road users. Depending on the vehicle
equipment, various Audi pre sense systems
may b
Front Backrest, Removing and Installing
Backrest Cover, Removing and Installing
Removing
WARNING
Danger of being injured by burrs on the backrest
cover.
Wear protective gloves.
- Reach behind the backrest cover -1-
and pull the cover off the backrest frame to the right as
illustrated.
Note
If this is d
