Audi Q3: Overview - Display and Control Head
Overview - Display and Control Head, Manual Climate Control System (Heater without A/C System)
A/C Control Module -J301- (Heater Control Module -J65-)
 Note
Note
- The following illustration shows a A/C Control Module -J301- display and control head as it was installed through MY 2013 (with a AC button). In MY 2013, modified Air Conditioning (A/C) control heads are being installed as a running change (recognizable, for example, by the button labeling A/C instead of AC). Pay attention to the correct allocation. Refer to the Parts Catalog.
- For A/C Control Module -J301- A/C control heads with the part number from the index "B", the button labeling for switching the A/C compressor activation on and off was changed from AC to A/C.
- For Heater Control Module -J65- heater control heads (installed on vehicles with a heater without an A/C system), the A/C or AC buttons do not exist.
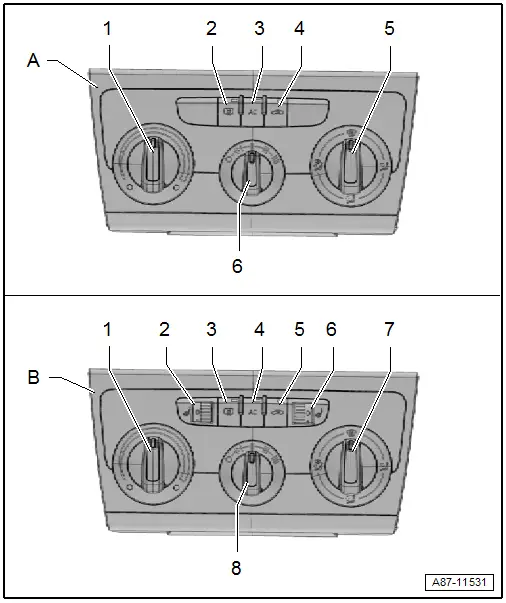
A - A/C Control Module -J301- control head for vehicles without seat heating
1 - Temperature Regulator
2 - Rear Window Defogger Button
- Illuminated Light Emitting Diode (LED) indicates the "Rear window defogger on" function is selected.
3 - AC or A/C Button for A/C compressor
- Illuminated LED indicates the "A/C compressor on" function is selected
- Different button labeling depending on the version of the A/C Control Module -J301-
- With a Heater Control Module -J65-, a cap is installed instead of this button
4 - Recirculating Air Mode Button
- Illuminated LED indicates the "recirculated-air mode" function is selected.
- The "recirculated-air mode" function is canceled when setting the air distribution to "Defrost" (air to the windshield).
5 - Air Distribution Knob
6 - Knob for Fresh Air Blower -V2-
B - A/C Control Module -J301- Control Head for Vehicles with Seat Heating
1 - Temperature Regulator
2 - Heated Driver Seat Adjuster
- The number on the thumbwheel indicates the selected level
3 - Rear Window Defogger Button
- Illuminated LEDs indicate the "Rear window defogger on" function is selected.
4 - AC or A/C Button for A/C Compressor
- Illuminated LED indicates the "A/C compressor on" function is selected
- Different button labeling depending on the version of the A/C Control Module -J301-
- With a Heater Control Module -J65-, a cap is installed instead of this button
5 - Recirculating Air Mode Button
- Illuminated LED indicates the "recirculated-air mode" function is selected.
- The "recirculated-air mode" function is canceled when setting the air distribution to "Defrost" (air to the windshield).
6 - Heated Front Passenger Seat Adjuster
- The number on the thumbwheel indicates the selected level
7 - Air Distribution Knob
8 - Knob for Fresh Air Blower -V2-
Overview - Display and Control Head, Automatic Climate Control System, Climatronic Control Module -J255-
 Note
Note
- The following illustration shows a display and control head as it was installed through MY 2013 (with a AC button). In MY 2013, modified Air Conditioning (A/C) control heads are being installed as a running change (recognizable, for example, by the button labeling A/C instead of AC). Pay attention to the correct allocation. Refer to the Parts Catalog.
- An OFF button exists on the Climatronic Control Module -J255- A/C control heads with the part number starting from the index "D". For these Climatronic Control Module -J255-, the function of the recirculation and A-recirculation buttons are combined in one button. The button labeling for switching the activation of the A/C compressor on and off is A/C instead of AC.
- For Climatronic Control Module -J255- A/C control heads with the part number from the index "F" (running change in MY 2014), the labeling of the buttons, trim and trim surface were changed (for example, the labeling on the defrost mode button was switched from Front to MAX). Pay attention to the correct version and allocation. Refer to the Parts Catalog.

A - Climatronic Control Module -J255- Control Head for Vehicles without Seat Heating
1 - AC or A/C Button for A/C Compressor
- Illuminated LED indicates the "A/C compressor on" function is selected
- Different button labeling depending on the version of the Climatronic Control Module -J255-
2 - Driver Side Temperature Preset Regulator
3 - Button for Recirculating Air Mode/OFF Button
- Illuminated LEDs indicate the selected function "recirculating air mode" or "A/C system off"
- The "recirculated-air mode" function is canceled when the defrost mode button (air to the windshield) is pressed
- Different button labeling and function depending on the version of the Climatronic Control Module -J255-
4 - Display
5 - - Button for Fresh Air Blower -V2-
- To reduce the blower speed
- Different labeling or symbols depending on the version of the Climatronic Control Module -J255-
6 - + Button for Fresh Air Blower -V2-
- To increase the blower speed
- Different labeling or symbols depending on the version of the Climatronic Control Module -J255-
7 - Button for Setting the Upper Air Distribution
- Illuminated LED indicates the "Upper air distribution" function is selected
8 - Front Passenger Side Temperature Preset Regulator
9 - Button for Setting the Center Air Distribution
- Illuminated LED indicates the "Center air distribution" function is selected
10 - Rear Window Defogger Button
- Illuminated LEDs indicate the "Rear window defogger on" function is selected.
11 - Button for Setting the Lower Air Distribution
- Illuminated LED indicates the "Lower air distribution" function is selected
12 - Auto Button for Automatic A/C System Control
- Illuminated LED indicates the "Automatic control" function is selected
13 - Button for Automatic Recirculating Air Mode Control / Button for Automatic and Manual Recirculating Air Mode
- Illuminated LEDs indicate the selected function "Auto recirculating air mode" (or "Manual recirculating air mode")
- Different button labeling and function depending on the version of the Climatronic Control Module -J255- (for a Climatronic Control Module -J255- with an OFF button, the "manual recirculating air mode" function is also switched on and off via this button).
- The "manual recirculating air mode" function is canceled when the defrost mode button (air to the windshield) is pressed
14 - Defrost Mode Button
- Illuminated LED indicates the "defrost mode" function is selected.
- Different labeling or symbols depending on the version of the Climatronic Control Module -J255-
B - Climatronic Control Module -J255- Control Head for Vehicles with Seat Heating
1 - Left Seat Heating Button
- Illuminated LED indicates the level selected.
- The selected level is set back one unit after a pre-set time.
2 - AC or A/C button for A/C compressor
- Illuminated LED indicates the "A/C compressor on" function is selected
- Different button labeling depending on the version of the Climatronic Control Module -J255-
3 - Driver Side Temperature Preset Regulator
4 - Button for Recirculating Air Mode/OFF Button
- Illuminated LEDs indicate the selected function "recirculating air mode" or "A/C system off"
- The "recirculated-air mode" function is canceled when the defrost mode button (air to the windshield) is pressed
- Different button labeling and function depending on the version of the Climatronic Control Module -J255-
5 - Display
6 - - Button for Fresh Air Blower -V2-
- To reduce the blower speed
- Different labeling or symbols depending on the version of the Climatronic Control Module -J255-
7 - + Button for Fresh Air Blower -V2-
- To increase the blower speed
- Different labeling or symbols depending on the version of the Climatronic Control Module -J255-
8 - Button for Setting the Upper Air Distribution
- Illuminated LED indicates the "Upper air distribution" function is selected
9 - Front Passenger Side Temperature Preset Regulator
10 - Button for Setting The Center Air Distribution
- Illuminated LED indicates the "Center air distribution" function is selected
11 - Right Seat Heating Button
- Illuminated LED indicates the level selected.
- The selected level is set back one unit after a pre-set time.
12 - Rear Window Defogger Button
- Illuminated LEDs indicate the "Rear window defogger on" function is selected.
13 - Button for Setting the Lower Air Distribution
- Illuminated LED indicates the "Lower air distribution" function is selected
14 - Auto Button for Automatic A/C System Control
- Illuminated LED indicates the "Automatic control" function is selected
15 - Button for Automatic Recirculating Air Mode Control / Button for Automatic and Manual Recirculating Air Mode
- Illuminated LEDs indicate the selected function "Auto recirculating air mode" (or "Manual recirculating air mode")
- Different button labeling and function depending on the version of the Climatronic Control Module -J255- (for a Climatronic Control Module -J255- with an OFF button, the "manual recirculating air mode" function is also switched on and off via this button).
- The "manual recirculating air mode" function is canceled when the defrost mode button (air to the windshield) is pressed
16 - Defrost Mode Button
- Illuminated LED indicates the "defrost mode" function is selected.
- Different labeling or symbols depending on the version of the Climatronic Control Module -J255-
READ NEXT:
 Display and Control Head, Removing and Installing
Display and Control Head, Removing and Installing, A/C Control Module
-J301- (Heater Control Module -J65-)
Note
Only for vehicles with a manual climate control system
(heater without
Sunlight Photo Sensor -G107-, Removing and Installing
Note
The Sunlight Photo Sensor -G107- is only installed with an
automatic climate control system.
Check the Sunlight Photo Sensor -G107- using the Vehicle
Diagnostic Tester in the "
SEE MORE:
Map update
Introduction
Applies to: vehicles with navigation system
You can update the map data in the MMI with a
map update. The functions depend on the country
and vehicle equipment.
Map update through online map update.
Import a map update from the USB connection
to your MMI.
Online map update
Applies
Tail Lamps
Overview - Rear Lid Tail Lamps
LED tail lamps have LED bulbs and are integrated in the tail
lamps. The LEDs cannot be replaced; the entire tail lamp must be
replaced.
1 - Tail Lamp
In rear lid
Removing and installing. Refer to
→ Chapter "Rear Lid Tail Lamp, Remo
