Audi Q3: Tail Lamps
Overview - Rear Lid Tail Lamps
- LED tail lamps have LED bulbs and are integrated in the tail lamps. The LEDs cannot be replaced; the entire tail lamp must be replaced.
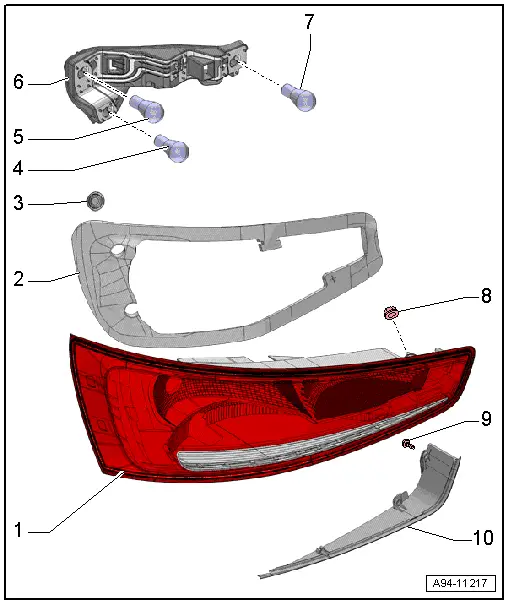
1 - Tail Lamp
- In rear lid
- Removing and installing. Refer to → Chapter "Rear Lid Tail Lamp, Removing and Installing".
2 - Seal
- Self-adhesive
- Replace if damaged.
3 - Grommet
- Quantity: 2
4 - Rear Turn Signal Bulb
- Left Rear Turn Signal Bulb -M6-
- Right Rear Turn Signal Bulb -M8-
- 12 V, 21 W
- Bulb, replacing. Refer to → Chapter "Bulb Holder, Removing and Installing".
5 - Brake and Tail Lamp Bulb
- Left Brake/Tail Lamp Bulb -M21-
- Right Brake/Tail Lamp Bulb -M22-
- 12 V, 21 W
- Bulb, replacing. Refer to → Chapter "Bulb Holder, Removing and Installing".
6 - Lamp Socket
- Removing and installing. Refer to → Chapter "Bulb Holder, Removing and Installing".
7 - Brake and Tail Lamp Bulb
- Left Brake/Tail Lamp Bulb 2 -M58-
- Right Brake/Tail Lamp Bulb 2 -M59-
- 12 V, 21 W
- Bulb, replacing. Refer to → Chapter "Bulb Holder, Removing and Installing".
8 - Nut
- Quantity: 3
- Tightening specification and sequence. Refer to → Fig. "Tail Lamps, Tightening Specification and Sequence"
9 - Bolt
- 1 Nm
- Quantity: 3
10 - Cover
- For the tail lamp
Tail Lamps, Tightening Specification and Sequence
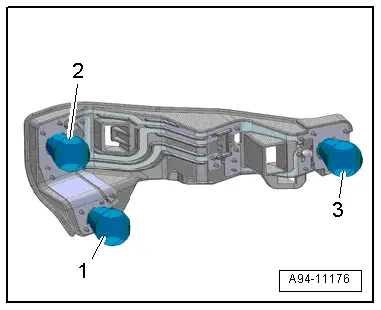
- Tighten the nuts for the tail lamps to 4 Nm and in the sequence -1, 2 and 3-.

Overview - Body Tail Lamps

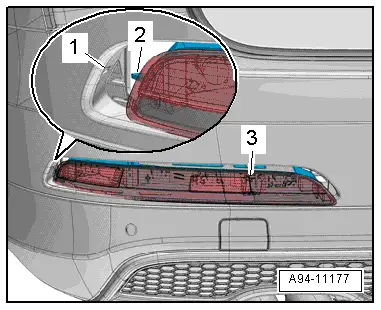
1 - Tail Lamp
- There are different versions. Refer to the Parts Catalog.
- Removing and installing. Refer to → Chapter "Tail Lamp, Removing and Installing".
2 - Brake and Tail Lamp Bulb
- Left Brake/Tail Lamp Bulb 3 -M82-
- Right Brake/Tail Lamp Bulb 3 -M83-
- 12 V, 16 W (W16W)
- Bulb, replacing. Refer to → Chapter "Bumper Cover Tail Lamp Bulbs, Removing and Installing".
3 - Rear Turn Signal Bulb
- Left Rear Turn Signal Bulb 2 -M80-
- Right Rear Turn Signal Bulb 2 -M81-
- 12 V, 21 W
- Bulb, replacing. Refer to → Chapter "Bumper Cover Tail Lamp Bulbs, Removing and Installing".
4 - Lamp Socket
- Replace if the seal is damaged.
5 - Lamp Socket
- Replace if the seal is damaged.
6 - Sensor for Rear Lid Closed
- Rear Lid -Closed- Sensor 1 -G525-
- Rear Lid -Closed- Sensor 2 -G526-
- Removing and installing. Refer to → Chapter "Rear Lid -Closed- Sensor 1 and 2 -G525-/-G526-, Removing and Installing".
7 - Lock Carrier Trim Panel
- Removing and Installing. Refer to → Body Interior; Rep. Gr.70; Luggage Compartment Trim Panels; Lock Carrier Trim Removing and Installing
8 - Lamp Socket
- Replace if the seal is damaged.
9 - Lamp Socket
- Replace if the seal is damaged.
10 - Rear Fog Lamp Bulb
- Left Rear Fog Lamp Bulb -L46-
- Right Rear Fog Lamp Bulb -L47-
- 12 V, 16 W (W16W)
- Bulb, replacing. Refer to → Chapter "Bumper Cover Tail Lamp Bulbs, Removing and Installing".
11 - Back-Up Lamp Bulb
- Left Back-Up Lamp Bulb -M16-
- Right Back-Up Lamp Bulb -M17-
- 12 V, 16 W (W16W)
- Bulb, replacing. Refer to → Chapter "Bumper Cover Tail Lamp Bulbs, Removing and Installing".
12 - Anti-Twist Mechanism
- For screw
13 - Bolt
- 2.5 Nm
14 - Cap
- For screw
- In the bumper cover
Rear Lid Tail Lamp, Removing and Installing
Removing
- Turn the light switch to position "0".
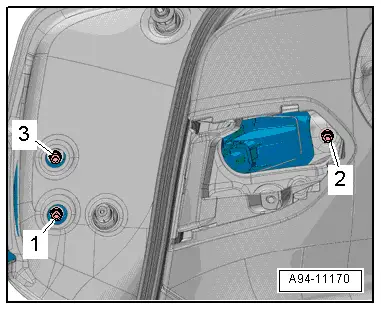
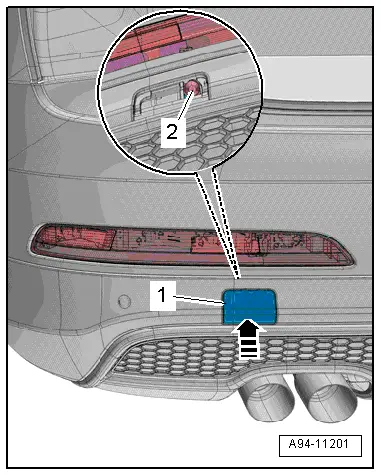
- Remove the grommet -1 and 2-.
- Remove the cap -3- in the direction of -the arrow-.
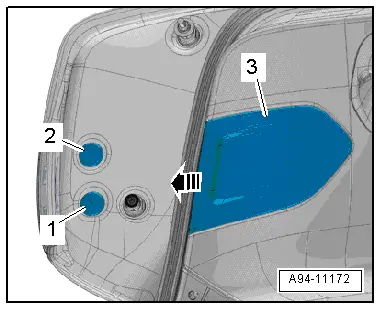
- Remove the nuts -arrows-.
- Remove the tail lamp -1- and disconnect the connector.
Installing
Install in reverse order of removal. Note the following:
 Note
Note
- A damaged or incorrectly attached seal must be replaced.
- A damaged or incorrectly seated seal can cause water can leak into the vehicle interior, what can lead to window glass damage.
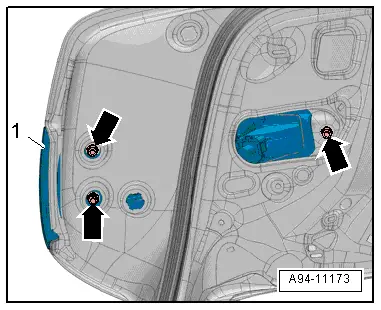
- Check the self-adhesive seal -1- in the tail lamp -2- for damage.
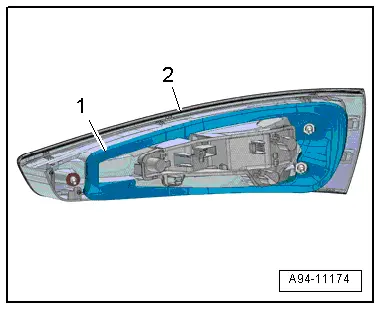
- Connect the connector to the tail lamp and place the wire in the guide on the bulb socket.
- Tighten the nuts for the tail lamp. Refer to → Fig. "Tail Lamps, Tightening Specification and Sequence".
Bulb Holder, Removing and Installing
Bulb Holder, Removing and Installing
Removing
- Remove the tail lamp. Refer to → Chapter "Rear Lid Tail Lamp, Removing and Installing".
- Open the tabs in direction of -arrows- and remove the bulb socket -1-.
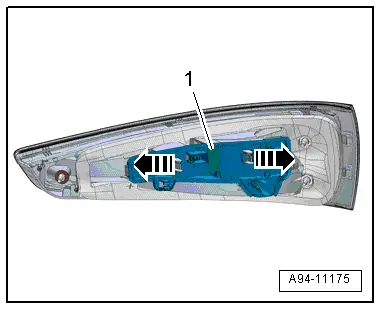
- Remove the bulbs -1, 2 and 3- from the bulb socket.
Installing
Install in reverse order of removal. Note the following:
- Insert new bulbs in the bulb socket. Do not touch the glass bulbs with bare hands.
- Install the tail lamps. Refer to → Chapter "Rear Lid Tail Lamp, Removing and Installing".
Bumper Cover Tail Lamp Bulbs, Removing and Installing
Removing
- Remove the tail lamp. Refer to → Chapter "Tail Lamp, Removing and Installing".
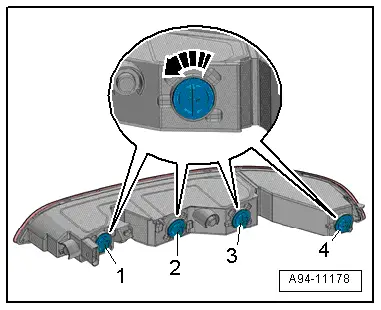
- Turn the socket counterclockwise in direction of -arrow- and remove it from the tail lamp.
- Remove the bulb from the bulb sockets -1 to 4-.
Installing
Install in reverse order of removal. Note the following:
- Insert new bulbs in the bulb socket. Do not touch the glass bulbs with bare hands.
- Secure the socket by turning it clockwise.
- Install the tail lamps. Refer to → Chapter "Tail Lamp, Removing and Installing".
Tail Lamp, Removing and Installing
Removing
- Turn the light switch to position "0".
 Note
Note
To protect the paint in the area around the cap, tape it off with a soft cloth.
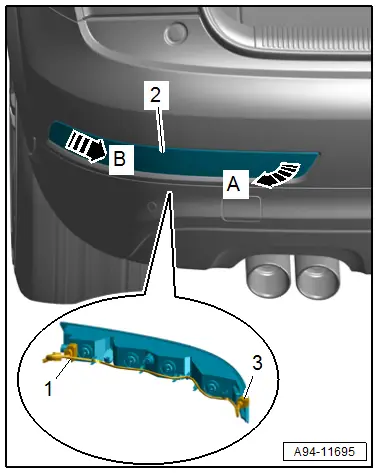
- Push the cap -1- on the outer side -arrow- toward the inside.
- Remove the cap and let it hang.
- Remove the bolt -2-.
- From the inside, pivot the tail lamp -2- slightly out of the bumper cover -arrow A- and from the outside, remove it from the bumper cover -arrow B-.
- Disconnect the connector -1-.
- Disconnect the connector -3-, if applicable.
Installing
Install in reverse order of removal. Note the following:
- Insert the tail lamp -3- on the outside in the tail lamp while doing this the guide -2- must engage in the mount -1-.
- Tighten the bolt.
- Push the cap until it engages audibly in the bumper cover.
Rear Lid -Closed- Sensor 1 and 2 -G525-/-G526-, Removing and Installing
Removing
- Remove the lock carrier trim panel. Refer to → Body Interior; Rep. Gr.70; Luggage Compartment Trim; Lock Carrier Trim Panel, Removing and Installing.
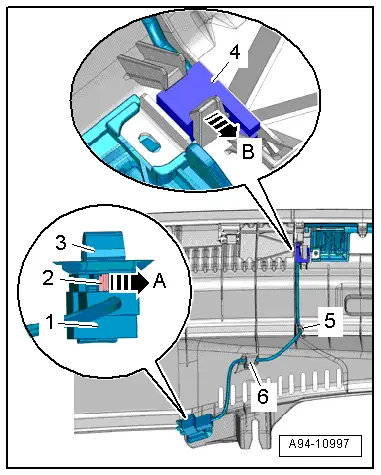
- Push the tab -2- to the side in direction of -arrow A- and remove the connector -1- from the mount -3-.
- Free up the wiring harness from the brackets -5 and 6-.
- Open the tab in direction of -arrow B- and remove the rear lid -closed- sensor -4-.
Installing
Install in reverse order of removal. Note the following:
- Install the lock carrier trim panel. Refer to → Body Interior; Rep. Gr.70; Luggage Compartment Trim; Lock Carrier Trim Panel, Removing and Installing.
READ NEXT:
 High-Mounted Brake Lamp
Overview - High-Mounted Brake Lamp
1 - High-Mounted Brake Lamp
High-Mounted Brake Lamp Bulb -M25-
Removing and installing. Refer to
→ Chapter "High-Mounted Brake Lamp Bulb,
Component Location Overview - Access/Start Authorization System
1 - Electronic Steering Column Lock Control Module -J764-
Overview. Refer to
→ Chapter "Overview - Steering Column Switch Module, with Electronic
Ignition Switch".
2
Front Exterior Door Handle Switch, Removing and Installing
Removing
- Remove the exterior door handle. Refer to
→ Body Exterior; Rep. Gr.57; Door Components; Door Handle,
Removing and Installing.
Note
Ignore -1 and 2-.
-&
SEE MORE:
Correct passenger seating position
General information
As the driver, you are responsible for making sure
every passenger is sitting correctly in their seat
and maintaining this seating position while driving.
Make sure that:
Every passenger in the vehicle has adjusted his
or her seat correctly.
The steering wheel is adjusted co
Indicator lights overview
Description
The indicator lights in the instrument cluster
blink or turn on. They indicate functions or malfunctions.
Some warning and indicator lights
turn on when you switch the ignition on and must
turn off when the drive system is switched on or
while driving
With some indicator lights, message
