Audi Q3: Rear Brake Caliper, Removing and Installing
Brake Caliper, Removing and Installing, Brake 1KU
 Note
Note
In the following description the brake caliper is removed with the brake carrier and pads. The brake hose remains connected.
Special tools and workshop equipment required
- Torque Wrench 1332 40-200Nm -VAG1332-
Removing
- The parking brake is released.
 Note
Note
Do not disconnect the connectors from the parking brake motors.
- Remove the affected rear wheel, refer to → Suspension, Wheels, Steering; Rep. Gr.44; Wheels and Tires.
- Disconnect the connector for the brake pad wear display -arrow-.
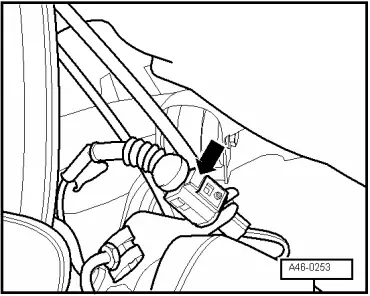
- Release the connector from the mount while turning it 90º at the same time.
- Remove the connector from the bracket.
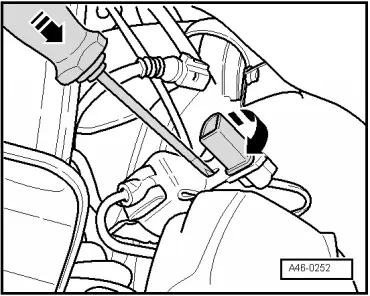
- Remove the connector for the parking brake motor from the bracket.
- Unclip the brake hose from the bracket.
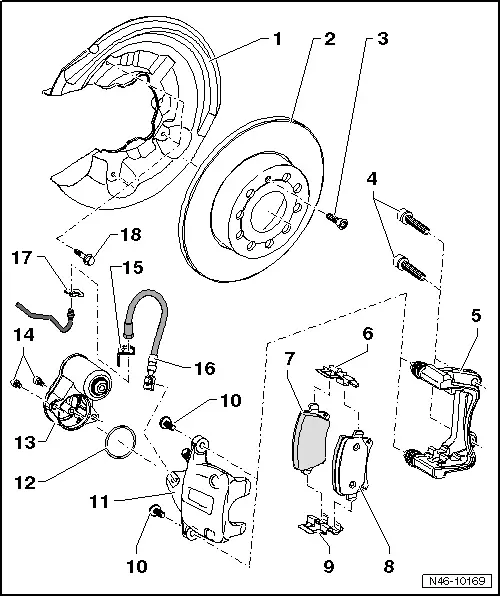
- Remove the bolts -4-.
- Remove the brake caliper with the brake carrier and installed brake pads from the brake rotor. If necessary, push the inner brake pad slightly back.
 Note
Note
If the brake rotor is so worn that the brake caliper cannot be removed, then the parking brake must be adjusted back, refer to → Chapter "Brake Pads, Removing and Installing".
- Hang the brake caliper with the brake carrier on the body with wire.
 Caution
- Do not let the brake caliper with the brake carrier hang on the brake hose. Do not support the weight with the brake hose.
- Replace the brake hose if damaged.
- Do not actuate the brakes or the electromechanical parking brake when the brake caliper is removed.
Installing
Install in reverse order of removal. Note the following:
 Note
Note
- Replace the brake carrier bolts.
- Use only mineral spirits to clean the brake caliper.
- Carefully press the brake caliper with the brake carrier and the brake pads installed over the brake rotor.

- Tighten the new brake carrier bolts -4-.
- Insert the brake hose -16- into the bracket -15-.
 Note
Note
- Make sure that the wires and brake hose are routed correctly.
- Make sure the brake hose is not blocked, bent or rubbing against the vehicle.
- Drive the parking brake motor out using the Vehicle diagnostic tester by following the directions on the display.
- Install the rear wheel, refer to → Suspension, Wheels, Steering; Rep. Gr.44; Wheels and Tires.
- Check brake fluid level.
 WARNING
Risk of accident!
- Before moving vehicle, depress brake pedal several times firmly to properly seat brake pads in their normal operating position.
- Make sure the brakes are working correctly before driving the vehicle.
Brake Caliper, Removing and Installing, 2EA, 2EJ, GP1 Brakes
Special tools and workshop equipment required
- Torque Wrench 1332 40-200Nm -VAG1332-
 Note
Note
In the following description the brake caliper is removed with the brake carrier and pads. The brake hose remains connected.
Removing
- The parking brake is released.
 Note
Note
Do not disconnect the connectors from the parking brake motors.
- Remove the affected rear wheel, refer to → Suspension, Wheels, Steering; Rep. Gr.44; Wheels and Tires.
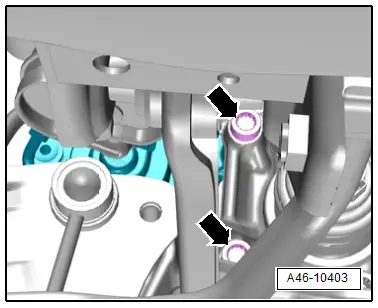
- Remove the bolts -arrows- on the brake carrier.
- Remove the brake caliper with brake carrier and brake pads installed from the brake rotor.
 Note
Note
If the brake rotor is so worn that the brake caliper cannot be removed, then the parking brake must be adjusted back, refer to → Chapter "Brake Pads, Removing and Installing, Brakes 2EA, 2EJ, GP1".
 Caution
- Do not let the brake caliper with the brake carrier hang on the brake hose/wire. Do not support the weight with the brake hose.
- Replace the brake hose if damaged.
- Do not actuate the brakes or the electromechanical parking brake when the brake caliper is removed.
- Hang the brake caliper with the brake carrier on the body with wire.
Installing
Install in reverse order of removal. Note the following:
 Note
Note
- Replace the brake carrier bolts.
- Use only mineral spirits to clean the brake caliper.
 WARNING
Do not blow out the brake caliper with compressed air.
- Carefully slide the brake caliper with the brake carrier and the brake pads installed over the brake rotor.

- Tighten the new bolts -arrows- on the brake carrier.
 Note
Note
- Make sure that the electrical wire and brake hose are routed correctly.
- Make sure the brake hose is not blocked, bent or rubbing against the vehicle.
- Install the rear wheel, refer to → Suspension, Wheels, Steering; Rep. Gr.44; Wheels and Tires.
- Depress brake pedal firmly several times with vehicle stationary so that the brake piston reaches its operating position.
- Drive the parking brake motor out using the Vehicle diagnostic tester by following the directions on the display.
 WARNING
Risk of accident!
- Before moving vehicle, depress brake pedal several times firmly to properly seat brake pads in their normal operating position.
- Make sure the brakes are working correctly before driving the vehicle.
READ NEXT:
 Rear Brake Caliper, Replacing
Brake Caliper, Replacing, Brakes 1KU
Note
In the following description the brake caliper is removed
and replaced without the brake carrier and pads. The brake hose
is removed.
Shou
Rear Brake Rotor, Removing and Installing
Brake Rotor, Removing and Installing, Brake 1KU
Removing
- Remove the brake caliper with brake carrier, refer to
→ Chapter "Brake Caliper, Removing and Installing, Brake 1KU".
-
Parking Brake
Overview - Parking Brake
1 - Bolt
Tightening specification, refer to item-14-.
2 - Parking Brake Motor
Left Parking Brake Motor -V282-, Right Parking Brake Motor -V28
SEE MORE:
Audi connect Infotainment services
Configuration
Applies to: vehicles with Audi connect Infotainment
Some Audi connect Infotainment services must
be configured through your personal myAudi account
at my.audi.com before using them for the first time.
Tips
A myAudi user must be logged in for some
Audi connect Infotainment services.
Upper Transverse Link, Removing and Installing
Upper Transverse Link, Removing and Installing, FWD Vehicles
Special tools and workshop equipment
required
Torque Wrench 1332 40-200Nm -VAG1332-
Removing
- Measure dimension from center of wheel to lower edge of
wheel housing. Refer to
→ Chapter "Wheel Bearing in Curb Weig
