Audi Q3: Speaker Ambient Lighting Bulb 1 and 2 -L211-/-L212-, Removing and Installing
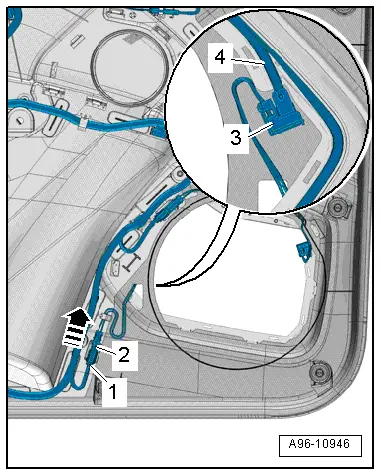
Speaker Ambient Lighting Bulb 1 -L211-, Removing and Installing, Front Door
Removing
- Remove the front door trim panel. Refer to → Body Interior; Rep. Gr.70; Front Door Trim Panels; Front Door Trim Panel, Removing and Installing.
- Disconnect the connector -4-.
- Push the connector -3- to release in the direction of -arrow- and free up the wiring harness.
- Remove the lamp -2- from the lighting strip -1-.
Installing
Install in reverse order of removal. Note the following:
- Install the front door trim panel. Refer to → Body Interior; Rep. Gr.70; Front Door Trim Panels; Front Door Trim Panel, Removing and Installing.

Speaker Ambient Lighting Bulb 2 -L212-, Removing and Installing, Front Door
Removing
- Remove the front door trim panel. Refer to → Body Interior; Rep. Gr.70; Front Door Trim Panels; Front Door Trim Panel, Removing and Installing.
- Disconnect the connector -1-.
- Push the connector -2- to release in the direction of -arrow- and free up the wiring harness.
- Remove the lamp -3- from the lighting strip -4-.
Installing
Install in reverse order of removal. Note the following:
- Install the front door trim panel. Refer to → Body Interior; Rep. Gr.70; Front Door Trim Panels; Front Door Trim Panel, Removing and Installing.
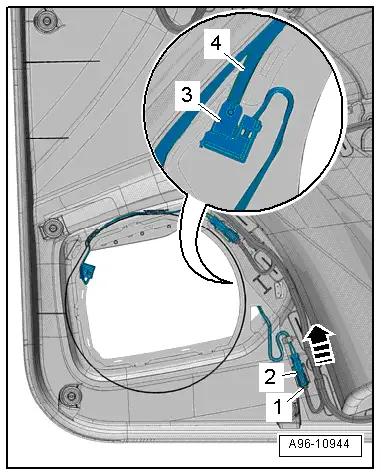
Speaker Ambient Lighting Bulb 1 -L211-, Removing and Installing, Rear Door
Removing
- Remove the rear door trim panel. Refer to → Body Interior; Rep. Gr.70; Rear Door Trim Panels; Rear Door Trim Panel, Removing and Installing.
- Disconnect the connector -3-.
- Push the connector -4- to release in the direction of -arrow- and free up the wiring harness.
- Remove the lamp -2- from the lighting strip -1-.
Installing
Install in reverse order of removal. Note the following:
- Install the rear door trim panel. Refer to → Body Interior; Rep. Gr.70; Rear Door Trim Panels; Rear Door Trim Panel, Removing and Installing.
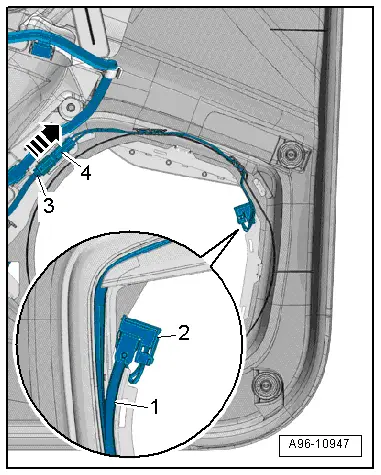
Speaker Ambient Lighting Bulb 2 -L212-, Removing and Installing, Rear Door
Removing
- Remove the rear door trim panel. Refer to → Body Interior; Rep. Gr.70; Rear Door Trim Panels; Rear Door Trim Panel, Removing and Installing.
- Disconnect the connector -1-.
- Push the connector -2- to release in the direction of -arrow- and free up the wiring harness.
- Remove the lamp -3- from the lighting strip -4-.
Installing
Install in reverse order of removal. Note the following:
- Install the rear door trim panel. Refer to → Body Interior; Rep. Gr.70; Rear Door Trim Panels; Rear Door Trim Panel, Removing and Installing.
READ NEXT:
 Left and Right Ambient Lighting Bulb for Rear Doors -L166-/-L167-, Removing
and Installing
Left and Right Ambient Lighting Bulb for Rear Doors -L166-/-L167-, Removing
and Installing
Removing
- Remove the switch mount. Refer to
→ Body Interior; Rep. Gr.70; Rear Door Trim Panels; Rear Pull
Handle Removing and Installing.
Note
The entire lamp mu
Component Location Overview - Instrument Panel Controls
1 - ASR/ESP Button -E256-
Removing and installing. Refer to
→ Chapter "ASR/ESP Button -E256-, Removing and Installing".
2 - Left Lower Button Unit
Equipment l
Component Location Overview - Center Console Controls
1 - Access/Start Authorization Button -E408-
Removing and installing. Refer to
→ Chapter "Access/Start Authorization Button -E408-, Removing and
Installing".
2 -&nbs
SEE MORE:
Overview - Drive Axle
Overview - Drive Axle, Drive Axle with 100 mm Inner CV Joint
Note
Grease joint again when replacing protective joint boot.
1 - Outer CV Joint
Replace only as complete unit.
When installing the joint on the profile shaft, the splines on the
profile shaft must be light
Expansion Valve, Removing and Installing
Special tools and workshop equipment
required
Engine Bung Set -VAS6122-
Removing
- Remove the refrigerant pipes from the expansion valve. Refer
to
→ Chapter "Refrigerant Lines, Disconnecting and Connecting at
Expansion Valve".
- Remove the bolts -A-.
- Remove
