Audi Q3: Expansion Valve, Removing and Installing
Special tools and workshop equipment required
- Engine Bung Set -VAS6122-
Removing
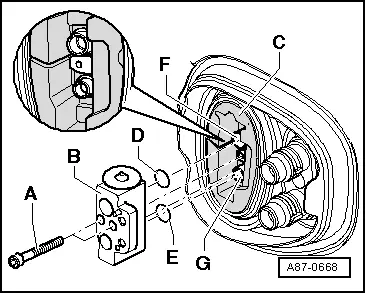
- Remove the refrigerant pipes from the expansion valve. Refer to → Chapter "Refrigerant Lines, Disconnecting and Connecting at Expansion Valve".
- Remove the bolts -A-.
- Remove the expansion valve -B- from the heat shield insulation -C-.
- Seal the open lines and connections with clean plugs from the Engine Bung Set -VAS6122-.
Installing
Installation is done is reverse order, observe the following:
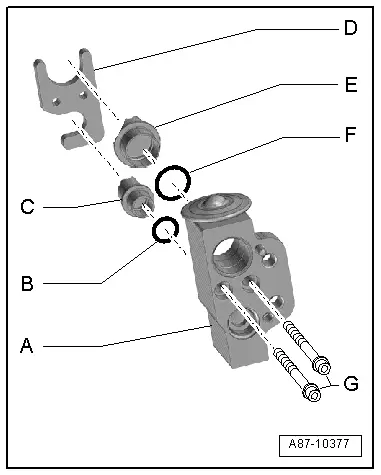
- Replace the O-ring seals. For the correct version, refer to the Parts Catalog.
- Install the O-ring seals -A and E- on the connection pipes -C and E- to the evaporator.
 Note
Note
- The expansion valve is available in different versions (same housing but a different control characteristic). Therefore, to ensure the exact allocation, refer to the Parts Catalog.
- Coat the O-ring seals lightly with refrigerant oil prior to installation. Refer to → Chapter "Refrigerant Circuit Seals".
- Inspect the refrigerant pipes leading to the evaporator for debris and damage.
- Check O-ring seals for proper seating on evaporator connecting pipes.
- If heat protection insulation C is missing or not installed correctly, it can cause reduced performance of the A/C system (change of adjusted control characteristic of expansion valve due to radiant heat).
- Insert the expansion valve -A- on the evaporator.
- Tighten the bolts -G-.
- Connect the refrigerant lines to the expansion valve. Refer to → Chapter "Refrigerant Lines, Disconnecting and Connecting at Expansion Valve".
- Evacuate the refrigerant circuit and fill it. Refer to → Refrigerant R134a, Servicing; Rep. Gr.87; Refrigerant Circuit (Refrigerant R134a, Servicing; Refrigerant Circuit, Using Service Station).
Refrigerant Lines, Disconnecting and Connector at Condenser
 WARNING
Danger due to refrigerant coming out under pressure.
Danger of frost bite to skin and other parts of the body.
- Extract the refrigerant and immediately open the refrigerant circuit after that.
- If the refrigerant was extracted more than 10 minutes in the past and the refrigerant circuit was not opened, extract the refrigerant again. Pressure in the refrigerant circuit is caused by evaporation.
Special tools and workshop equipment required
- Engine Bung Set -VAS6122-
Removing
- Discharge the refrigerant circuit. Refer to → Refrigerant R134a, Servicing; Rep. Gr.87; Refrigerant Circuit (Refrigerant R134a, Servicing; Refrigerant Circuit, Using Service Station).
- Remove the lock carrier cover. Refer to → Body Exterior; Rep. Gr.63; Front Bumper; Attachments, Removing and Installing.
- Remove the bolts -1 and 4- and the refrigerant lines -2 and 3-.
- Seal the open lines and connections with clean plugs from the Engine Bung Set -VAS6122-.

Installing
Installation is done is reverse order, observe the following:
- Replace the O-ring seals. For the correct version, refer to the Parts Catalog.
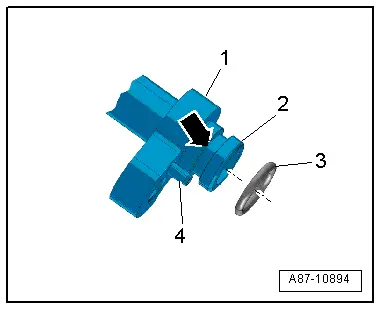
- If applicable, inspect the alignment pin -4- for damage and check that it is seated correctly.
- Inspect the guide ring -2- on the refrigerant line connection for damage.
- Insert the O-ring seal -3- into the groove -arrow- on the refrigerant line connection -1-.
 Note
Note
- Coat the O-ring seals lightly with refrigerant oil prior to installation. Refer to → Chapter "Refrigerant Circuit Seals".
- Check O-ring seals for proper seating in groove -arrow- of the respective refrigerant line.
- For the routing and securing the refrigerant lines, refer to → Chapter "Routing and Securing Lines".
- Insert the refrigerant lines -2 and 3- into the respective connection on the condenser.
- Tighten the bolts -1 and 4-.
- Evacuate the refrigerant circuit and fill it. Refer to → Refrigerant R134a, Servicing; Rep. Gr.87; Refrigerant Circuit (Refrigerant R134a, Servicing; Refrigerant Circuit, Using Service Station).
- Operate the A/C system after filling the refrigerant circuit. Refer to → Chapter "A/C System, Starting Operation after Filling Refrigerant Circuit".
- Install the lock carrier cover. Refer to → Body Exterior; Rep. Gr.63; Front Bumper; Attachments, Removing and Installing.
- Check the DTC memory and erase any displayed entries using the Vehicle Diagnostic Tester in the "Guided Fault Finding" function.

Condenser, Removing and Installing
 Note
Note
- The radiator and condenser may have small indentations on the fins even when installed correctly. It is not damage. Do not replace the radiator or condenser because of those small indentations.
- Slight deformations on the side securing straps on the condenser (for example, due to an accident), can result in an unparallel flow from the condenser and radiator; this can be resolved by pulling the straps back as long as the function/condenser sealing is not impaired. The straps on the condenser do not need to be replaced if there are small deformations.
- A slight bending of the condenser (up to 4 mm) is permissible as long as there is sufficient distance (minimum 4 mm) between the condenser and the radiator and the function/sealing of the condenser is not impaired. The condenser does not have to be replaced if there are slight deformations.
- There are different versions of the condenser, radiator and auxiliary radiator. Observe the correct allocation of these components. Refer to the Parts Catalog.
Removing
- Remove the front bumper cover. Refer to → Body Exterior; Rep. Gr.63; Front Bumper; Bumper Cover, Removing and Installing.
On vehicles with Coolant Auxiliary Cooler (for Example on Audi RS Q3 with 5-Cylinder Engine)
- Remove the impact member. Refer to → Body Exterior; Rep. Gr.63; Front Bumper; Impact Member, Removing and Installing.
- Loosen the auxiliary cooler and tip forward. Refer to → Engine Mechanical; Rep. Gr.19; Overview - Radiator/Coolant Fan.
All Vehicles
- Remove the refrigerant lines from the condenser. Refer to → Chapter "Refrigerant Lines, Disconnecting and Connector at Condenser".
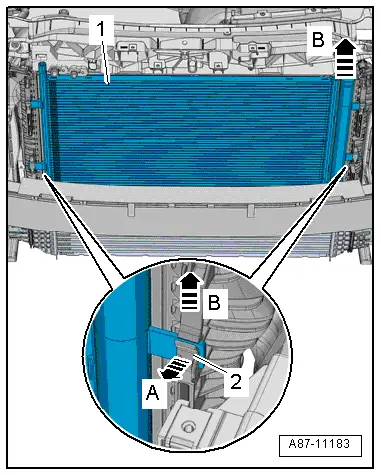
- Release the tabs -A arrows- and remove the left and right air guide -1--arrow B-.
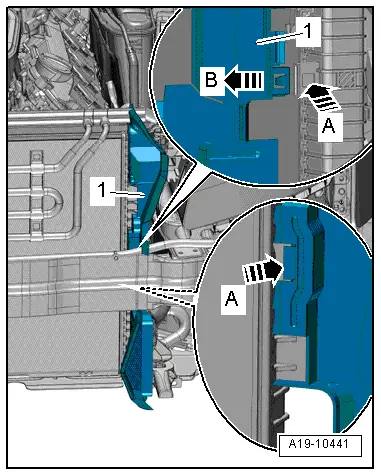
- Release the left and right retaining pins for the radiator and remove it upward -arrows-.
- Move the radiator at the upper edge slightly forward.
- Have a second technician release the tabs -2- in the direction of -arrow A- and pull the condenser -1- upward out of the mounts on the radiator -arrows B-.
Installing
Install in reverse order of removal. Note the following:
 Note
Note
The removed condenser contains refrigerant oil that must be returned to the refrigerant circuit (with the new condenser). Refer to → Refrigerant R134a Servicing; Rep. Gr.87; Refrigerant Circuit Components, Replacing (Refrigerant R134a, Servicing; Refrigerant Circuit Components, Replacing).
- Install the radiator. Refer to → Rep. Gr.19; Radiator/Coolant Fan; Radiator, Removing and Installing.
- Attach the refrigerant lines to the condenser. Refer to → Chapter "Refrigerant Lines, Disconnecting and Connector at Condenser".
- Evacuate the refrigerant circuit and fill it. Refer to → Refrigerant R134a, Servicing; Rep. Gr.87; Refrigerant Circuit (Refrigerant R134a, Servicing; Refrigerant Circuit, Using Service Station).
- Operate the A/C system after filling the refrigerant circuit. Refer to → Chapter "A/C System, Starting Operation after Filling Refrigerant Circuit".
- Check the DTC memory and erase any displayed entries using the Vehicle Diagnostic Tester in the "Guided Fault Finding" function.
Refrigerant Line Grommet, Removing and Installing
Removing
- Remove the A/C unit (heater). Refer to → Chapter "Heater and A/C Unit, Removing and Installing".
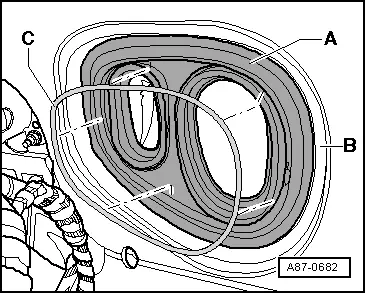
- Coat the support ring -C- with lubricant and pry it out of the mount toward the front.
- Loosen the grommet -A- out of the bulkhead partition mount -B-.
Installing
Installation is done is reverse order, observe the following:
 Note
Note
Before installing, check all seals on A/C unit (heater) for damage and replace if necessary.
- Coat the grommet with lubricant and insert into the bulkhead partition.
- Insert the support ring into the grommet.
- The brace on the support ring must face outward.
- Install the A/C unit (heater). Refer to → Chapter "Heater and A/C Unit, Removing and Installing".
READ NEXT:
 Receiver/Dryer, Removing and Installing
WARNING
Danger due to refrigerant coming out under pressure.
Danger of frost bite to skin and other parts of the
body.
Extract the refrigerant and immediately open the
refrigerant
Dryer Bag/Dryer Cartridge, Removing and Installing
Dryer Bag/Dryer Cartridge, Removing and Installing
WARNING
Danger due to refrigerant coming out under pressure.
Danger of frost bite to skin and other parts of the
body.
Extract the
Service Connection on Low and High Pressure Side, Removing and Installing
WARNING
Danger due to refrigerant coming out under pressure.
Danger of frost bite to skin and other parts of the
body.
Extract the refrigerant and immediately open the
refrigerant
SEE MORE:
Subframe, Securing
Special tools and workshop equipment
required
Locating Pins -T10096-
Torque Wrench 1332 40-200Nm -VAG1332-
Engine and Gearbox Jack -VAS6931-
Procedure
- Remove the noise insulation -1-.
Refer to
→ Body Exterior; Rep. Gr.66; Noise Insulation; Noise Insulation,
Overview - Front Seat
Overview - Front Seat, Manual Standard Seat/Sport Seat
1 - Seat Angle Adjuster
Only for Sport seats
Overview. Refer to
→ Chapter "Overview - Seat Pan, Seat Angle Adjuster".
Removing and installing. Refer to
→ Chapter "Seat Angle Adjuster, Removing and Installin
