Audi Q3: Overview - Front Seat
Overview - Front Seat, Manual Standard Seat/Sport Seat
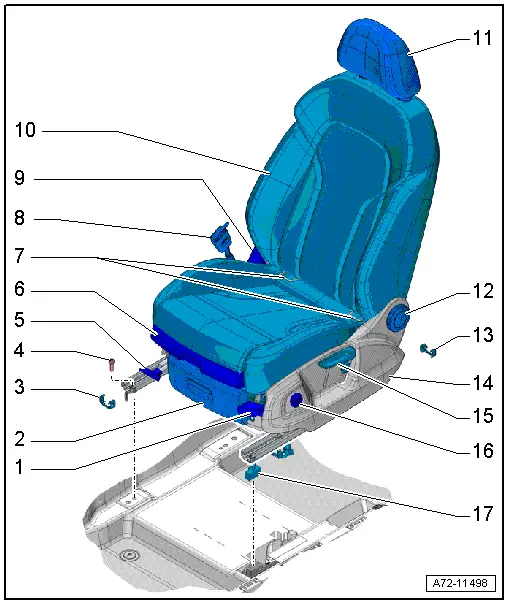
1 - Seat Angle Adjuster
- Only for Sport seats
- Overview. Refer to → Chapter "Overview - Seat Pan, Seat Angle Adjuster".
- Removing and installing. Refer to → Chapter "Seat Angle Adjuster, Removing and Installing".
2 - Drawer/Storage Compartment
- Overview - drawer. Refer to → Chapter "Overview - Seat Pan, Drawer".
- Drawer, removing and installing. Refer to → Chapter "Drawer Mount, Removing and Installing".
- Overview - storage compartment. Refer to → Chapter "Overview - Seat Pan, Storage Compartment".
- Storage compartment, removing and installing. Refer to → Chapter "Storage Compartment, Removing and Installing".
3 - Front Cover
- For the seat rail
- Quantity: 2
- Removing and installing. Refer to → Chapter "Seat Rail Cover, Removing and Installing".
- Push onto the seat rail until it audibly latches
4 - Bolt
- 50 Nm
- Quantity: 4
5 - Seat Forward/Back Adjuster
- Handle, Removing and Installing. Refer to → Chapter "Seat Forward/Back Adjustment Handle, Removing and Installing".
6 - Seat Depth Adjuster
- Only for Sport seats
- Overview. Refer to → Chapter "Overview - Seat Pan, Seat Depth Adjuster".
- Removing and installing. Refer to → Chapter "Seat Depth Adjuster, Removing and Installing".
7 - Child Seat Anchor
- Equipment levels
- For the front passenger seat only
- Overview. Refer to → Chapter "Overview - Front Child Seat Anchors".
- Removing and installing. Refer to → Chapter "Front Child Seat Anchor, Removing and Installing".
- Checking after an accident. Refer to → Chapter "Child Seat Anchors, Checking After a Collision".
8 - Seat Belt Latch
- Removing and installing. Refer to → Chapter "Front Seat Belt Latch, Removing and Installing".
9 - Seat Side Trim on the Tunnel Side
- Removing and installing. Refer to → Chapter "Seat Side Trim on the Tunnel Side, Removing and Installing".
10 - Standard Seat/Sport Seat
Vehicles with:
- Seat/backrest heating
- Lumbar Support
- Footwell lamp
- Removing and installing. Refer to → Chapter "Front Seat, Removing and Installing".
11 - Headrest
- Removing and installing. Refer to → Chapter "Headrest, Removing and Installing".
12 - Hand Wheel
- For backrest adjustment
- Removing and installing. Refer to → Chapter "Backrest Adjustment Hand Wheel, Removing and Installing".
13 - Rear Cover
- For the seat rail
- Quantity: 2
- Removing and installing. Refer to → Chapter "Seat Rail Cover, Removing and Installing".
- Push onto the seat rail until it audibly latches
14 - Seat Side Sill Panel Trim
- Removing and installing. Refer to → Chapter "Seat Side Trim on Sill Panel Side, Removing and Installing, Manual Front Seat".
15 - Seat Height Adjuster
- Overview. Refer to → Chapter "Overview - Seat Pan, Seat Height Adjustment".
- Removing and installing. Refer to → Chapter "Seat Height Adjuster, Removing and Installing".
16 - Driver Seat Lumbar Support Adjustment Switch -E176-
- Front passenger side Front Passenger Seat Lumbar Support Adjustment Switch -E177-
- Equipment levels
- Removing and installing. Refer to → Chapter "Driver/Front Passenger Seat Lumbar Support Adjustment Switch -E176-/-E177-, Removing and Installing".
- Lumbar Support, removing and installing. Refer to → Chapter "Lumbar Support Adjustment Motors -V125-/-V126-/-V129-/-V130-, Removing and Installing".
17 - Connector
- With a corrugated tube for the modular wiring routing
- Modular wiring with corrugated tube on front seat. Refer to → Chapter "Modular Wiring Routing with Corrugated Tube".
- Connector station and connector assignment. Refer to → Chapter "Connectors, Disconnecting and Connecting at Connector Station".
Overview - Front Seat, Front Passenger Folding Seat
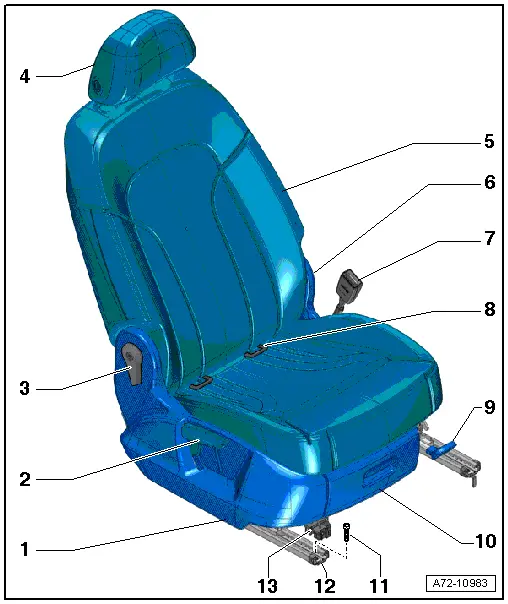
1 - Seat Side Sill Panel Trim
- Overview. Refer to → Chapter "Overview - Seat Pan, Sill Panel/Tunnel Side Seat Side Trim on Folding Passenger Seat".
- Removing and installing. Refer to → Chapter "Seat Side Trim on Sill Panel Side, Removing and Installing, Passenger Folding Seat".
2 - Seat Height Adjuster
- Overview. Refer to → Chapter "Overview - Seat Pan, Seat Height Adjustment".
- Removing and installing. Refer to → Chapter "Seat Height Adjuster, Removing and Installing".
- Push the handle all the way on
3 - Release Lever
- For the backrest
- Overview. Refer to → Chapter "Overview - Seat Pan, Sill Panel/Tunnel Side Seat Side Trim on Folding Passenger Seat".
- Removing and installing. Refer to → Chapter "Backrest Release, Removing and Installing".
- Press until it engages completely
4 - Headrest
- Overview. Refer to → Chapter "Overview - Headrest".
- Removing and installing. Refer to → Chapter "Headrest, Removing and Installing".
5 - Front Folding Seat
- Only front passenger side
- The seat pan upper frame is not designed to be separated from the lower frame on the folding front passenger seat.
- Removing and installing. Refer to → Chapter "Front Seat, Removing and Installing".
6 - Seat Side Trim on the Tunnel Side
- Overview. Refer to → Chapter "Overview - Seat Pan, Sill Panel/Tunnel Side Seat Side Trim on Folding Passenger Seat".
- Removing and installing. Refer to → Chapter "Seat Side Trim on the Tunnel Side, Removing and Installing".
7 - Seat Belt Latch
- Overview. Refer to → Chapter "Overview - Front Seat Belt Latch".
- Removing and installing. Refer to → Chapter "Front Seat Belt Latch, Removing and Installing".
8 - Child Seat Anchor
- Equipment levels
- Overview. Refer to → Chapter "Overview - Front Child Seat Anchors".
- Removing and installing. Refer to → Chapter "Front Child Seat Anchor, Removing and Installing".
- Checking after an accident. Refer to → Chapter "Child Seat Anchors, Checking After a Collision".
9 - Seat Forward/Back Adjuster
- Handle, Removing and Installing. Refer to → Chapter "Seat Forward/Back Adjustment Handle, Removing and Installing".
- Push the handle all the way on
10 - Drawer
- Equipment levels
- Overview. Refer to → Chapter "Overview - Seat Pan, Drawer".
- Removing and installing. Refer to → Chapter "Drawer Mount, Removing and Installing".
11 - Bolt
- 50 Nm
- Quantity: 4
12 - Cover
- For the seat rail
- Quantity: 4
- Removing and installing. Refer to → Chapter "Seat Rail Cover, Removing and Installing".
- Push onto the seat rail until it audibly latches
13 - Connector
- With a corrugated tube for the modular wiring routing
- Modular wiring with corrugated tube on front seat. Refer to → Chapter "Modular Wiring Routing with Corrugated Tube".
- Connector station and connector assignment. Refer to → Chapter "Connectors, Disconnecting and Connecting at Connector Station".
Overview - Front Seat, Power Standard Seat/Sport Seat
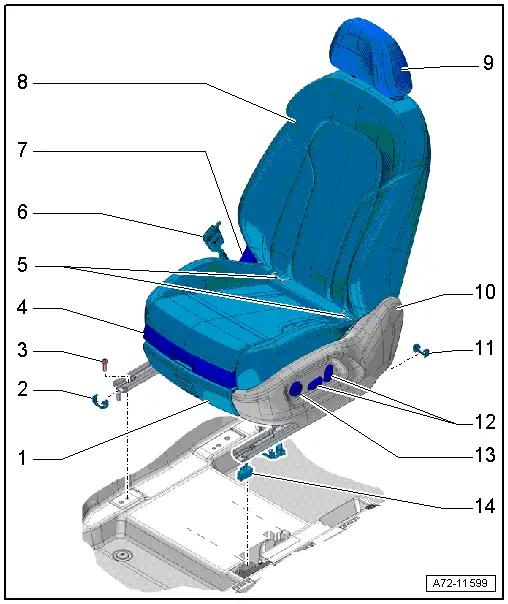
1 - Storage Compartment
- Equipment levels
- Overview. Refer to → Chapter "Overview - Seat Pan, Storage Compartment".
- Removing and installing. Refer to → Chapter "Storage Compartment, Removing and Installing".
2 - Front Cover
- For the seat rail
- Quantity: 2
- Removing and installing. Refer to → Chapter "Seat Rail Cover, Removing and Installing".
- Push onto the seat rail until it audibly latches
3 - Bolt
- 50 Nm
- Quantity: 4
4 - Seat Depth Adjuster
- Equipment levels
- Only for Sport seats
- Overview. Refer to → Chapter "Overview - Seat Pan, Seat Depth Adjuster".
- Removing and installing. Refer to → Chapter "Seat Depth Adjuster, Removing and Installing".
5 - Child Seat Anchor
- Equipment levels
- for the front passenger seat only
- Overview. Refer to → Chapter "Overview - Front Child Seat Anchors".
- Removing and installing. Refer to → Chapter "Front Child Seat Anchor, Removing and Installing".
- Checking after an accident. Refer to → Chapter "Child Seat Anchors, Checking After a Collision".
6 - Seat Belt Latch
- Removing and installing. Refer to → Chapter "Front Seat Belt Latch, Removing and Installing".
7 - Seat Side Trim on the Tunnel Side
- Removing and installing. Refer to → Chapter "Seat Side Trim on the Tunnel Side, Removing and Installing".
8 - Standard Seat/Sport Seat
Vehicles with:
- Seat and backrest heating
- Footwell lamp
- Removing and installing. Refer to → Chapter "Front Seat, Removing and Installing".
9 - Headrest
- Removing and installing. Refer to → Chapter "Headrest, Removing and Installing".
10 - Seat Side Sill Panel Trim
- Removing and installing. Refer to → Chapter "Seat Side Trim on Sill Panel Side, Removing and Installing, Power Front Seat".
11 - Rear Cover
- For the seat rail
- Quantity: 2
- Removing and installing. Refer to → Chapter "Seat Rail Cover, Removing and Installing".
- Push onto the seat rail until it audibly latches
12 - Driver Seat Adjustment Control Head -E470-
- Front passenger side: Front Passenger Seat Adjustment Control Head -E471-
- Overview. Refer to → Chapter "Overview - Seat Pan, Power Seat Adjustment Control Head".
- Removing and installing. Refer to → Chapter "Driver/Front Passenger Seat Adjustment Control Head -E470-/-E471-, Removing and Installing".
13 - Driver Seat Lumbar Support Adjustment Switch -E176-
- Front passenger side Front Passenger Seat Lumbar Support Adjustment Switch -E177-
- Removing and installing. Refer to → Chapter "Driver/Front Passenger Seat Lumbar Support Adjustment Switch -E176-/-E177-, Removing and Installing".
- Lumbar Support, removing and installing. Refer to → Chapter "Lumbar Support Adjustment Motors -V125-/-V126-/-V129-/-V130-, Removing and Installing".
14 - Connector
- With a corrugated tube for the modular wiring routing
- Modular wiring with corrugated tube on front seat. Refer to → Chapter "Modular Wiring Routing with Corrugated Tube".
READ NEXT:
 Overview - Front Backrest
Overview - Front Backrest, Standard Seat/Sport Seat
1 - Seat Pan
2 - Bolt
33 Nm
Quantity: 2
Self-locking
Replace
Threaded holes for bolts must be cleaned, for examp
Overview - Seat Pan
Overview - Seat Pan, Modular Wiring Routing
1 - Corrugated Tube Upper Section
Must terminate flush with the wiring bracket
Must terminate flush with the corrugated tube lower sectio
Overview - Seat Pan, Sill Panel/Tunnel Side Seat Side Trim on Power Front
Seat
1 - Bolt
Quantity: 3
8 Nm
2 - Front Seat
3 - Seat Side Trim on the Tunnel Side
Removing and installing. Refer to
→ Chapter "Seat Side Trim o
SEE MORE:
Component Location Overview - Electric and Electronic Components
Component Location Overview - Electric and Electronic Components, Manual
Front Seat
1 - Left Front Seat Heating Element -Z45-/Driver Backrest Heating
Element -Z7-
Front passenger side: Right Front Seat Heating Element -Z46-/Front
Passenger Backrest Heating Element -Z9-
Equip
Wheel and Tire Guide
Audi Q3, Type 8U
This is the Wheel and Tire Guide for the Following Model:
"Audi Q3 / RS Q3".
Play Close Attention to the corresponding Notes and Cautions As Well As the
Comments in the Document.
Note
Inner diameter 57 mm, hole circle 112 mm, 5 wheel bolts,
tightening specification
