Audi Q3: Overview - Seat Pan
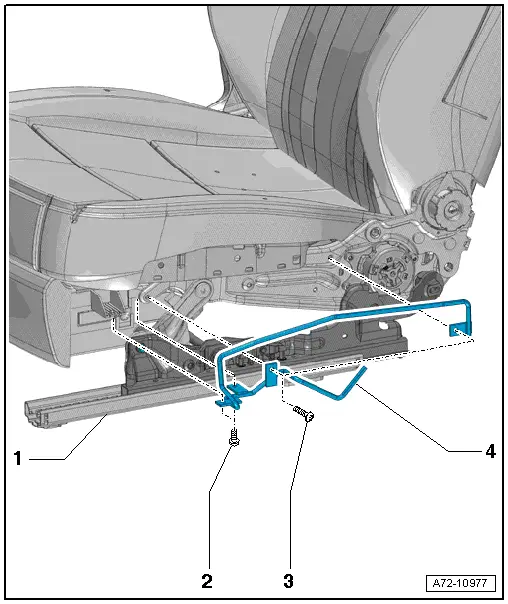
Overview - Seat Pan, Modular Wiring Routing
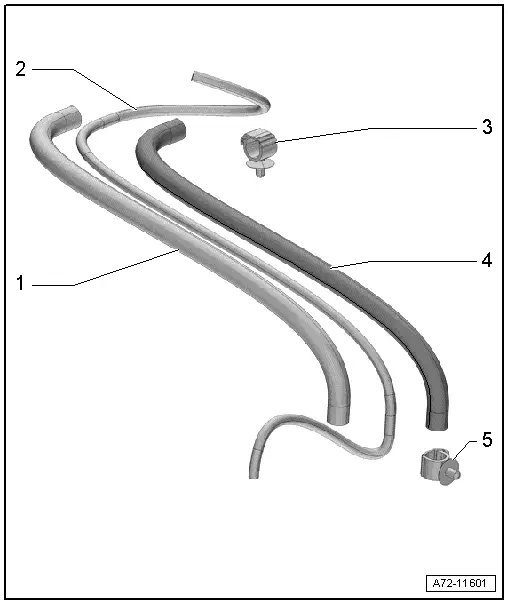
1 - Corrugated Tube Upper Section
- Must terminate flush with the wiring bracket
- Must terminate flush with the corrugated tube lower section
2 - Wiring Harness
- Do not twist installed wires
3 - Rear Wiring Bracket
- Attach back at the same location when installing
- Clipped into the seat pan.
4 - Corrugated Tube Lower Section
- Must terminate flush with the wiring bracket
- Must terminate flush with the corrugated tube upper section
5 - Front Wiring Bracket
- Attach back at the same location when installing
- Clip in on the sill panel
Overview - Seat Pan, Sill Panel/Tunnel Side Seat Side Trim on Manual Front Seat
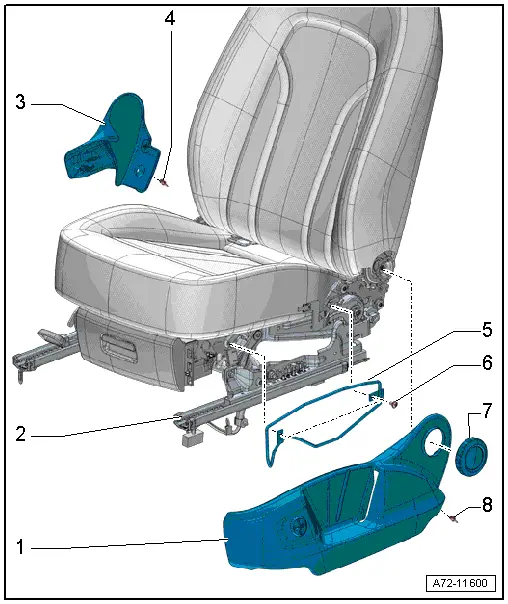
1 - Seat Side Sill Panel Trim
- Removing and installing. Refer to → Chapter "Seat Side Trim on Sill Panel Side, Removing and Installing, Manual Front Seat".
2 - Front Seat
3 - Seat Side Trim on the Tunnel Side
- Removing and installing. Refer to → Chapter "Seat Side Trim on the Tunnel Side, Removing and Installing".
4 - Expanding Rivet
5 - Bracket
- For seat side sill panel trim
- Removing and installing. Refer to → Chapter "Seat Side Trim on Sill Panel Side, Removing and Installing, Manual Front Seat".
6 - Bolt
- 8 Nm
- Quantity: 2
7 - Hand Wheel
- For backrest adjustment
- Removing and installing. Refer to → Chapter "Backrest Adjustment Hand Wheel, Removing and Installing".
- Press on until it engages audibly
8 - Expanding Rivet
Overview - Seat Pan, Sill Panel/Tunnel Side Seat Side Trim on Folding Passenger Seat
Sill Panel/Tunnel Side Seat Side Trim
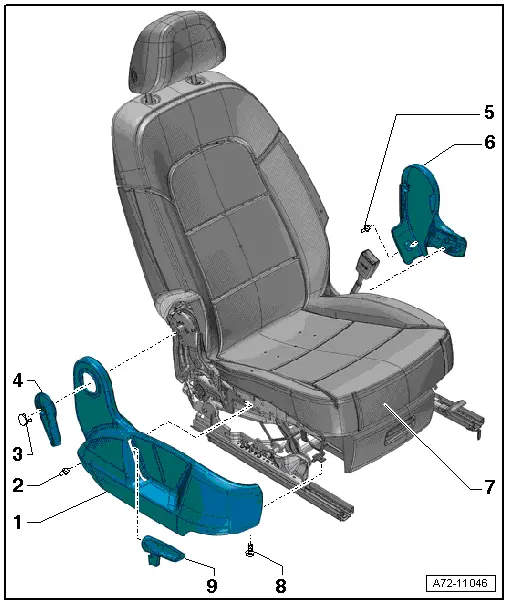
1 - Seat Side Sill Panel Trim
- can be replaced with seat installed
- Removing and installing. Refer to → Chapter "Seat Side Trim on Sill Panel Side, Removing and Installing, Passenger Folding Seat".
- Push in until fully engaged in the bracket.
2 - Expanding Clip
3 - Cap
- Press until it engages completely
4 - Release Lever
- For the backrest
- Removing and installing. Refer to → Chapter "Backrest Release, Removing and Installing".
- Press until it engages completely
5 - Expanding Clip
6 - Seat Side Trim on the Tunnel Side
- Can be replaced only with the seat removed
- Removing and installing. Refer to → Chapter "Seat Side Trim on the Tunnel Side, Removing and Installing".
7 - Front Folding Seat
- Passenger seat only
8 - Bolt
- 8 Nm
9 - Seat Height Adjustment Handle
- Removing and installing. Refer to → Chapter "Seat Height Adjuster, Removing and Installing".
- Push the handle all the way on
Sill Panel Seat Side Trim Bracket
1 - Front Seat
2 - Bolt
- 8 Nm
- Quantity: 2
3 - Bolt
- 8 Nm
- Quantity: 2
4 - Bracket
- For seat side sill panel trim
- Removing and installing. Refer to → Chapter "Seat Side Trim on Sill Panel Side, Removing and Installing, Passenger Folding Seat".
READ NEXT:
 Overview - Seat Pan, Sill Panel/Tunnel Side Seat Side Trim on Power Front
Seat
Overview - Seat Pan, Sill Panel/Tunnel Side Seat Side Trim on Power Front
Seat
1 - Bolt
Quantity: 3
8 Nm
2 - Front Seat
3 - Seat Side Trim on the Tunnel Side
Removing and installing. Refer to
→ Chapter "Seat Side Trim o
Overview - Seat Pan, Drawer
1 - Retaining Tab
2 - Drawer
3 - Bolt
1.5 Nm
4 - Bolt
1.5 Nm
5 - Mount
For the drawer
Removing and installing. Refer to
→&
Front Seat, Removing and Installing
Front Seat, Removing and Installing, Manual/Power
Special tools and workshop equipment
required
Universal Vehicle Protector -VAS871 001-
Airbag Lockout Adapter -VAS6282-
Removing
SEE MORE:
Refrigerant Circuit, Tracing Leaks Using Electronic Leak Detector
Vehicles with a High Voltage System (Hybrid Vehicles)
Read and follow all of the supplemental warnings for all
work performed on vehicles with the high voltage system. Refer
to
→ Chapter "Warnings when Working on Vehicles with High Voltage
System" and
→ Electrical Equipment;
Service Station, Connecting with No Connection on Low- and High Pressure
Side of Refrigerant Circuit
General Information
On the following vehicles, no service connection is provided
for the service station on the low-pressure side of the
refrigerant circuit; adapters must be used to connect the
service station to the refrigerant circuit on these vehicles:
Audi 80, Audi Cabrio, Audi Coupe
