Audi Q3: Front Seat, Removing and Installing
Front Seat, Removing and Installing, Manual/Power
Special tools and workshop equipment required
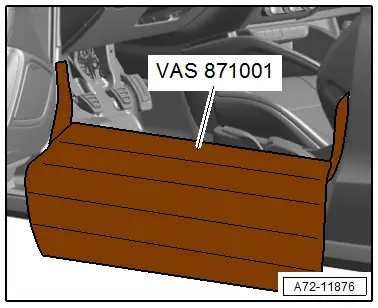
- Universal Vehicle Protector -VAS871 001-
- Airbag Lockout Adapter -VAS6282-
Removing
 WARNING
- Follow all safety precautions when working with pyrotechnic components. Refer to → Chapter "Pyrotechnic Components Safety Precautions".
- Before handling pyrotechnic components (for example, disconnecting the connector), the person handling it must "discharge static electricity". This can be done by touching the door striker, for example.
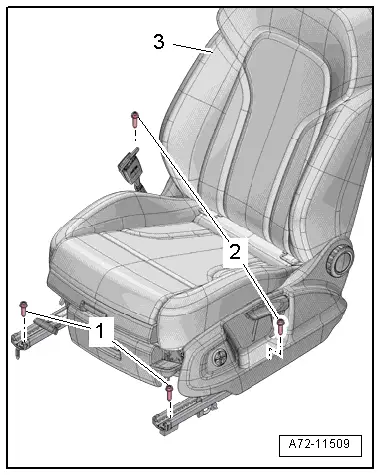
- Push the headrest into the lowest position.
- Move front seat -3- into the front, highest position.
- Remove rear bolts -2- from the seat rail.
- Move the front seat all the way to the rear and then into its highest position.
- Remove front bolts -1- from the seat rail.
- Disconnect the battery ground cable with the ignition turned on. Refer to → Electrical Equipment; Rep. Gr.27; Battery; Battery, Disconnecting and Connecting.
 WARNING
Before handling pyrotechnic components (for example, disconnecting the connector), the person handling it must "discharge static electricity". This can be done by touching the door striker, for example.
- Disconnect the connectors on the connector station in the floor. Refer to → Chapter "Connectors, Disconnecting and Connecting at Connector Station".
- Connect Airbag Lockout Adapter -VAS6282- to the side airbag harness connector. Refer to → Chapter "Airbag Adapter, Connecting and Disconnecting".
- To protect the sill panel before prying out the front seat install the Universal Vehicle Protector -VAS871 001- as shown in the illustration.
- Remove the front seat from the vehicle with a second technician.
Installing
 WARNING
- Follow all safety precautions when working with pyrotechnic components. Refer to → Chapter "Pyrotechnic Components Safety Precautions".
- Before handling pyrotechnic components (for example, connecting the connector), the person handling it must "discharge static electricity". This can be done by touching the door striker, for example.
Install in reverse order of removal. Note the following:
- Remove the Airbag Lockout Adapter -VAS6282- only after installing the front seat. Refer to → Chapter "Airbag Adapter, Connecting and Disconnecting".
 Note
Note
Make sure the connectors are installed correctly and are secure.
- Connect electrical harness connectors to the connectors of the connector station in the floor. Refer to → Chapter "Connectors, Disconnecting and Connecting at Connector Station".

- Align the front seat -3- inside the vehicle and tighten the front bolts -1- on the seat rail.
 WARNING
Ignition must be on when connecting battery. If pyrotechnic components (for example, airbag, belt tensioner) are not repaired correctly, they may deploy unintentionally after connecting battery. There must not be anyone inside the vehicle when connecting the battery.
- Connect the battery ground cable with the ignition turned on. Refer to → Electrical Equipment; Rep. Gr.27; Battery; Battery, Disconnecting and Connecting.
- Move the front seat all the way forward/up.
- Install the rear bolts -2- on the seat rail and tighten them.
 Note
Note
If the Airbag Indicator Lamp -K75- indicates a fault, check the DTC memory, erase it and check it again using the Vehicle Diagnostic Tester → Vehicle diagnostic tester.
Installation notes, for example tightening specifications, replacing components. Refer to → Chapter "Overview - Front Seat, Power Standard Seat/Sport Seat".

Power Front Seat, Removing with a Defective Seat Forward/Back Adjustment Motor
Special tools and workshop equipment required
- Universal Vehicle Protector -VAS871 001-
- Airbag Lockout Adapter -VAS6282-
Driver/Front Passenger Seat Forward/Back Adjustment Motor -V28-/-V31-, Checking
 WARNING
- Follow all safety precautions when working with pyrotechnic components. Refer to → Chapter "Pyrotechnic Components Safety Precautions".
- Before handling pyrotechnic components (for example, disconnecting the connector), the person handling it must "discharge static electricity". This can be done by touching the door striker, for example.
- Move the front seat all the way up.
 Note
Note
Check electrical and electronic components and wires before removing the front seat further to avoid unnecessary repair costs.
- Perform the following tests:
- Check the fuse. Refer to → Wiring diagrams, Troubleshooting & Component locations.
- Check the voltage at the connector station and perform fault finding if necessary. Refer to → Wiring diagrams, Troubleshooting & Component locations.
- Check the voltage to the seat forward/back adjustment motor. Refer to → Wiring diagrams, Troubleshooting & Component locations.
- Replace the fuse if faulty. Refer to → Wiring diagrams, Troubleshooting & Component locations.
- If there is no voltage at the connector station, repair or replace the wire. Refer to → Wiring diagrams, Troubleshooting & Component locations.
- Replace the seat pan together with seat forward/back adjustment motor if the motor is faulty. Refer to → Chapter "Seat Pan, Removing and Installing, Power Front Seat".
Removing with faulty Driver/Front Passenger Seat Forward/Back Adjustment Motor -V28-/-V31-
 WARNING
Before handling pyrotechnic components (for example, disconnecting the connector), the person handling it must "discharge static electricity". This can be done by touching the door striker, for example.
- Disconnect the battery ground cable with the ignition turned on. Refer to → Electrical Equipment; Rep. Gr.27; Battery; Battery, Disconnecting and Connecting.
- Disconnect the connectors on the connector station in the floor. Refer to → Chapter "Connectors, Disconnecting and Connecting at Connector Station".
- Connect Airbag Lockout Adapter -VAS6282- to the side airbag harness connector. Refer to → Chapter "Airbag Adapter, Connecting and Disconnecting".
- Disconnect the connector on the seat forward/back adjustment motor.
- Remove modular wire routing bracket on the seat pan lower frame.
- Disconnect the connector from the front seat belt latch.
- Unclip the wire from the seat pan and set aside.
 Caution
Danger of damaging the threaded holes or the bushing in the bearing points (connecting upper/ lower frame).
A second technician is needed to be pushing on the seat via the backrest while removing the following screws.
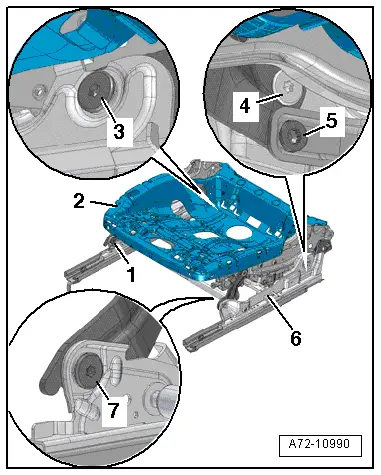
- Remove the bolt -5-.
- Remove the bolts -1, 3, 4 and 7-.
- To protect the sill panel before prying out the front seat install the Universal Vehicle Protector -VAS871 001- as shown in the illustration.
- With a second technician, separate the upper seat frame -2- from the lower frame -6- and remove from the vehicle.
 Note
Note
The seat pan is shown without the cushion, cover and seat backrest.

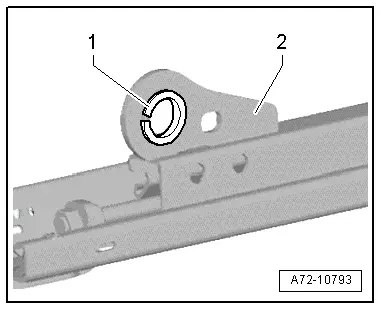
 Caution
Risk of damaging the bushings -1- in the bearing points -2- (upper/lower frame bolted connection).
- The bushings cannot be replaced with workshop materials.
- If the bushings are damaged, the corresponding assembly parts must be replaced.
- Remove accessible bolts for the seat rails on the console.
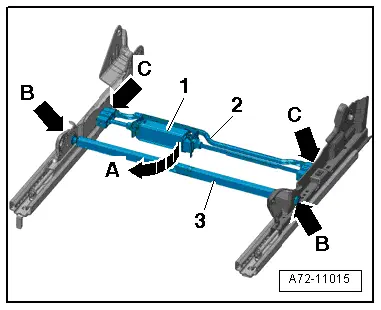
- Remove the faulty seat forward/back adjustment motor -1- on the bracket -arrow A-.
- Remove the screws -arrows B- and remove the seat rail cross brace -3-.
- Remove the screws -arrows C- and seat forward/back adjustment motor bracket -2-.
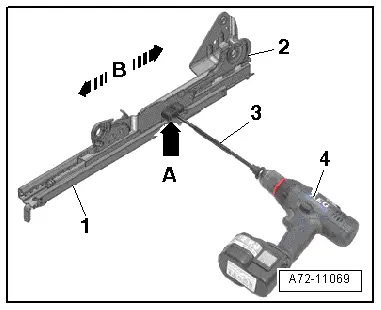
- Install the seat forward/back adjustment motor driveshaft -3- with a cordless screwdriver -4- or drill.
- Insert the input shaft into the drive spindle -arrow A- and push the upper seat rails -2- forward and/or backward -arrows B-, until the bolts for the lower seat rails -1- are accessible.
- Remove the screws and the seat rail.
- Repeat procedure on opposite side of the seat rail.
- Replace the seat pan lower frame together with seat forward/back adjustment motor. Refer to → Chapter "Seat Pan, Removing and Installing, Power Front Seat".
READ NEXT:
 Airbag Adapter, Connecting and Disconnecting
Connectors, Disconnecting and Connecting at Connector Station
Connector assignment. Refer to
→ Wiring diagrams, Troubleshooting & Component locations.
Note
The connector stati
Seat Height Adjuster, Removing and Installing
Seat Height Adjuster, Removing and Installing
Removing
Caution
Move the front seat to the highest possible
position. This reduces the spring force when removing
and installing the sea
Seat Angle Adjuster, Removing and Installing
Seat Angle Adjustment Handle, Removing and Installing
Note
Removal and Installation can be done with the seat
installed.
Removing
- Remove the seat side sill panel trim. Refer to
SEE MORE:
Luggage Compartment Side Trim Panel, Removing and Installing
Special tools and workshop equipment
required
Pry Lever -80-200-
Omega Clip Tool -T40280-
Removing
- If installed, remove the luggage compartment roller cover.
- Remove the rear seat backrest. Refer to
→ Chapter "Rear Seat Backrest, Removing and Installing".
- V
Overview - Rear Outer Three-Point Seat Belt
1 - Belt Guide
Caution
Do not rotate bolts under any circumstances when removing
and installing belt guide. They are set by the manufacturer.
Replace the entire belt guide if damaged.
Removing and installing. Refer to
→ Chapter "Rear Seat Belt Guide, Rem
