Audi Q3: Overview - Rear Outer Three-Point Seat Belt
Audi Q3 (8U) 2011-2018 Service Manual / Body / Body Interior / Passenger Protection, Airbags, Seat Belts / Overview - Rear Outer Three-Point Seat Belt
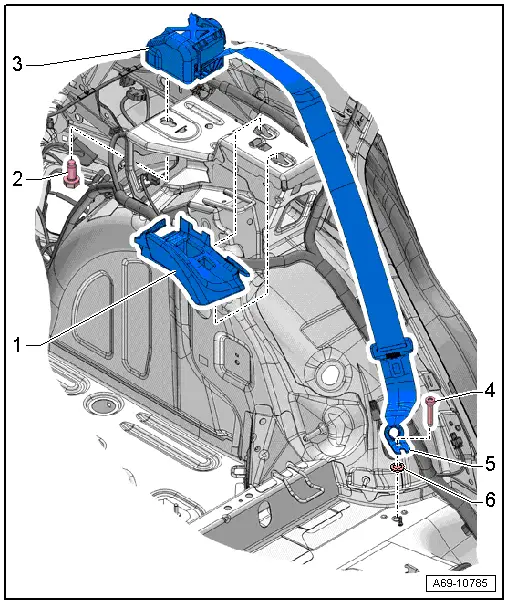
1 - Belt Guide
 Caution
- Do not rotate bolts under any circumstances when removing and installing belt guide. They are set by the manufacturer.
- Replace the entire belt guide if damaged.
- Removing and installing. Refer to → Chapter "Rear Seat Belt Guide, Removing and Installing".
- Place in the bolt heads on the guides on the console and pull forward until the catches engage audibly.
2 - Bolt
- If it was removed because of an accident, replace the bolt
- 45 Nm
3 - Automatic Belt Retractor
- Driver side: USA and Canada market-specific with Driver Side Rear Seat Belt Tensioner Igniter -N196-
- Front passenger side: USA and Canada market-specific with Passenger Side Rear Seat Belt Tensioner Igniter -N197-
- Removing and installing. Refer to → Chapter "Outer Rear Three-Point Seat Belt, Removing and Installing".
4 - Bolt
- 45 Nm
- If it was removed because of an accident, replace the bolt
5 - Outer Rear Belt End Fitting
- Removing and installing. Refer to → Chapter "Rear Outer Belt End Fitting, Removing and Installing".
6 - Seal
- Slide over the bolt thread and turn it all the way until it stops.
Overview - Rear Center Three-Point Seat Belt
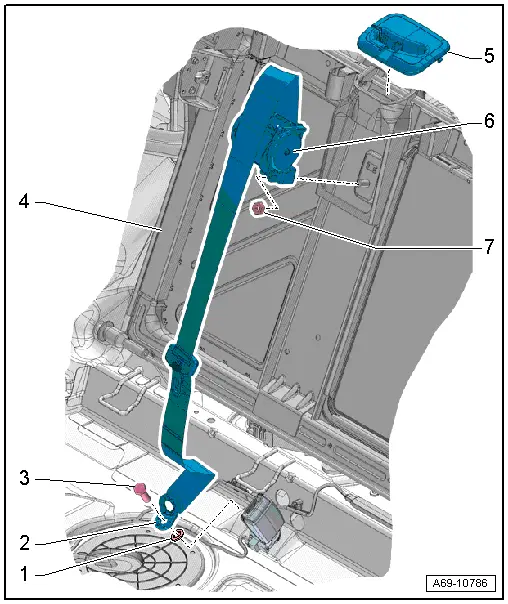
1 - Seal
- Slide over the bolt thread and turn it all the way until it stops.
2 - Center Rear Belt End Fitting
- Removing and installing. Refer to → Chapter "Rear Seat Belt Latch, Removing and Installing".
3 - Bolt
- Tightening specification. Refer to → Chapter "Overview - Rear Seat Belt Latch".
4 - Right 2/3 Rear Seat Backrest
5 - Rear Center Belt Guide
- Replace the entire belt guide if damaged.
- Removing and installing. Refer to → Chapter "Rear Seat Belt Guide in Center Seating Position, Removing and Installing".
- Press on until it engages audibly
6 - Automatic Belt Retractor
- Removing and installing. Refer to → Chapter "Rear Three Point Seat Belt in Center Seating Position, Removing and Installing".
7 - Nut
- 45 Nm
- If it was removed because of an accident, replace the nut
Overview - Front Seat Belt Latch
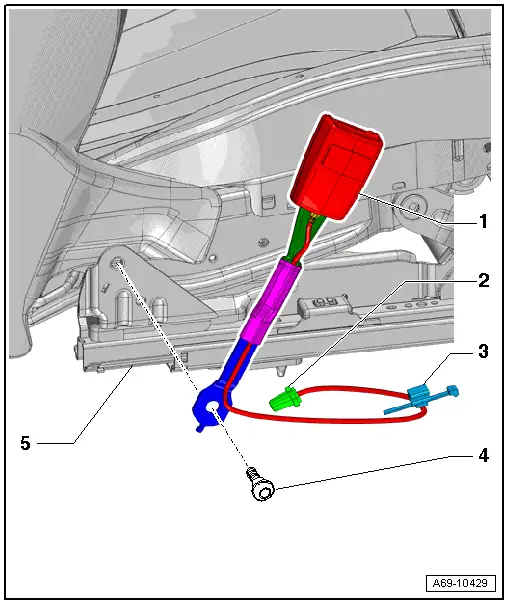
1 - Front Seat Belt Latch
- Driver side: with Driver Seat Belt Switch -E24-
- Front passenger side: with Front Passenger Seat Belt Switch -E25-
- Removing and installing. Refer to → Chapter "Front Seat Belt Latch, Removing and Installing".
- Always replaced if the belt tensioner has deployed with the belt on
2 - Connector
- For the seat belt switch
3 - Wiring Bracket
4 - Bolt
- 34 Nm
- If it was removed because of an accident, replace the bolt
5 - Front Seat
Overview - Rear Seat Belt Latch
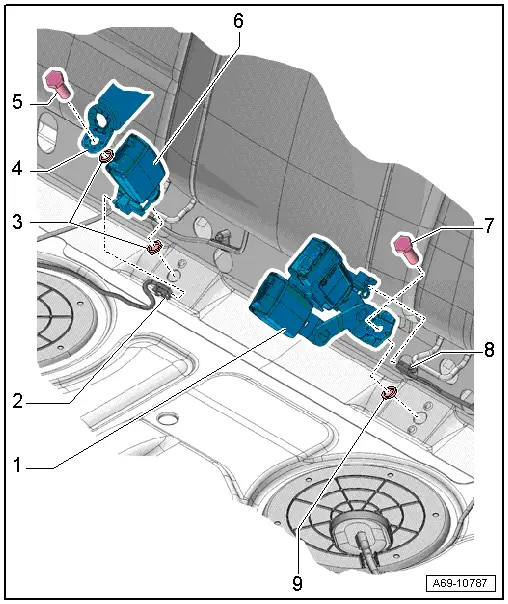
1 - Seat Belt Latch
- With Driver Side Rear Seat Belt Switch -E258-
- USA and Canada market-specific without seat belt switch
- Removing and installing. Refer to → Chapter "Rear Seat Belt Latch, Removing and Installing".
- Always replaced if the belt tensioner has deployed with the belt on
- Align with the direction of travel when bolting it on
- The tabs on the floor panel must be between the recesses on the bolting surface of the seat belt latch.
2 - Connector
- For Passenger Side Rear Seat Belt Switch -E259-
- Equipment levels
3 - Seals
- Slide over the bolt thread and turn it all the way until it stops.
4 - Center Rear Belt End Fitting
- Removing and installing. Refer to → Chapter "Rear Seat Belt Latch, Removing and Installing".
5 - Bolt
- 45 Nm
- If it was removed because of an accident, replace the bolt
6 - Seat Belt Latch
- with Passenger Side Rear Seat Belt Switch -E259-
- USA and Canada market-specific without seat belt switch
- Removing and installing. Refer to → Chapter "Rear Seat Belt Latch, Removing and Installing".
- Always replaced if the belt tensioner has deployed with the belt on
- Align with the direction of travel when bolting it on
- The tabs on the floor panel must be between the recesses on the bolting surface of the seat belt latch.
7 - Bolt
- 45 Nm
- If it was removed because of an accident, replace the bolt
8 - Connector
- For the Driver Side Rear Seat Belt Switch -E258-
- Equipment levels
9 - Seal
- Slide over the bolt thread and turn it all the way until it stops.
READ NEXT:
 Front Three-Point Seat Belt, Removing and Installing
Front Three-Point Seat Belt, Removing and Installing
Removing
WARNING
Follow all safety precautions when working with
pyrotechnic components. Refer to
→ Chapter "Pyrotechnic
Rear Three-Point Seat Belt, Removing and Installing
Outer Rear Three-Point Seat Belt, Removing and Installing
Removing
- Remove the rear outer belt end fitting. Refer to
→ Chapter "Rear Outer Belt End Fitting, Removing and Installing".
Front Belt End Fitting, Removing and Installing
Front Belt End Fitting, Removing and Installing, USA and Canada
Market-Specific
Removing
- Remove the front seat. Refer to
→ Chapter "Front Seat, Removing and Installing".
- Re
SEE MORE:
Interior lighting
Front interior lighting
Fig. 40 Headliner: interior lighting
Interior lighting buttons
- Interior lighting on/off
- Door contact switch on/off.
The interior lighting
is controlled automatically.
Touch-sensitive reading lights
To turn a reading light on or off, touch the surface
1 briefly.
To
Overview - Belt Pulley, Valeo A/C Compressor
1 - Bolt
17 Nm
Replacing
- The threaded bolt holes, into which the self-locking bolts or bolts
with locking compound were installed, must be cleaned (for example with
a thread tap). Otherwise, there is a danger that the bolts break off
during assembly.
- Cl
© 2019-2025 Copyright www.auq3.net
