Audi Q3: Front Belt End Fitting, Removing and Installing
Front Belt End Fitting, Removing and Installing, USA and Canada Market-Specific
Removing
- Remove the front seat. Refer to → Chapter "Front Seat, Removing and Installing".
- Remove front sill panel trim. Refer to → Chapter "Front Sill Panel Strip, Removing and Installing".
- Remove the lower B-pillar trim panel. Refer to → Chapter "Lower B-Pillar Trim Panel, Removing and Installing".
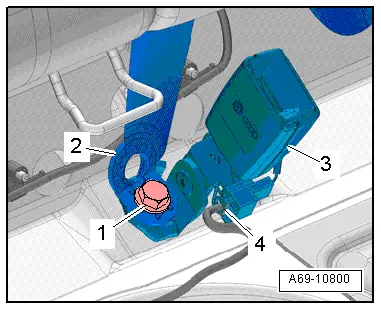
- Remove the nuts -arrows- for the carpet reinforcement.
- Disengage the carpet -1- with the reinforcement from the sill panel and pull to the side.
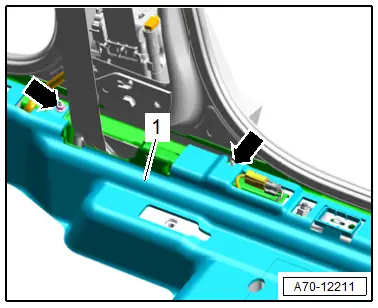
- Disengage the front belt tensioner connector -2- at the cover and free it up.
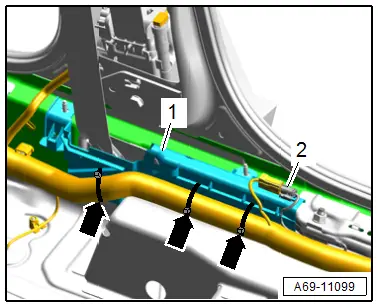
- Pull the carpet near the belt end fitting to the side, and cut through the cable ties -arrows-.
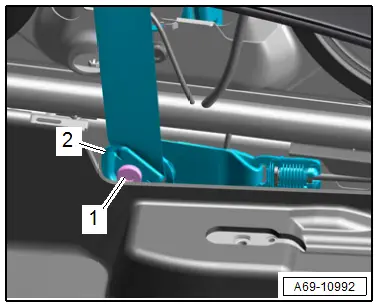
- Unclip the belt end fitting cover -1- from the sill panel and remove.
- Open the cover -2- for the belt anchor -1- with a screwdriver on the catches -arrow-, open and push aside.
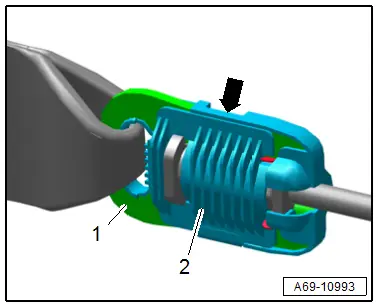
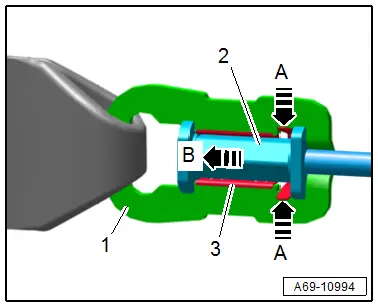
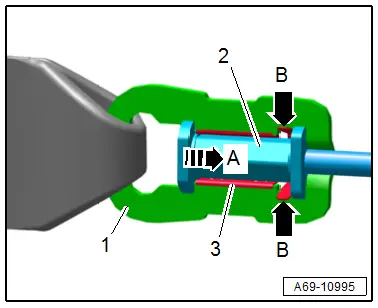
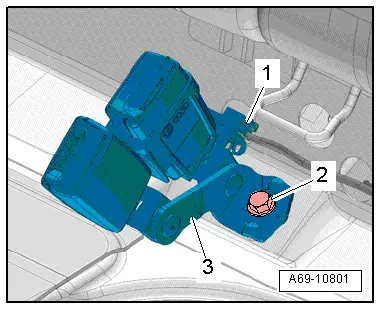
- Push together the catches on the securing clamp with a plies -A arrows-.
- At the same time push the anchoring pins -2- together with the securing clamp -3- to release in the direction of -arrow B-.
- Disengage the anchoring pins from the securing clamp in the belt anchor -1-.
- Remove the bolt -1- and then remove the belt relay -2-.
Installing
Install in reverse order of removal. Note the following:
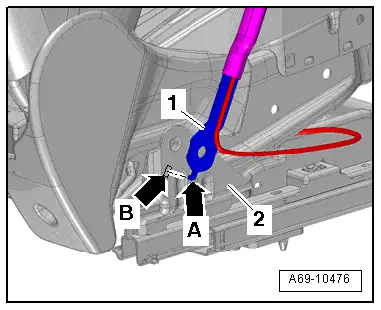
- Engage the anchoring bolts -2- in the securing clamp -3- and push in the direction of -arrow A-, until the catches -B arrows- engage.
Information for installation: for example, tightening specifications, replacing body parts. Refer to → Chapter "Overview - Front Three-Point Seat Belt, USA and Canada Market" and → Chapter "Overview - Foot Rest and Carpet".
Front Belt End Fitting, Removing and Installing, Not USA and Canada Market-Specific
NOT FOR NORTH AMERICAN MARKET
Removing
- Move the front seat all the way forward/up.
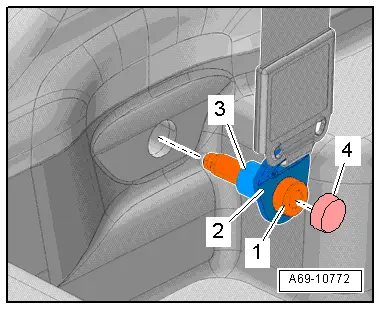
- Pry the cap -4- off using a screwdriver.
- Remove the bolt -1-.
- Remove the bolt with the belt anchor -2- and the stop sleeves -3-.
Installing
Install in reverse order of removal.
Installation notes, for example tightening specifications, replacing components. Refer to → Chapter "Overview - Front Three-Point Seat Belt".
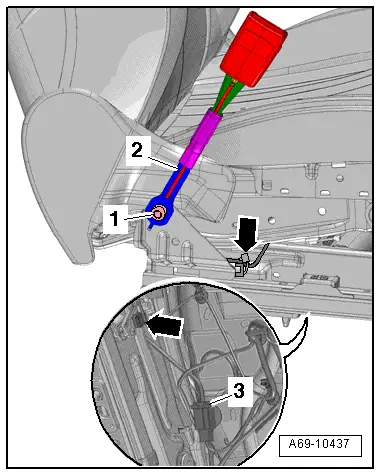
Rear Outer Belt End Fitting, Removing and Installing
Removing
- Remove the rear bench seat. Refer to → Chapter "Bench Seat/Single Seat, Removing and Installing".
- Remove the rear sill trim. Refer to → Chapter "Rear Sill Panel Strip, Removing and Installing".
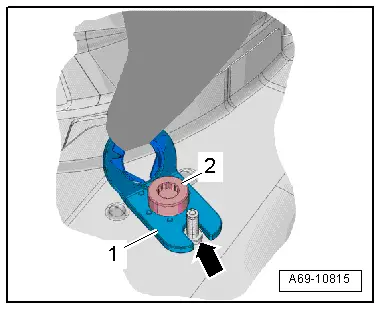
- Remove the bolt -2- from the belt end fitting -1-.
Installing
Install in reverse order of removal. Note the following:
- The threaded pin -arrow- on the floor panel must be positioned in the cut-out of the belt anchor.
Installation notes, for example tightening specifications, replacing components. Refer to → Chapter "Overview - Rear Outer Three-Point Seat Belt".
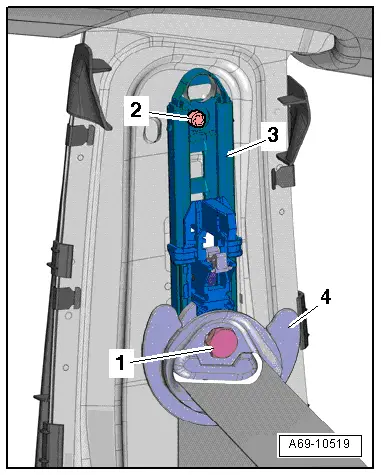
Seat Belt Height Adjuster, Removing and Installing
Removing
- Press button for seat belt height adjuster and move the slide for seat belt height adjustment into the lowest position.
- Remove the upper B-pillar trim panel. Refer to → Chapter "Upper B-Pillar Trim, Removing and Installing".
- Set aside the upper B-pillar trim with the seat belt still threaded through it.
- Remove the bolt -1-.
- Remove the seat belt relay -4- and seat belt.
- Remove the bolt -2-.
- Remove the seat belt height adjuster -3- at the top of the B-pillar.

Installing
Install in reverse order of removal. Note the following:
- If parts of the seat belt system are removed due to an accident, replace the belt system bolts.
 Note
Note
- Replacement seat belt height adjusters are delivered with the slide in the lowest position (installation position).
- If removed seat belt height adjusters are reinstalled, these should be placed in the lowest position (installation position).
- Hook seat belt height adjuster -3- into the B-pillar.
- Tighten the bolt -2-.
- Install the seat belt height adjuster -4- and tighten the bolt -1-.
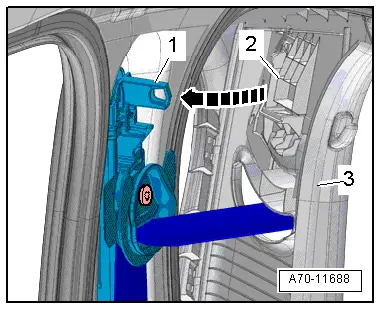
 Note
Note
The belt height adjuster button must not be pressed when installing the upper B-pillar trim with slide.
- First, insert the B-pillar trim panel -3- upward into the mount on the roof.
- The mount -2- for the sliding piece of the upper B-pillar trim panel must engage in the retaining pin -1- on the seat belt height adjuster -arrow-.
Seat belt height adjuster replacement part:
- After installing the upper B-pillar trim, push the slide all the way up.
- This unlocks the seat belt height adjuster assembly anchorage.
Procedure for all seat belt height adjusters:
- When checking function, the following conditions must be fulfilled:
- The seat belt height adjuster must audibly engage all four possible positions (and in the highest position too).
- Belt height adjuster button must return to upper position by itself after being pressed.
- Belt relay must swing into vertical position or carrier direction by itself after tightening screw.
If any functions did not work, the seat belt height adjuster assembly must be checked; the height adjuster may need to be replaced.
Installation notes, for example tightening specifications, replacing components. Refer to → Chapter "Overview - Front Three-Point Seat Belt".
Front Seat Belt Latch, Removing and Installing
Removing
- Remove the front seat. Refer to → Chapter "Front Seat, Removing and Installing".
- Disconnect the connector -3- and free up the wire -arrows-.
- Remove bolt -1- and remove belt latch -2-.
Installing
Install in reverse order of removal. Note the following:
- Install the seat belt latch -1- so that the tab -arrow A- engages in the opening -arrow B- on the seat frame -2-.
 WARNING
- Follow all safety precautions when working with pyrotechnic components. Refer to → Chapter "Pyrotechnic Components Safety Precautions".
- Before handling pyrotechnic components (for example, connecting the connector), the person handling it must "discharge static electricity". This can be done by touching the door striker, for example.
- Observe all measures when installing the front seat. Refer to → Chapter "Front Seat, Removing and Installing".
Installation notes, for example tightening specifications, replacing components. Refer to → Chapter "Overview - Front Seat Belt Latch".
Rear Seat Belt Latch, Removing and Installing
Removing
- Remove the rear bench seat. Refer to → Chapter "Bench Seat/Single Seat, Removing and Installing".
Right rear seat belt latch with rear center belt end fitting:
- Vehicles with a seat belt switch: disconnect the connector -4- from the seat belt switch.
- Remove the bolt -1-.
- Remove the center rear belt end fitting -2-.
- Remove the seat belt latch -3-.
Left rear seat belt latch:
- Vehicles with a seat belt switch: disconnect the connector -1- from the seat belt switch.
- Remove the bolt -2-.
- Remove the seat belt latch -3-.
Installing
Install in reverse order of removal.
Installation notes, for example tightening specifications, replacing components. Refer to → Chapter "Overview - Rear Seat Belt Latch".
READ NEXT:
 Child Seat Anchors
Overview - Front Child Seat Anchors
1 - Bolt
8 Nm
Quantity: 2
Replace
Install with locking compound. Refer to the Parts Catalog for the
locking compound.
2 -
Airbag System
Component Location Overview - Airbag System
1 - Airbag Control Module -J234-
Overview. Refer to
→ Chapter "Overview - Airbag Control Module".
2 - Airbag Indicato
Airbag Control Module
Overview - Airbag Control Module
1 - Airbag Control Module -J234-
Removing and installing. Refer to
→ Chapter "Airbag Control Module -J234-, Removing and Installing".
Contr
SEE MORE:
Central locking
General information
WARNING
If you leave the vehicle, switch the ignition
off and take the key with you. This applies
particularly when children remain in the vehicle.
Otherwise, children could start the vehicle
or operate electrical equipment (such
as power windows), which increases the risk
Antenna Amplifier, Removing and Installing
Antenna Amplifier -R24-, Removing and Installing
The Antenna Amplifier -R24- is located on the upper left of
the rear lid.
Removing
- Turn off the ignition and all electrical equipment and
remove the ignition key.
- Remove the upper rear lid trim panel. Refer to
→ Body Inte
