Audi Q3: Component Location Overview - Center Console Controls
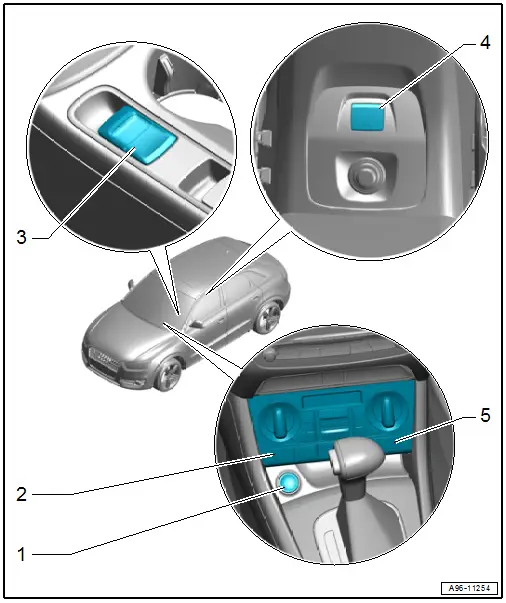
1 - Access/Start Authorization Button -E408-
- Removing and installing. Refer to → Chapter "Access/Start Authorization Button -E408-, Removing and Installing".
2 - Heated Driver Seat Adjuster -E94-
- Integrated in the A/C Control Module -J301-/ Climatronic Control Module -J255- control head. Cannot be replaced separately if faulty.
- Replacing the A/C Control Module -J301-/ Climatronic Control Module -J255-. Refer to → Heating, Ventilation, and Air Conditioning; Rep. Gr.87; Display and Control Unit, Removing and Installing.
3 - Electromechanical Parking Brake Button -E538-, -Auto Hold- Button -E540-
- Removing and installing. Refer to → Chapter "Electromechanical Parking Brake Button -E538-/ -AUTO HOLD- Button -E540-, Removing and Installing".
4 - Central Locking Button -E600-
- Removing and installing. Refer to → Chapter "Central Locking Button -E600-".
5 - Heated Front Passenger Seat Adjuster -E95-
- Integrated in the A/C Control Module -J301-/ Climatronic Control Module -J255- control head. Cannot be replaced separately if faulty.
- Replacing the A/C Control Module -J301-/ Climatronic Control Module -J255-. Refer to → Heating, Ventilation, and Air Conditioning; Rep. Gr.87; Display and Control Unit, Removing and Installing.
Component Location Overview - Roof Trim Panel Controls
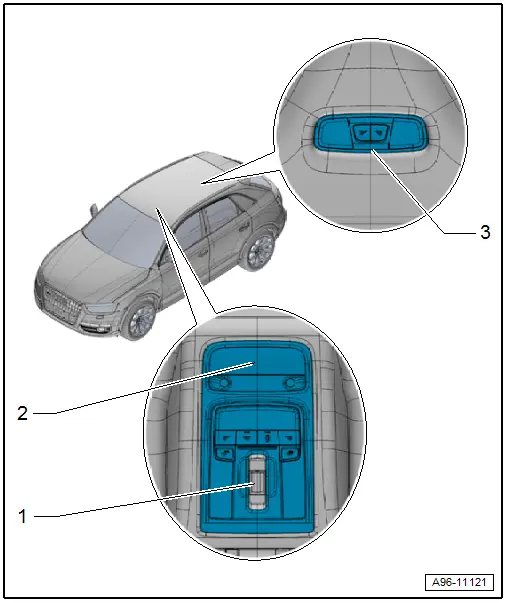
1 - Sunroof Button -E325-
- Equipment level
- Removing and installing. Refer to → Chapter "Sunroof Button -E325-, Removing and Installing".
2 - Front Roof Module -WX3- - Interior Lamp/Reading Lamp
- There are different versions. Refer to the Parts Catalog.
- With interior lighting switch, reading lamp button, window shade button.
- Removing and installing. Refer to → Chapter "Front Interior Lamp/Reading Lamp, Removing and Installing".
3 - Interior Lamp/Rear Reading Lamp
- There are different versions. Refer to the Parts Catalog.
- Removing and installing. Refer to → Chapter "Rear Interior/Reading Lamp, Removing and Installing".
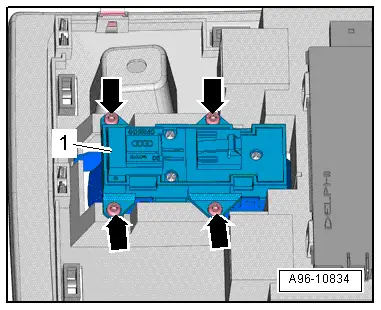
Tightening Specification Sunroof Button -E325-
- Tighten the screws -arrows- to 0.65 Nm.
Component Location Overview - Luggage Compartment Controls
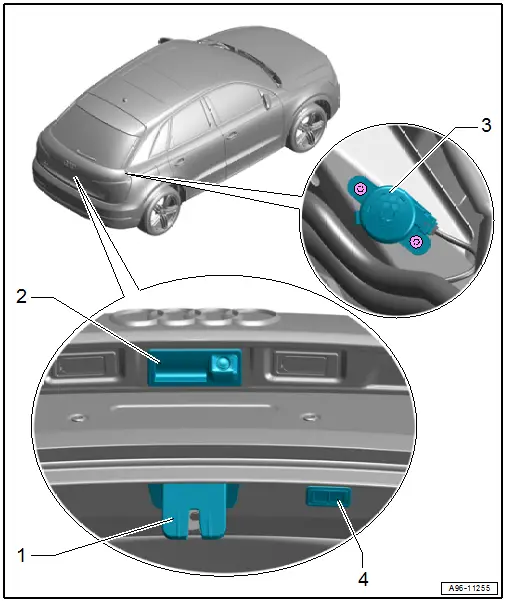
1 - Rear Lid Contact Switch
- Integrated inside the rear lid lock. Cannot be replaced separately if faulty.
- Removing and installing. Refer to → Chapter "Rear Lid Contact Switch, Removing and Installing".
2 - Rear Lid Lock Cylinder Unlock Button -F248-
- Removing and installing. Refer to → Chapter "Rear Lid Lock Cylinder Unlock Button -F248-, Removing and Installing".
3 - Rear Lid Warning Buzzer -H32-
- The buzzer is activated by closing the rear lid using the rear lid remote release button in the front door
- Removing and installing. Refer to → Chapter "Rear Lid Warning Buzzer -H32-, Removing and Installing".
4 - Rear Lid Closing Button -E574-
- With Locking Mechanism Button in the Rear Lid -E806-
- Removing and installing. Refer to → Chapter "Rear Lid Lock Button in Luggage Compartment -E406-, Removing and Installing".
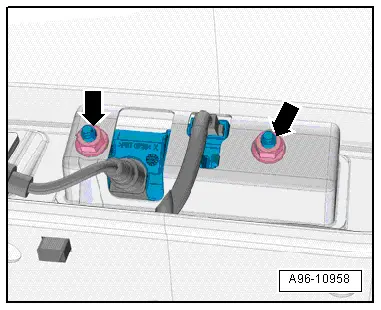
Tightening Specification: Anti-Theft Protection to Rear Lid Lock Cylinder Unlock Button -F248-.
- Tighten the nuts -arrows- to 6 Nm.
READ NEXT:
 Light Switch -E1-, Removing and Installing
Removing
- Turn the light switch to position "0".
- Push the light switch in direction of
-arrow A- and turn right at the same time in direction of
-arrow B-.
- Hold the switch in
Power Window Control Head In Driver Door -E512-, Removing and Installing
Removing
- Remove the pull handle with the switch mount. Refer to
→ Body Interior; Rep. Gr.70; Door Trim Panels; Front Pull
Handle, Removing and Installing.
- Carefully
Rear Lid Lock Cylinder Unlock Button -F248-, Removing and Installing
Removing
- Remove the rear lid trim panel. Refer to
→ Body Interior; Rep. Gr.70; Luggage Compartment Trim Panels;
Rear Lid Lower Trim Panel, Removing and Installing.
-
SEE MORE:
Changing engine oil
Audi recommends having the oil changed at an
authorized Audi dealer or authorized Audi Service
Facility.
Observe the safety precautions.
The engine oil must be changed at the intervals
specified in the Warranty & Maintenance Booklet.
This is very important because the lubrication
function of th
Roof Trim Panels
Component Location Overview - Roof Trim Panel
1 - Roof Grab Handle
Overview. Refer to
→ Chapter "Overview - Sun Visors".
2 - Sun Visor
Overview. Refer to
→ Chapter "Overview - Sun Visors".
3 - Front Interior Lamp/Reading Lamp
Remov
