Audi Q3: Rear Lid Lock Cylinder Unlock Button -F248-, Removing and Installing
Removing
- Remove the rear lid trim panel. Refer to → Body Interior; Rep. Gr.70; Luggage Compartment Trim Panels; Rear Lid Lower Trim Panel, Removing and Installing.
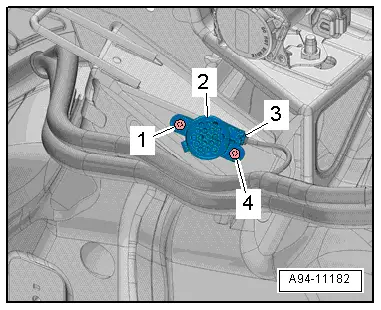
- Disconnect the connectors -2 and 4- and the antenna wire -1-.
- Free up the wiring harness -3-.
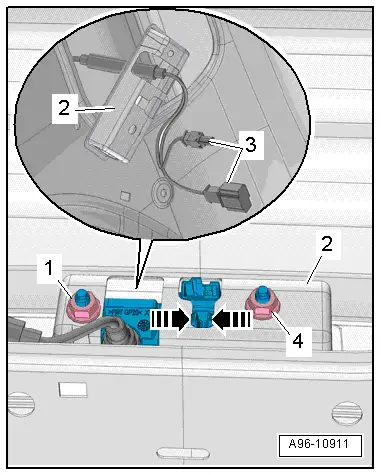
- Remove the nuts -1 and 4-.
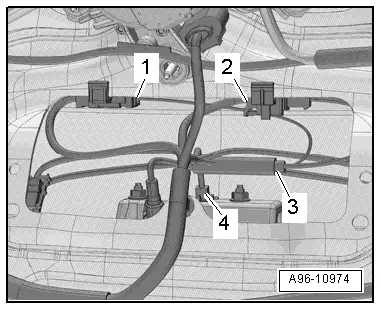
- Open the tabs in direction of -arrows- and remove the anti-theft protection -2-. Guide the wires -3- through the opening.
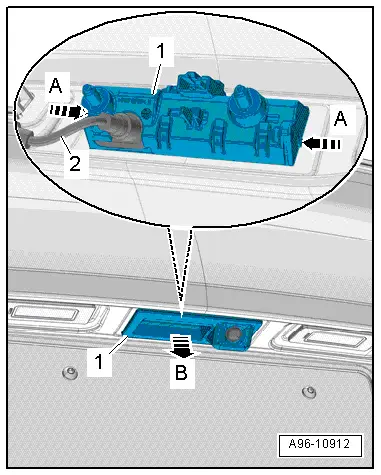
- Release the side tabs -arrows A- and remove the button -1- toward the outside -arrow B-.
- Guide the electric wire -2- out through the opening.
Installing
Install in reverse order of removal. Note the following:
- Install the rear lid lower trim panel. Refer to → Body Interior; Rep. Gr.70; Luggage Compartment Trim Panel; Rear Lid Lower Trim Panel, Removing and Installing.
- For vehicles with a rearview camera, the Rearview Camera -R189- must be recalibrated. Refer to → Communication; Rep. Gr.91; Rearview Camera System; Rearview Camera System, Calibrating.
Rear Lid Lock Button in Luggage Compartment -E406-, Removing and Installing
Removing
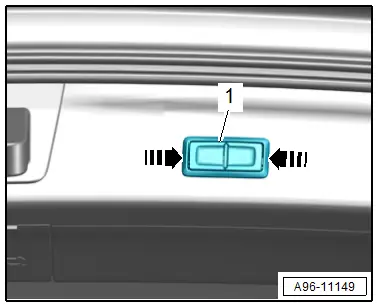
- Release the clips on the Rear Lid Closing Button -E574--1- in direction of -arrows-.
- Remove the switch from the rear lid trim panel.
- Disconnect the connector.
 Note
Note
Remove the rear lid trim panel if it is not possible to remove the button as described. Refer to → Body Interior; Rep. Gr.70; Luggage Compartment Trim Panels; Rear Lid Lower Trim Panel, Removing and Installing.
Installing
Install in reverse order of removal.
Rear Lid Warning Buzzer -H32-, Removing and Installing
Removing
- Remove the right luggage compartment side trim panel. Refer to → Body Interior; Rep. Gr.70; Luggage Compartment Trim Panel; Luggage Compartment Side Trim Panel, Removing and Installing.
- Remove the bolts -1 and 4-.
- Remove the warning buzzer -2- with the expanding clips.
- Disconnect the connector -3-.
Installing
Install in reverse order of removal.
Rear Lid Contact Switch, Removing and Installing
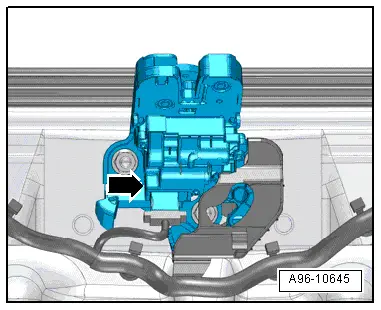
The rear lid contact switch -arrow- is located in the rear lid lock and cannot be replaced separately if faulty.
- Replace the rear lid lock. Refer to → Body Exterior; Rep. Gr.55; Rear Lid; Rear Lid Lock, Removing and Installing.
Driver/Front Passenger Vanity Mirror Lamp Contact Switch -F147-/-F148-, Removing and Installing
The vanity mirror contact switch is located in the sun visor mount and cannot be replaced separately if faulty.
- Sun visor removing and installing. Refer to → Body Interior; Rep. Gr.68; Equipment; Overview - Sun Visors.
Sunroof Button -E325-, Removing and Installing
Removing
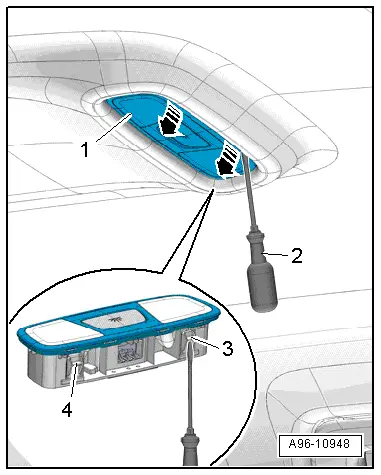
- Remove the front interior/reading lamp. Refer to → Chapter "Front Interior Lamp/Reading Lamp, Removing and Installing".
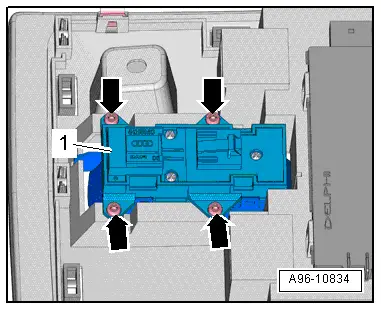
- Remove the bolts -arrows-.
- Remove the Sunroof Button -E325--1- from the front interior lamp/reading lamp.
- Disconnect the connector.
Installing
Install in reverse order of removal. Note the following:
- Install the front interior lamp/reading lamp. Refer to → Chapter "Front Interior Lamp/Reading Lamp, Removing and Installing".
Front Interior Lamp/Reading Lamp, Removing and Installing
Special tools and workshop equipment required
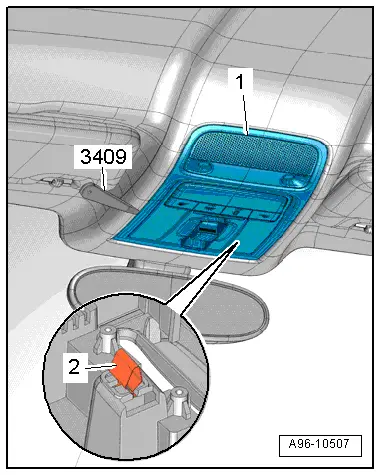
- Trim Removal Wedge -3409-
Removing
- Pry the interior lamp/reading lamp -1- out of the roof cutout using the Trim Removal Wedge -3409-. In doing so, the retainer -2- is removed from the body.
- Disconnect the connectors.
Installing
Install in reverse order of removal. Note the following:
- Insert the interior lamp/reading lamp into the roof cutout and press until it audibly engages.
Rear Interior/Reading Lamp, Removing and Installing
Removing
- With a narrow screwdriver -2- release the retaining tabs -3 and 4- on the interior lamp/reading lamp -1- and carefully pry out of the roof opening in direction of -arrows-.
- Disconnect the connector.
Installing
Install in reverse order of removal. Note the following:
- Insert the interior/reading lamp into the roof cutout and clip it in.
READ NEXT:
 Anti-Theft Alarm System
Overview - Interior Monitoring
1 - Nut
7 Nm
2 - Bracket
For Alarm Horn -H12-
3 - Alarm Horn -H12-
Removing and installing. Refer to
→ C
Lane Change Assistance
Overview - Lane Change Assistance
1 - Lane Change Assistance Button -E530-
Removing and installing. Refer to
→ Chapter "Lane Change Assistance Button -E530-, Removing and
I
Lane Change Assistance, Calibrating
Special tools and workshop equipment
required
Calibration Tool -VAS6350-
Conditions
- The Lane Change Assistance Control Module -J769-/ Lane
Change Assistance Control Module 2 -J770-
SEE MORE:
Setting the central locking system
You can adjust the central locking system to your
preferences. The settings depend on the vehicle
equipment.
Applies to MMI: Select on the home screen: VEHICLE
> Settings & Service > Central locking.
Door unlocking
If you select All, all doors and the luggage compartment
lid will be
Component Overview - Run-Flat Tire (PAX)
Caution
It is mandatory for run-flat tires to have a tire
pressure monitoring system in the vehicle.
Note
Be careful not to scratch off the glued- on wheel trim on
these rims.
The surface of the wheel trim is very sensitive.
The rim will have be replaced if the wheel
