Audi Q3: Power Window Control Head In Driver Door -E512-, Removing and Installing
Removing
- Remove the pull handle with the switch mount. Refer to → Body Interior; Rep. Gr.70; Door Trim Panels; Front Pull Handle, Removing and Installing.
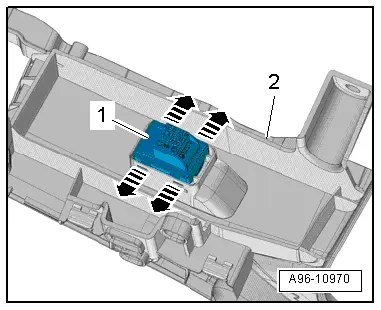
- Carefully release the hooks using a small screwdriver in direction of -arrows-.
- Remove the power window switch -2- from the switch mount -1-.
Installing
Install in reverse order of removal. Note the following:
- Install the switch mount. Refer to → Body Interior; Rep. Gr.70; Front Door Trim Panels; Front Pull Handle Removing and Installing.

Front Passenger Door Window Regulator Switch -E107-, Removing and Installing
Removing
- Remove the pull handle with the switch mount. Refer to → Body Interior; Rep. Gr.70; Door Trim Panels; Front Pull Handle, Removing and Installing.
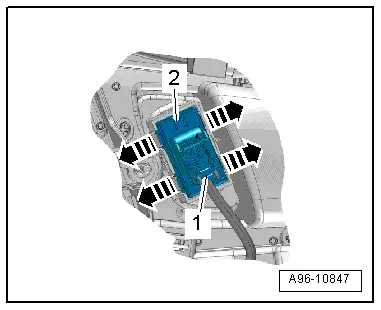
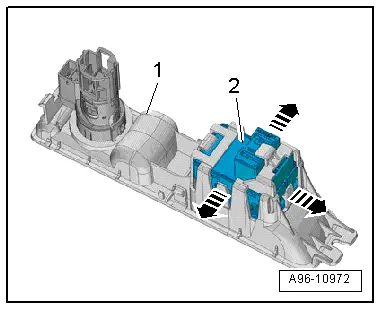
- Carefully release the retaining tabs in direction of -arrows-.
- Press the power window switch -1- out of the switch mount -2-.
Installing
Install in reverse order of removal. Note the following:
- Install the pull handle. Refer to → Body Interior; Rep. Gr.70; Front Door Trim Panels; Front Pull Handle Removing and Installing.
Driver Interior Locking Button -E308-, Removing and Installing
Removing
- Remove the front door trim panel. Refer to → Body Interior; Rep. Gr.70; Front Door Trim Panels; Front Door Trim Panel, Removing and Installing.
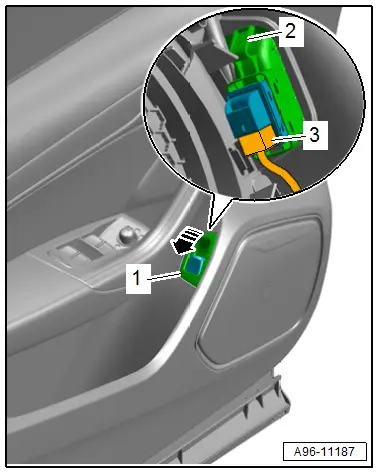
- Disconnect the connector -1-.
- Open the clips in direction of -arrows- and remove the interior locking button -2- outward.
Installing
Install in reverse order of removal. Note the following:
- Install the front door trim panel. Refer to → Body Interior; Rep. Gr.70; Front Door Trim Panels; Front Door Trim Panel, Removing and Installing.
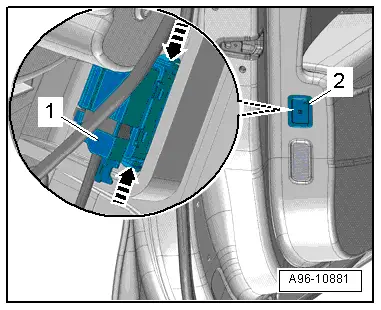
Rear Lid Unlock Switch -E165-, Removing and Installing
Removing
- Remove the front door trim panel. Refer to → Body Interior; Rep. Gr.70; Front Door Trim Panels; Front Door Trim Panel, Removing and Installing.
- Disconnect the connector -3-.
- Release the clip -2- and remove the trim -1- with the switch from the door trim panel in direction of -arrow-.
- Release the hooks in direction of -arrows- carefully with a small screwdriver.
- Remove the switch -1- toward the rear from the trim -2-.
Installing
Install in the reverse order of removal. Note the following:
- Install the trim and the switch until the hooks engage in the mount.
- Install the front door trim panel. Refer to → Body Interior; Rep. Gr.70; Front Door Trim Panels; Front Door Trim Panel, Removing and Installing.
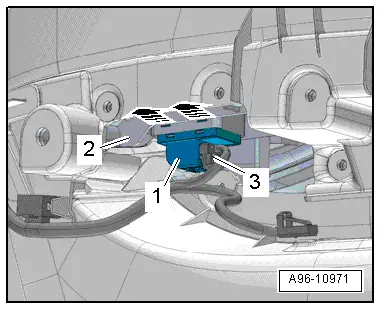
Passenger Compartment Monitoring Switch -E183-, Removing and Installing
Removing
- Remove the front door trim panel. Refer to → Body Interior; Rep. Gr.70; Front Door Trim Panels; Front Door Trim Panel, Removing and Installing.
- Disconnect the connector -1-.
- Release the retaining springs in direction of -arrows- and remove the switch -2- from the door trim panel.
Installing
Install in reverse order of removal. Note the following:
- Install the front door trim panel. Refer to → Body Interior; Rep. Gr.70; Front Door Trim Panels; Front Door Trim Panel, Removing and Installing.
Left Rear Power Window Switch in Left Rear Door -E52-/ Right Rear Window Switch in Right Rear Door -E54-, Removing and Installing
Removing
- Remove the rear door trim panel. Refer to → Body Interior; Rep. Gr.70; Rear Door Trim Panels; Rear Door Trim Panel, Removing and Installing.
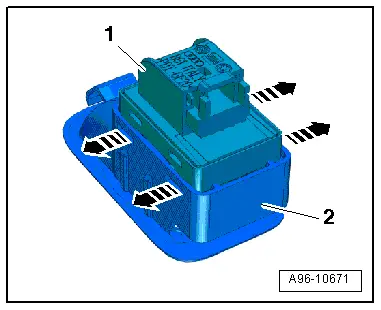
- Release the hooks in direction of -arrows- carefully with a small screwdriver.
- Press the power window switch -1- out of the switch mount -2-.
- Disconnect the connector -3-.
Installing
Install in reverse order of removal. Note the following:
- Install the rear door trim panel. Refer to → Body Interior; Rep. Gr.70; Rear Door Trim Panels; Rear Door Trim Panel, Removing and Installing.
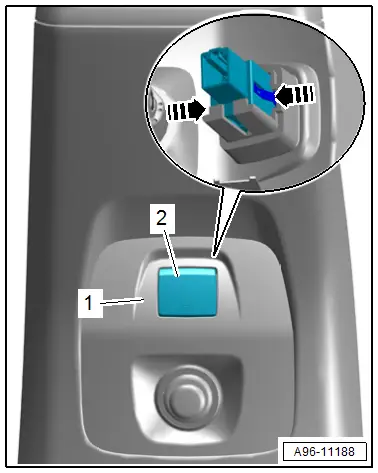
Central Locking Button -E600-
Removing
- Remove the rear center console trim. Refer to → Body Interior; Rep. Gr.68; Center Console; Rear Center Console Trim, Removing and Installing.
- Release the retainers in direction of -arrows-.
- Remove the button -2- from the switch mount -1-.
Installing
Install in reverse order of removal.
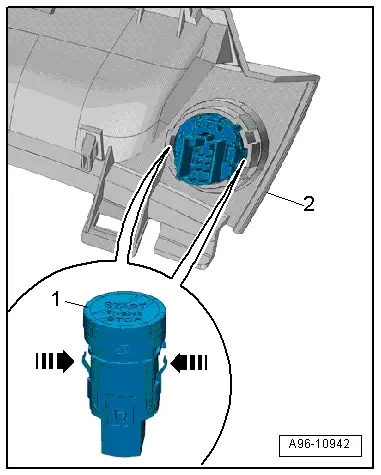
Access/Start Authorization Button -E408-, Removing and Installing
Special tools and workshop equipment required
- Locking Pin -T40011-
Removing
- Remove the A/C system control head. Refer to → Heating Ventilation and Air Conditioning; Rep. Gr.87; Display And Control Unit, Removing and Installing.
- Remove the front storage compartment. Refer to → Body Interior; Rep. Gr.68; Center Console; Front Center Console Storage Compartment, Removing and Installing.
- Release the clips in direction of -arrows- with the Locking Pin (3 pc.) -T40011-.
- Remove the Access/Start Authorization Button -E408--1- from the storage compartment -2-.
Installing
Install in reverse order of removal. Note the following:
- Install the front storage compartment. Refer to → Body Interior; Rep. Gr.68; Center Console; Front Center Console Storage Compartment, Removing and Installing.
- Install the A/C system control head. Refer to → Heating Ventilation and Air Conditioning; Rep. Gr.87; Display And Control Unit, Removing and Installing.
Electromechanical Parking Brake Button -E538-/ -AUTO HOLD- Button -E540-, Removing and Installing
Removing
- Remove the mount for the switch and socket. Refer to → Body Interior; Rep. Gr.68; Center Console, Removing and Installing.
- Open the retainers in direction of -arrows- and remove the button -2- from the mount -1-.
Installing
Install in reverse order of removal. Note the following:
- Install the mount for the switch and socket. Refer to → Body Interior; Rep. Gr.68; Center Console, Removing and Installing.
READ NEXT:
 Rear Lid Lock Cylinder Unlock Button -F248-, Removing and Installing
Removing
- Remove the rear lid trim panel. Refer to
→ Body Interior; Rep. Gr.70; Luggage Compartment Trim Panels;
Rear Lid Lower Trim Panel, Removing and Installing.
-
Anti-Theft Alarm System
Overview - Interior Monitoring
1 - Nut
7 Nm
2 - Bracket
For Alarm Horn -H12-
3 - Alarm Horn -H12-
Removing and installing. Refer to
→ C
Lane Change Assistance
Overview - Lane Change Assistance
1 - Lane Change Assistance Button -E530-
Removing and installing. Refer to
→ Chapter "Lane Change Assistance Button -E530-, Removing and
I
SEE MORE:
Exterior Rearview Mirror Lamps
Overview - Exterior Rearview Mirror Lamps
1 - Mirror Glass
2 - Mirror Adjusting Unit Mount
3 - Exterior Rearview Mirror Housing
4 - Exterior Rearview Mirror Turn Signal Bulb
Driver Exterior Rearview Mirror Turn Signal Bulb -L131-
Front Passenger Ex
Floor Heat Shield, Removing and Installing
Center Tunnel Heat Shield, Removing and Installing
Removing
- Remove the left and right underbody cover. Refer to
→ Chapter "Underbody Panels, Removing and Installing".
- Remove the driveshaft heat shield. Refer to
→ Chapter "Driveshaft Heat Shield, Removing and Installi
