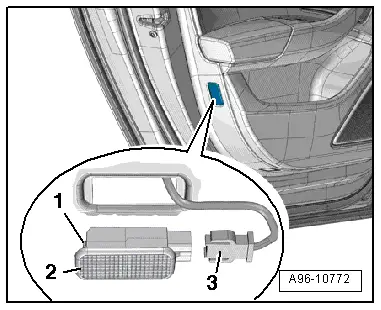
Audi Q3: Driver/Front Passenger Door Warning Lamp -W30-/-W36-, Removing and Installing
Removing
- Press the tab -1- with a flat-blade screwdriver and remove the door warning lamp -2-.
- Disconnect the connector -3-.
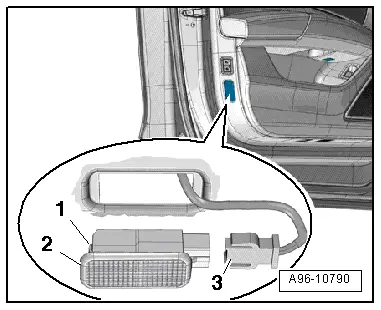
- Carefully pry out the cover over the lamp in direction of -arrow-.
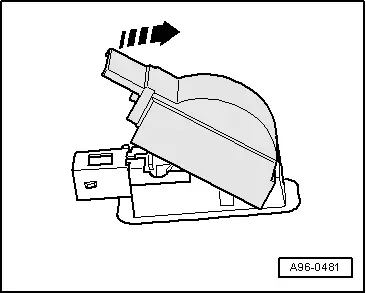
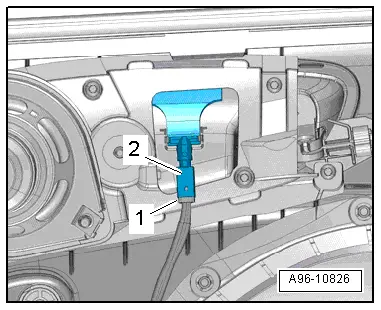
- Remove the bulb -1- from the socket -2- on the back of the door warning lamp.
Installing
Install in reverse order of removal. Note the following:
- Mount the cover on the door warning lamp.
- Insert the door warning lamp into the opening and engage on the opposite side.

Left/Right Rear Door Opener Illumination Bulb -L110- / -L111-, Removing and Installing
Removing
- Remove the rear door trim panel. Refer to → Body Interior; Rep. Gr.70; Rear Door Trim Panels; Rear Door Trim Panel, Removing and Installing.
- Disconnect the connector -1-.
- Turn the bulb socket -2- to the left and remove it at the door opener.
Installing
Install in reverse order of removal. Note the following:
- Install the rear door trim panel. Refer to → Body Interior; Rep. Gr.70; Rear Door Trim Panels; Rear Door Trim Panel, Removing and Installing.
Left/Right Rear Entry Lamp -W33- / -W34-, Removing and Installing
Removing
- Use flat screwdriver to press in the retaining tab -1- and lift out the entry lamp -2-.
- Disconnect the connector -3-.
Installing
Install in reverse order of removal. Note the following:
 Note
Note
The entire entry lamp must be replaced if an LED is faulty.
- Install the entry lamp into the opening and engage on the opposite side.
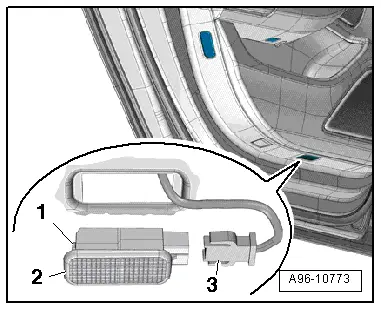
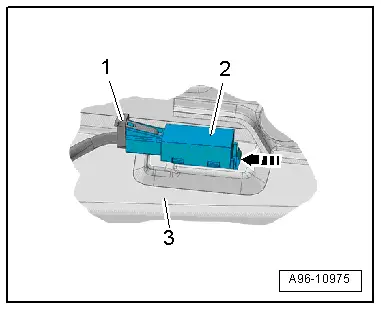
Left/Right Rear Door Warning Lamp -W37-/-W38-, Removing and Installing
Removing
- Press the tab -1- with a flat-blade screwdriver and remove the door warning lamp -2-.
- Disconnect the connector -3-.
- Carefully pry out the cover over the lamp in direction of -arrow-.

- Remove the bulb -1- from the socket -2- on the back of the door warning lamp.
Installing
Install in reverse order of removal. Note the following:
- Mount the cover on the door warning lamp.
- Insert the door warning lamp into the opening and engage on the opposite side.

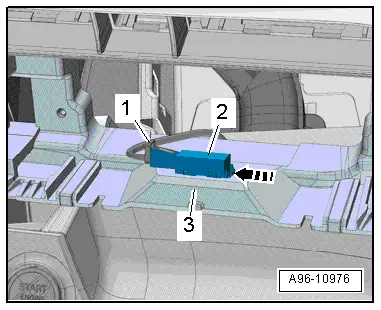
Storage Compartment Illumination Bulb -L120-, Removing and Installing
Removing
- Remove the A/C system control head. Refer to → Heating Ventilation and Air Conditioning; Rep. Gr.87; Display And Control Unit, Removing and Installing.
 Note
Note
The entire lamp must be replaced if an LED is faulty.
- Disconnect the connector -1-.
- Open the clip in direction of -arrow-.
- Remove the storage compartment illumination bulb -2- from the mount -3-.
Installing
Install in reverse order of removal. Note the following:
- Install the A/C system control head. Refer to → Heating Ventilation and Air Conditioning; Rep. Gr.87; Display And Control Unit, Removing and Installing.
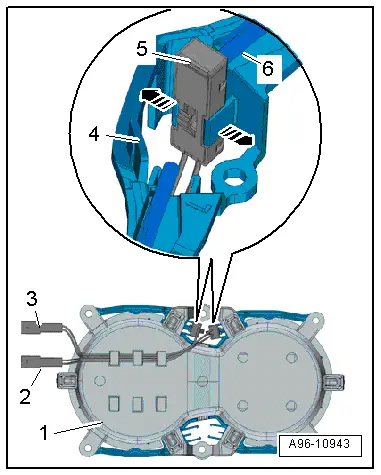
Cupholder Illumination Bulb\Cupholder Illumination Bulb 2 -L121-/-L215-, Removing and Installing
Removing
- Remove the cupholder. Refer to → Body Interior; Rep. Gr.68; Center Console; Cupholder, Removing and Installing.
 Note
Note
The entire lamp must be replaced if an LED is faulty.
- Carefully release the retainers in direction of -arrows- and remove the lamp -5- from the lighting strip -6- and the mount -4-.
- Free up the wiring harness -2 and 3- from the cupholder -1-.
Installing
Install in reverse order of removal. Note the following:
- Install the cupholder. Refer to → Body Interior; Rep. Gr.68; Center Console; Cupholder, Removing and Installing.
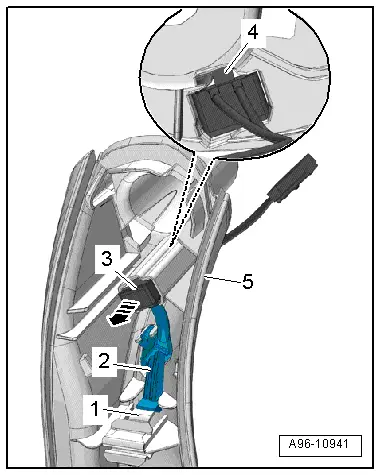
Driver and Front Passenger Door Ambient Lighting Bulb -L164-/-L165-, Removing and Installing
Removing
- Remove the switch mount. Refer to → Body Interior; Rep. Gr.70; Front Door Trim Panels; Front Pull Handle Removing and Installing.
- Open the clip -1- and remove the lighting strip -2- from the pull handle -5- and at the same time disengage from the lamp.
- Release the spring -4- and remove the lamp -3- from the pull handle in the direction of -arrow-.
 Note
Note
The entire lamp must be replaced if an LED is faulty.
Installing
Install in reverse order of removal. Note the following:
- Install the switch mount. Refer to → Body Interior; Rep. Gr.70; Front Door Trim Panels; Front Pull Handle Removing and Installing.
Driver and Front Passenger Door Storage Compartment Illumination Bulb -L160-/-L161-, Removing and Installing
Removing
- Remove the front door trim panel. Refer to → Body Interior; Rep. Gr.70; Front Door Trim Panels; Front Door Trim Panel, Removing and Installing.
- Disconnect the connector -1-.
- Open the clip in direction of -arrow-.
- Remove the door storage compartment illumination bulb -2- from the door trim panel -3-.
Installing
Install in reverse order of removal. Note the following:
 Note
Note
If one of the LEDs is faulty, then the complete door storage compartment illumination bulb must be replaced.
- Install the front door trim panel. Refer to → Body Interior; Rep. Gr.70; Front Door Trim Panels; Front Door Trim Panel, Removing and Installing.
READ NEXT:
 Speaker Ambient Lighting Bulb 1 and 2 -L211-/-L212-, Removing and Installing
Speaker Ambient Lighting Bulb 1 -L211-, Removing and Installing, Front
Door
Removing
- Remove the front door trim panel. Refer to
→ Body Interior; Rep. Gr.70; Front Door Tri
Left and Right Ambient Lighting Bulb for Rear Doors -L166-/-L167-, Removing
and Installing
Removing
- Remove the switch mount. Refer to
→ Body Interior; Rep. Gr.70; Rear Door Trim Panels; Rear Pull
Handle Removing and Installing.
Note
The entire lamp mu
Component Location Overview - Instrument Panel Controls
1 - ASR/ESP Button -E256-
Removing and installing. Refer to
→ Chapter "ASR/ESP Button -E256-, Removing and Installing".
2 - Left Lower Button Unit
Equipment l
SEE MORE:
Tires, Mounting, Run-Flat Tires
Caution
It is mandatory for run-flat tires to have a tire
pressure monitoring system in the vehicle.
- Coat rim flanges, tire beads and inside of upper tire beads
thoroughly with tire mounting paste.
WARNING
The minimum mounting temperature for a tire may not
be be
myAudi navigation
Applies to: vehicles with myAudi navigation
MMI navigation works seamlessly with the myAudi
app.
Your destinations (favorites, last destinations)
are synchronized through your myAudi account.
All important destinations can be displayed in
the vehicle and in the myAudi app.
To load destinations in
