Audi Q3: Battery in Luggage Compartment, Removing and Installing
 Note
Note
If the battery is to be replaced, connect the battery charger for battery support mode. Refer to → Electrical Equipment General Information; Rep. Gr.27; Battery, Charging.
Removing
- Turn off the ignition.
- Vehicles with ignition lock: Remove the key.
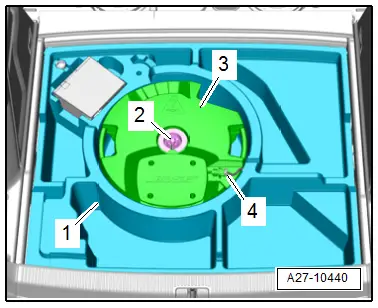
- Remove the luggage compartment floor panel cover.
- On vehicles with a subwoofer disconnect the connector -4-, remove the bolt -2- and remove the subwoofer -3-.
- Remove the molded insert -1-.
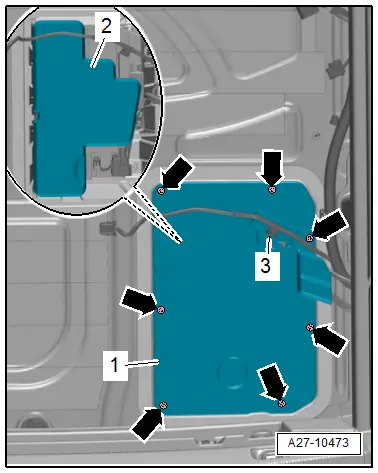
- Remove the bolts -arrows-.
- If equipped, free up the wiring harness -3-.
- Remove the battery cover -1-.
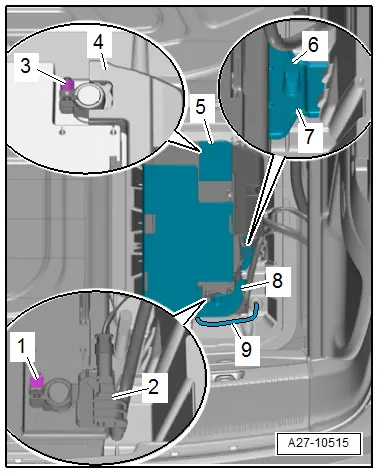
- Remove the heat shield -2- from the battery.
- Remove the cover -8- over the battery negative terminal.
- Loosen the nut -1- several turns and remove the battery ground cable terminal -2- from the battery negative terminal.
- Remove the cover -5- over the battery positive terminal.
- Loosen the nut -3- a few turns and disconnect the battery positive cable terminal -4- and the main fuse panel from the battery pole.
- Remove the bolt -6- on the battery bracket -7-.
- Disconnect the central gas vent hose -9-.
- Remove the battery from the battery tray and remove it from the luggage compartment.
 WARNING
Pollution risk.
Battery and sulfuric acid disposal regulations must be followed when disposing of batteries. Refer to → Electrical Equipment General Information; Rep. Gr.27; Battery.
Installing
 Note
Note
- Only maintenance-free batteries conforming to standards "TL82506" (from 12/1997) and "VW75073" (from 08/2001) may be installed.
- Batteries from the Audi Parts Program have a bottom strip-adapter for adapting to different grip channels. For information on how to use the base strip adapter, if applicable, see the battery operating instructions.
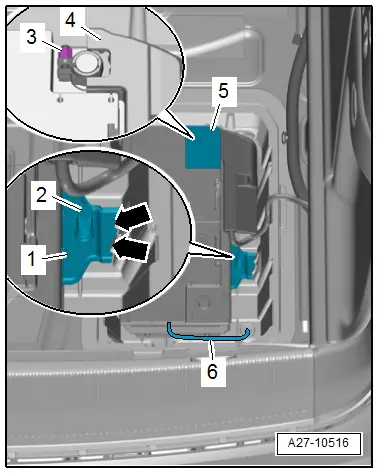
- Install the battery in the battery tray -1- so that the battery clamping strip fits into the strip -arrow- in the battery tray.
- It should no longer be possible to move the battery.
- Install the battery bracket -1-.
- The mounts -arrows- on the battery mounting bracket must fit into the openings on the battery tray.
- Tighten the bolt -2- on the battery bracket.
- Attach the hose -6- for the central venting system.
- Turn off the ignition and all electrical consumers, and connect the battery in the following sequence:
- First connect the battery positive cable terminal -4- to the battery positive pole "+" by hand and tighten the nut -3-.

- Close the cover -5- over the battery positive terminal.
 Note
Note
If the connector -2- on the Battery Monitoring Control Module -J367--3- comes loosen when connecting the battery, wait 30 seconds before connecting it again.
- Connect the battery ground cable terminal to the battery negative pole "-" by hand and tighten the nut -1-.
- Make sure the battery is secure after installation.
- Close the cover over the battery negative terminal.
- If the battery was replaced, then the new battery must be adapted using the Vehicle Diagnostic Tester.
Procedure
Vehicle Diagnostic Tester is attached.
- Choose operation mode Diagnosis and start the diagnosis.
- Select the tab test plan.
- Select select individual tests and choose the following sequence.
- Body
- Electrical Equipment
- 27 - Starter, voltage supply
- Electrical Components
- A - Adapt battery after replacing
The Vehicle Diagnostic Tester continues from here onward.
When the battery is connected, the following steps must be performed:
- Activate the one-touch up/one-touch down power window regulators. Refer to the Owner's Manual.
- Check DTC memories of all control modules and erase "Undervoltage" DTC if necessary. Refer to Vehicle Diagnostic Tester.
 Note
Note
After connecting the power supply, the ABS warning lamp may only go out after the vehicle has been driven a few yards.
READ NEXT:
 Battery Tray, Removing and Installing
Battery Tray, Removing and Installing, Version 1
Removing
- Remove the air filter housing. Refer to
→ Rep. Gr.23; Air Filter; Air Filter Housing, Removing and
Installing or
â†
Battery, Charging
Preparing for Charging, Engine Compartment Battery
Procedure
WARNING
Risk of explosion on discharged battery with "Visual
indicator".
If the "Visual indicator" has no color or is light
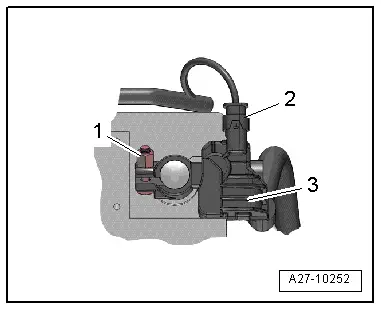
Battery Jump Start Terminal
Overview - Battery Jump Start Terminal
1 - Bolt
6 Nm
2 - Battery Jump Start Terminal -U6-
With positive terminal grip
Removing and installing. Refer to
→ CSEE MORE:
Settings
Wi-Fi
Applies to: vehicles with Wi-Fi hotspot
Depending on the country and the vehicle equipment,
the following functions may be available:
Wi-Fi
When the function is switched on, the MMI's Wi-Fi hotspot is active and Wi-Fi
devices can be connected
to the hotspot.
Wi-Fi hotspot settings
The Wi-Fi c
Wheel Housing Liner
Overview - Front Wheel Housing Liner
1 - Front Wheel Spoiler
Removing and installing. Refer to
→ Chapter "Front Wheel Spoiler, Removing and Installing".
2 - Bolt
2.5 Nm
3 - Metal Nut
4 - Spring Nut
For the quick release
Quantit