Audi Q3: Door, Removing and Installing
Removing
- Disconnect the door connector from the B-pillar. Refer to → Electrical Equipment; Rep. Gr.97; Connectors.
 Note
Note
Secure the B-pillar in the area of the door arrester using adhesive tape, so that the paint will not be damaged.
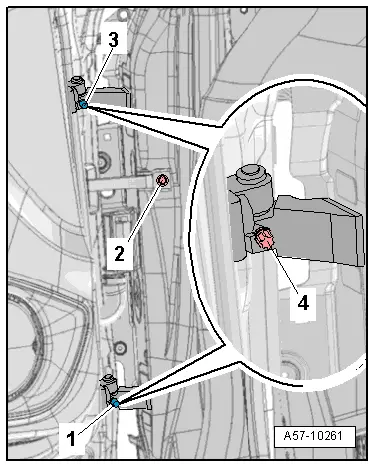
- Remove the door arrester bolt -2-.
- Remove the cover caps -1- and -3- from the stud bolts.
- Remove the stud bolts -4- on the upper and lower door hinge.
 Caution
There is a risk of damaging the paint.
Protect the painted surfaces on the door or on the side panel from damage.
- Carefully remove the door upward out of the door hinges.
Installing
- Gap dimensions.
Install in reverse order of removal. Note the following:
 Note
Note
Do not make any adjustments after installing the door.
Door Arrester, Removing and Installing
Removing
 Note
Note
Secure the B-pillar in the area of the door arrester using adhesive tape, so that the paint will not be damaged.
- Move the door window into the "closed" position.
- Remove the door trim panel. Refer to → Body Interior; Rep. Gr.70; Rear Door Trim Panels; Rear Door Trim Panel, Removing and Installing.
- Remove the lower speaker. Refer to → Communication; Rep. Gr.91; Component Location Overview - Sound System.
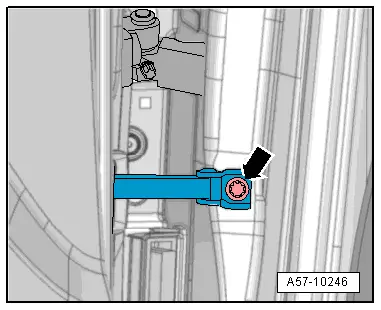
- Remove the door arrester bolt -arrow-.
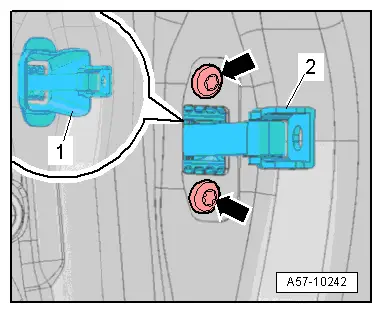
- If equipped, remove the door arrester cover -1- from the door opening.
- Remove the bolt -arrows- and remove the door arrester -2- inward.
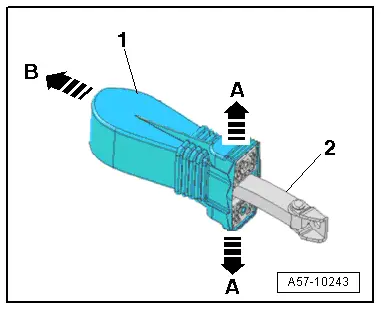
- Pull the rubber grommet -1- on the door arrester to the side slightly -A arrows-.
- Remove the rubber grommet from the door arrester -2--arrow B-.
Installing
Install in reverse order of removal. Note the following:
- Push the rubber seal on the door arrester, while doing so pay attention to the allocation of the rubber seal.
- The name badge for the left or right side must be readable at the top.
- Install the lower speaker. Refer to → Communication; Rep. Gr.91; Component Location Overview - Sound System.
- Install the door trim panel. Refer to → Body Interior; Rep. Gr.70; Rear Door Trim Panels; Rear Door Trim Panel, Removing and Installing.
READ NEXT:
 Door, Adjusting
Special tools and workshop equipment
required
Gauge - Gap Adjustment -3371-
Door Adjustment Template -T40038 /16-
Check the Height Adjustment using the Door Adjustment
Template -T40038 /1
Inner Door Seal, Removing and Installing
Removing
- Remove the rear sill panel strip. Refer to
→ Body Interior; Rep. Gr.70; Passenger Compartment Trim; Sill
Panel Strip, Removing and Installing.
- Remove the u
Overview - Window Regulator
1 - Door
2 - Window Regulator
Removing and installing. Refer to
→ Chapter "Window Regulator, Removing and Installing".
3 - Nut
6 Nm
4 -&nbsSEE MORE:
Limitations
Applies to: vehicles with adaptive cruise assist
Fig. 95 Example: vehicle changing lanes and stationary vehicle
Fig. 96 Example: driving into a curve
In some situations, the adaptive cruise assist
function is limited and you must assume control
of the vehicle when necessary, for example by applyin
Side Windows
Overview - Rear Side Window
1 - Side Window
Pull or unclip the roof trim molding in the area of the side window
from the clip.
Window glass removing and installing. Refer to
→ Chapter "Rear Side Window, Removing and Installing".
When installing a new window, first pre