Audi Q3: Driver Assistance Systems Front Camera
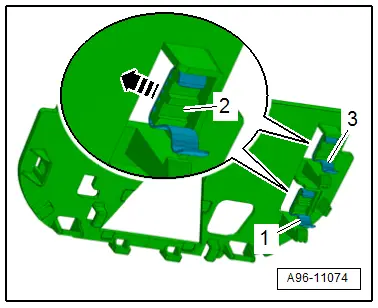
Driver Assistance Systems Front Camera Component Location Overview
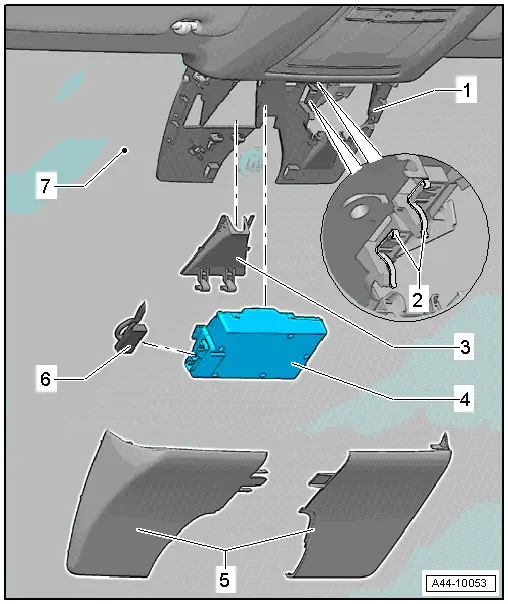
1 - Retaining Plate
- There are different versions. Refer to the Parts Catalog.
- With heated windshield
- Cannot be separated from the windshield
2 - Retaining Clips
- Replace after every removal
3 - Lens Shade
- Removing and installing. Refer to → Chapter "Driver Assistance Systems Front Camera -R242-, Removing and Installing".
4 - Driver Assistance Systems Front Camera -R242-
- Removing and installing. Refer to → Chapter "Driver Assistance Systems Front Camera -R242-, Removing and Installing".
5 - Cover
- There are different versions. Refer to the Parts Catalog.
6 - Connector
7 - Windshield
Driver Assistance Systems Front Camera -R242-, Removing and Installing
Driver Assistance Systems Front Camera -R242-, Removing and Installing, Version 1
- If replacing the control module, select the "Replace Control Module" function see Vehicle Diagnostic Tester.
Removing
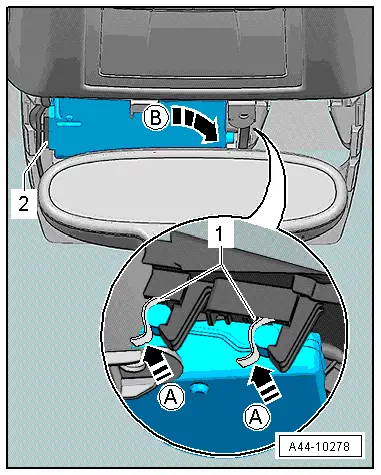
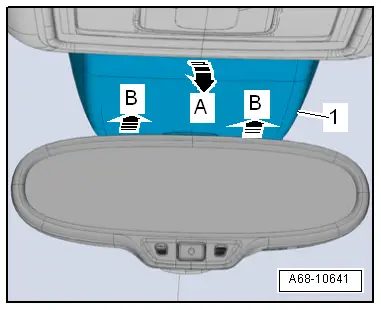
- Unclip the right cover -2- from the left cover and from the bracket in direction of -arrow A-.
- Unclip the left cover -1- from the bracket in direction of -arrow B- and remove.
- Free up the electrical wire if necessary.
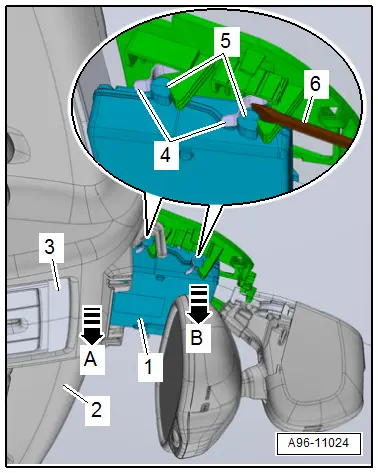
- Remove the front interior lamp/reading lamp -1- from the roof opening. Refer to → Chapter "Front Interior Lamp/Reading Lamp, Removing and Installing".
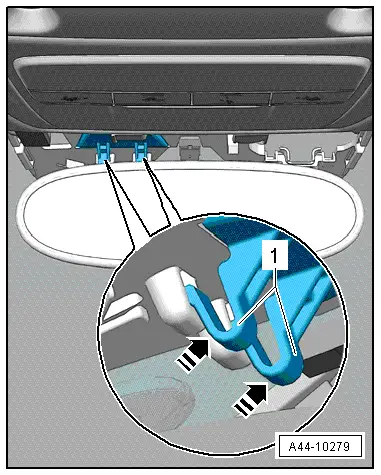
- Push the retaining tabs -1- in the direction of the vehicle interior in direction of -A arrows- and remove the Driver Assistance Systems Front Camera -R242- downward from the clips.
- Remove the Driver Assistance Systems Front Camera -R242- to the right from the retaining plate guide in the direction of -arrow B-.

- remove the connector -2- and remove the Driver Assistance Systems Front Camera -R242-.
Lens Shade, Removing
- Press the clips in direction of -arrow- and remove the lens shade downward from its bracket.
Installing
Install in the reverse order of removal. Note the following:
 Note
Note
The camera vision range on the inside of the windshield must not be fogged up or dirty.
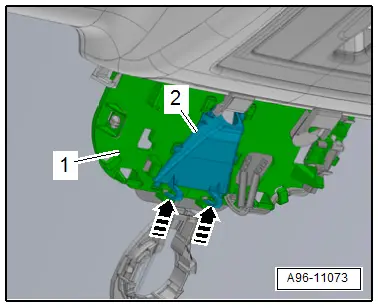
- The retaining tabs -1 and 3- must be replaced after removing the front camera, to do this remove the retaining tabs in the direction of -arrow- from the mount -2-.
- Clean the lens on the windshield with Cleaning Solution -D 009 401 04-.
- Calibrate the driver assistance systems front camera. Refer to → Suspension, Wheels, Steering; Rep. Gr.44; Driver Assistance Systems Front Camera; Driver Assistance Systems Front Camera, Calibrating.
Driver Assistance Systems Front Camera -R242-, Removing and Installing, Version 2
- If replacing the control module, select the "Replace Control Module" function see Vehicle Diagnostic Tester.
Removing
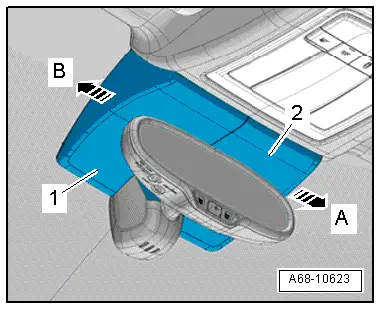
- Unclip the rear cover -1- from the headliner and pull it downward in direction of -arrow A-.
- Disengage the front cover on the front camera bracket in direction of -B arrows- and remove downward.
- Remove the sun visor center support. Refer to → Body Interior; Rep. Gr.68; Vehicle Equipment; Sun Visor Center Support, Removing and Installing.
- Reach in the front of the headliner -2- by hand and with a light tug on the headliner in direction of -arrow A- lower the interior lamp -3- to the first catch on the retaining clamp.
 Note
Note
The interior lamp/reading lamp is not removed.
- Position the screwdriver -6- on the retaining pin -5- as illustrated and slowly press the front camera -1- out of the retaining clips -4- in direction of -arrow B-.
- Remove the front camera to the right from the retaining plate guides.
- Disconnect the connector and remove the front camera.
Lens Shade, Removing
- Press the retainers in direction of -arrow- and remove the lens shade -2- downward from the retaining plate -1-.
Installing
Install in the reverse order of removal. Note the following:
 Note
Note
The camera vision range on the inside of the windshield must not be fogged up or dirty.
- The retaining tabs -1 and 3- must be replaced after removing the front camera, to do this remove the retaining tabs in the direction of -arrow- from the mount -2-.
- Clean the lense on the windshield with Cleaning Solution -D 009 401 04-.
- Calibrate the driver assistance systems front camera. Refer to → Suspension, Wheels, Steering; Rep. Gr.44; Driver Assistance Systems Front Camera; Driver Assistance Systems Front Camera, Calibrating.

READ NEXT:
 Trailer Hitch
Overview - Trailer Hitch Socket and Towing Recognition Control Module
1 - LED Indicator Lamp
Trailer Hitch -Locked- Indicator Lamp -K226-, Trailer Hitch
-Unlocked- Indicator Lamp -K
Component Location Overview - Relay Carriers, Fuse Panels and E-Boxes
Overview - E-box, Wire Junction, Fuse Panel, Suppressor
1 - Nut
9 Nm
2 - Wiring Harness
3 - Nut
4.5 Nm
4 - Suppressor -C24-
Removing and i
SEE MORE:
Switching lane guidance on and off
Applies to: vehicles with adaptive cruise assist and lane guidance
Fig. 101 Turn signal lever: button for lane guidance and
lane departure warning
Within the limits of the system, lane guidance
provides corrective steering to assist the driver
with keeping the vehicle in the center of the lane
as m
Connector Assignments, Cell Phone Preparation Concert MOST, 9ZF
Information Electronics Control Module 1 -J794-
1 - Connector AM/FM1 from the Antenna Amplifier -R24- (Radio
Antenna 2 -R93-)
2 - DAB connection from Antenna Amplifier 4 -R113-, Digital
Radio Antenna -R183-
3 - Not installed
4 - Black connection block
