Audi Q3: Fender
Overview - Fender
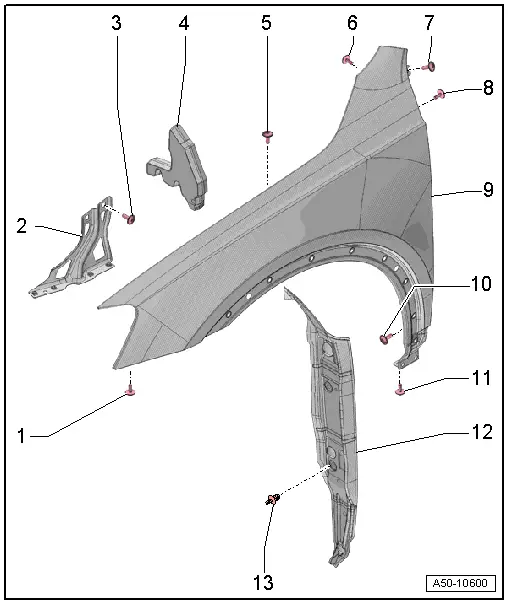
1 - Bolt
- 8 Nm
- Quantity: 2
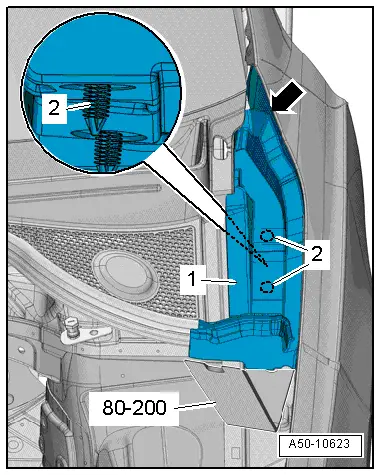
2 - Lower bracket
- For the fender
- Removing and installing. Refer to → Chapter "Fender, Removing and Installing".
3 - Bolt
- 8 Nm
- Quantity: 2
4 - Seal
- Inside on the fender
5 - Bolt
- 8 Nm
- Quantity: 3
6 - Bolt
- 6.4 Nm
7 - Bolt
- 8 Nm
8 - Bolt
- 8 Nm
9 - Fender
- Removing and installing. Refer to → Chapter "Fender, Removing and Installing".
10 - Bolt
- 8 Nm
- Quantity: 2
11 - Bolt
- 8 Nm
- Quantity: 2
12 - End Plate
- Removing and installing. Refer to → Chapter "End Panel, Removing and Installing".
13 - Expanding Rivet
- Quantity: 2
Fender, Removing and Installing
Fender, Removing and Installing
Removing
- Remove the drip rail and drill out the rivet head from the fender. Refer to → Chapter "Drip Rail, Removing and Installing".
- Remove the end plate. Refer to → Chapter "End Panel, Removing and Installing".
- Remove the bumper cover lower mount. Refer to → Chapter "Bumper Cover Lower Mount, Removing and Installing".
- Remove the bolts -1 to 5-.
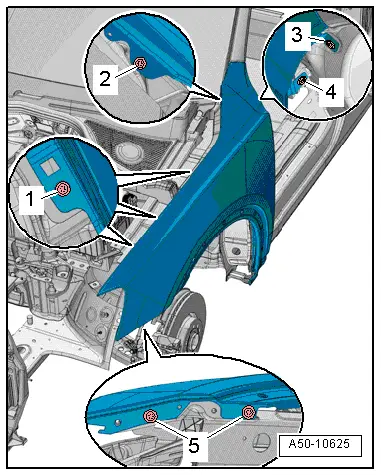
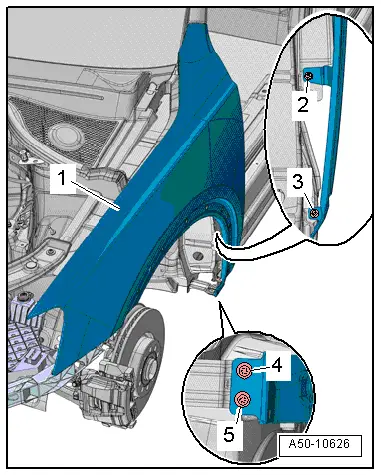
- Remove the bolts -2 to 5-.
- Remove the fender -1-.
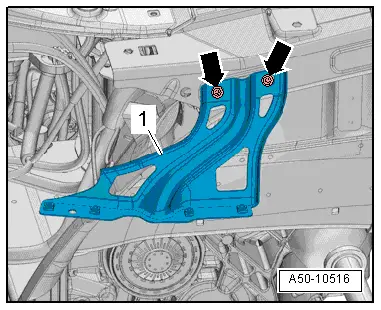
- To remove the lower bracket -1- remove the bolts -arrows-.
Installing
Install in reverse order of removal. Note the following:
- Insert the seal -2- in the fender near the center bolt -1- as illustrated.
- Install the front bumper cover mount. Refer to → Chapter "Bumper Cover Lower Mount, Removing and Installing".
- Install the end plate. Refer to → Chapter "End Panel, Removing and Installing".

Sealing Piece, Removing and Installing
Special tools and workshop equipment required
- Pry Lever -80 - 200-
- Safety Gloves
Removing
- Carefully remove the retainers -2- from the foam piece -1- using the Pry Lever -80 - 200- from the body.
- Remove the foam piece forward, while doing this the foam piece must be guided out the fender cut-out -arrow-.
Installing
Install in reverse order of removal. Note the following:
 Note
Note
If the catches are damaged, the foam piece must be replaced.
End Panel, Removing and Installing
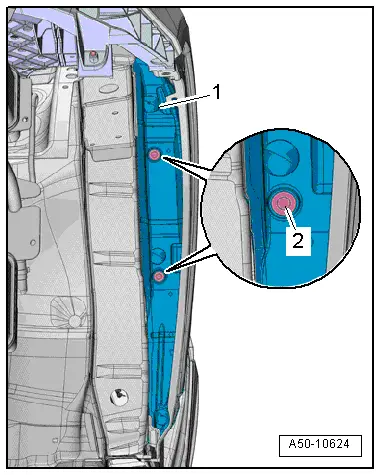
Removing
- Remove the sealing piece. Refer to → Chapter "Sealing Piece, Removing and Installing".
- Remove the front wheel housing liner. Refer to → Chapter "Front Wheel Housing Liner, Removing and Installing".
- Remove expanding rivets -2-.
- Remove the end plate -1- downward.
Installing
Install in reverse order of removal. Note the following:
- Install the front wheel housing liner. Refer to → Chapter "Front Wheel Housing Liner, Removing and Installing".
- Install the sealing piece. Refer to → Chapter "Sealing Piece, Removing and Installing".
READ NEXT:
 Bulkhead
Overview - Bulkhead
1 - Gasket for Plenum Chamber
To remove, pull forward off the body flange.
Mount the seal on the foam piece -arrows-
and then push it onto the flange on the bo
Overview - Hood
Overview - Hood
1 - Hood
A second technician is needed to support and hold the hood during
removal and installation.
Removing:
Unclip and remove the cover -4-.
Engage th
SEE MORE:
Visual Inspection
WARNING
Risk of injury. Follow all warning messages and
safety precautions. Refer to
→ Chapter "Warnings and Safety Precautions".
Before any extensive measurements are taken, visually
inspect the exterior of the battery, the connections, and the
secure installation of the
Component Location Overview - Passenger Compartment Trim
1 - Cover
Overview. Refer to
→ Chapter "Overview - C-Pillar Trim Panel".
2 - Rear Sill Panel Strip
Overview. Refer to
→ Chapter "Overview - Rear Sill Panel Strip".
3 - Lower B-Pillar Trim Panel
Overview. Refer to
→ Chapter
