Audi Q3: Front Bumper Cover, Removing and Installing
Bumper Cover, Removing and Installing
Removing
- Remove the front wheel spoiler. Refer to → Chapter "Front Wheel Spoiler, Removing and Installing".
- Remove the front wheel housing liner. Refer to → Chapter "Front Wheel Housing Liner, Removing and Installing".
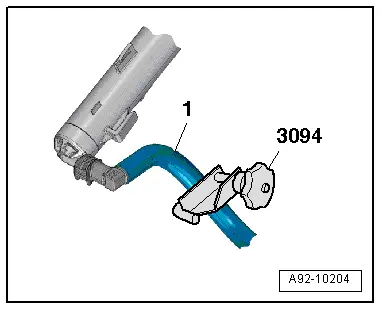
- Clamp off the washer fluid hose -1- with the Hose Clamps - Up To 25mm -3094-.
 Note
Note
Place a cloth underneath to soak up any escaping water.
- Vehicles through MY 2014: Press the release button and remove the washer fluid hose from the spray nozzle.
- Vehicles from MY 2015: Press the release button and remove the washer fluid hose from the headlamp washer system pump and free up the washer fluid hose.
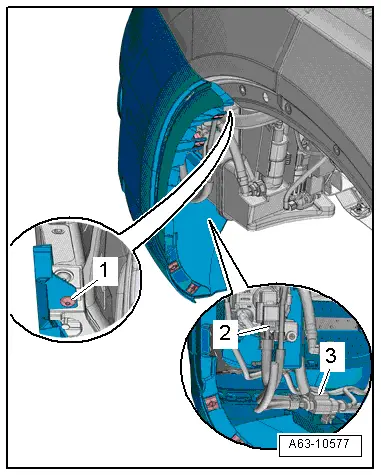
- Loosen the front wheel cover tab on the bumper cover from the inside. Refer to → Chapter "Front Wheel Cover, Removing and Installing".
- Remove the bolt -1-.
- If installed, disconnect the connector -2- from the fog lamp.
- Disconnect the central connector -3-.
- Remove the lock carrier cover. Refer to → Chapter "Lock Carrier Cover, Removing and Installing, Vehicles through MY 2014".
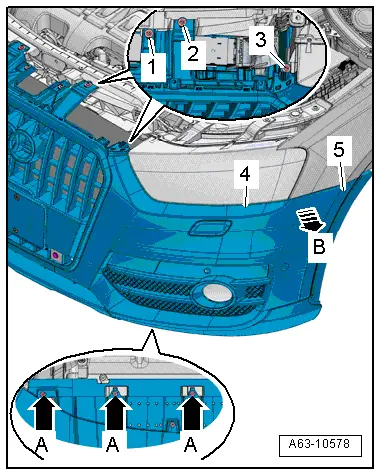
- Remove the screws -1, 2 and 3- and -A arrows-.
- Disengage the side piece -5- from the side panel -arrow B- and remove the bumper cover -4- with a second technician.
Installing
Install in reverse order of removal.
Front Bumper Cover, Adjusting
Procedure
- Remove the lock carrier cover. Refer to → Chapter "Attachments, Removing and Installing".
Longitudinal setting:
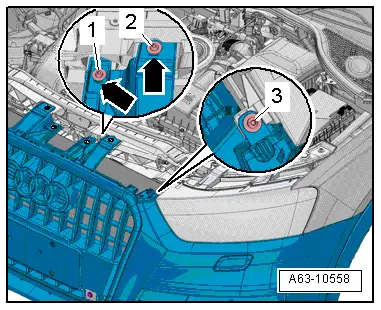
- Loosen bolts -1, 2, 3-.
- Adjust the front connector lengthwise to the markings -arrows-.
- Tighten the bolts.
- Check the gap dimension for evenness, and if necessary repeat.
Impact Member, Removing and Installing
Removing
- Remove the front bumper cover. Refer to → Chapter "Bumper Cover, Removing and Installing".
- Disconnect the connector from the horn and free it up.
- If equipped, remove the bolt -2- from the charge air cooler -1-.
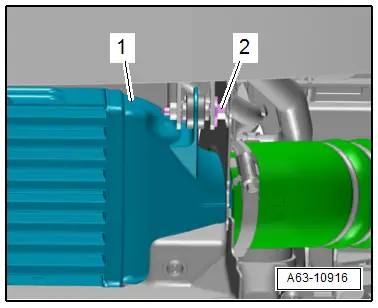
- Pull out locking washer -3-.
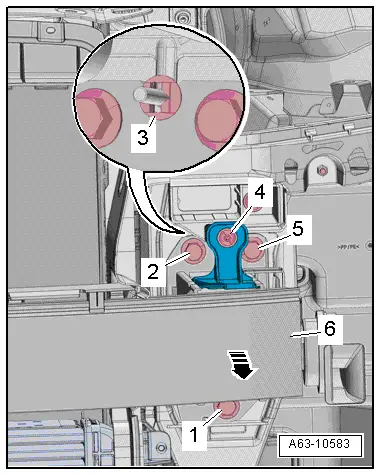
- Remove the bolts -1, 2, 4 and 5-.
- Tilt the upper impact member -6- forward -arrow- and remove from the lock carrier.
- If the impact member is replaced:
- Remove the horn bracket. Refer to → Electrical Equipment; Rep. Gr.90; Overview- Horn.
- Remove the lower mount bracket. Refer to → Chapter "Bumper Cover Mount Bracket, Removing and Installing".
- Remove the impact member cover.
Installing
Install in reverse order of removal. Note the following:
- Install the charge air cooler. Refer to → Rep. Gr.21; Overview - Charge Air System.
- Install the front bumper cover. Refer to → Chapter "Bumper Cover, Removing and Installing".
READ NEXT:
 Lock Carrier Cover, Removing and Installing, Vehicles through MY 2014
Removing
- To remove the expanding clips -arrows-,
push the clamping pin -1- carefully
to dimension -x- until it clicks
into the expanding clip -arrow A-.
Dimension -x- = 5 mm
-&nbs
Center Grille. Removing and Installing, Audi Q3 Offroad
Removing
- Remove the noise insulation. Refer to
→ Chapter "Overview - Noise Insulation".
- Remove the front bumper cover end plate. Refer to
→ Chapter "Front Bumper Cover
Bumper Cover Lower Section, Removing and Installing, Audi Q3
Removing
- Remove the front bumper cover. Refer to
→ Chapter "Bumper Cover, Removing and Installing".
- Remove the front bumper cover end plate. Refer to
→ Chapter "Front
SEE MORE:
Technical data
Identification data
Vehicle data label
Fig. 176 Vehicle identification label
The vehicle identification label
fig. 176 is located
in the luggage compartment under the cargo
floor cover.
The sticker contains the following vehicle data:
Vehicle Identification Number (VIN)
Vehicle type, displace
Door Handle, Removing and Installing
Housing, Removing and Installing
Removing
- Remove the sealing plugs.
- Remove the clamping screw -3-
until it stops using a screwdriver -4-.
- Press the housing retaining bracket
-2- inward.
- Remove the housing -1- from the
bracket -arrow B-.
Installing
Install i
