Audi Q3: Front Midrange Speaker, Removing and Installing
Mid Bass Speaker/Front Bass Speaker, Removing and Installing
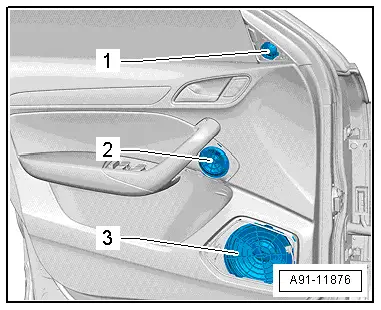
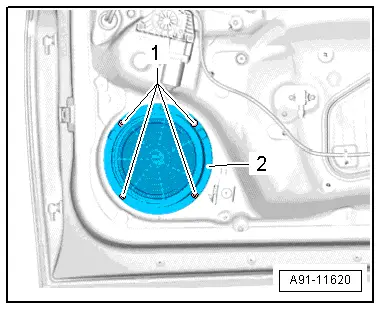
The Left Front Mid-Bass Speaker -R101-/Right Front Mid-Bass Speaker - R102-/Left Front Bass Speaker -R21-/Right Front Bass Speaker -R23--3- are located at the bottom of the front doors.
Removing and installing is identical.
Removing
- Turn off the ignition and all electrical equipment and remove the ignition key.
- Remove the front door trim panel. Refer to → Body Interior; Rep. Gr.70; Front Door Trim Panels; Front Door Trim Panel, Removing and Installing.
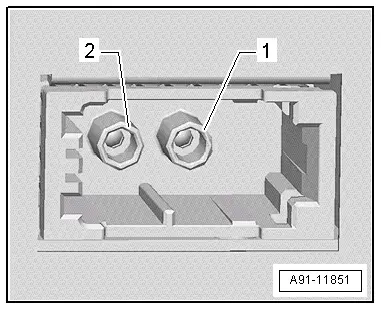
- Release and disconnect the connector from the Left Front Bass Speaker -R21--2-.
- Remove the screws -1- from the Left Front Bass Speaker -R21--2-.
- Remove the Left Front Bass Speaker -R21--2-.
Installing
- Install in reverse order of removal.
Front Midrange Speaker, Removing and Installing
The Left Front Midrange Speaker -R103-/Right Front Midrange Speaker -R104--2- are located in the center of the front doors.
Removing and installing is identical.
Removing
- Turn off the ignition and all electrical equipment and remove the ignition key.
- Remove the front door trim panel. Refer to → Body Interior; Rep. Gr.70; Front Door Trim Panels; Front Door Trim Panel, Removing and Installing.

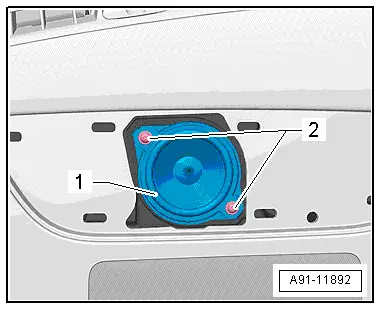
- Release and disconnect the connector from the Left Front Midrange Speaker -R103--1-.
- Remove the screws -2- from the Left Front Midrange Speaker -R103--1-.
- Remove the Left Front Mid-Range Speaker -R103--1-.
Installing
- Install in reverse order of removal.
Rear Mid-Bass Speaker, Removing and Installing
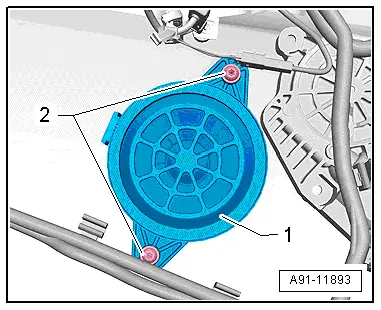
The Left Rear Mid-Bass Speaker -R159-/Right Rear Mid-Bass Speaker -R160--2- are located at the bottom of the rear doors.
Removing and installing is identical.
Removing
- Turn off the ignition and all electrical equipment and remove the ignition key.
- Remove the rear door trim panel. Refer to → Body Interior; Rep. Gr.70; Rear Door Trim Panels; Rear Door Trim Panel, Removing and Installing.
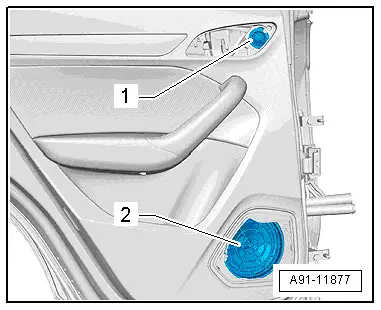
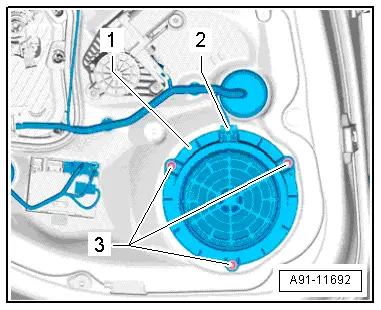
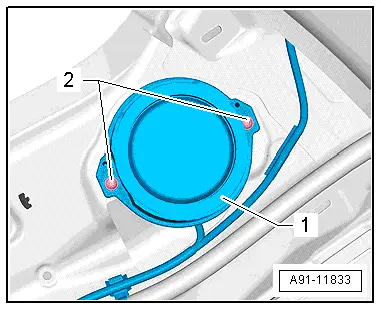
- Release and disconnect the connector -2- from the Left Rear Mid-Bass Speaker -R159--1-.
- Remove the bolts -3- and the Left Rear Mid-Bass Speaker -R159--1-.
Installing
- Install in reverse order of removal.
Subwoofer -R211-, Removing and Installing
The Subwoofer -R211- is located in the spare wheel well.
Removing
- Turn off the ignition and all electrical equipment and remove the ignition key.
- Remove the luggage compartment floor covering.
- Release and disconnect the connector -3- from the Subwoofer -R211--1-.
- Remove the bolt -2- from the Subwoofer -R211--1-.
- Remove the Subwoofer -R211--1- upward out of the spare wheel well.
Installing
- Install in reverse order of removal.

Effects Speaker, Removing and Installing
The Left Rear Speaker -R4-/Right Rear Speaker -R5- is located behind the D-pillar trim panel.
Removing and installing is identical.
Removing
- Turn off the ignition and all electrical equipment and remove the ignition key.
- Remove the D-pillar trim panel. Refer to → Body Interior; Rep. Gr.70; Passenger Compartment Trim Panel; D-Pillar Trim, Removing and Installing.
- Disengage and remove the connector from the Left Rear Speaker -R4-.
- Remove the bolts -2- from the Left Rear Speaker -R4--1-.
- Remove the Left Rear Speaker -R4--1- from the D-pillar.
Installing
- Install in reverse order of removal.
Center Speaker, Removing and Installing
The Center Speaker -R208- is located in the center front of the instrument panel.
Removing
- Turn off the ignition and all electrical equipment and remove the ignition key.
- Remove the center speaker trim. Refer to → Body Interior; Rep. Gr.70; Instrument Panel; Speaker Trim, Removing and Installing.
- Remove the screws -2- from the Center Speaker -R208--1-.
- Release and disconnect the connector from the Center Speaker -R208--1-.
- Remove the Center Speaker -R208--1- from the instrument panel.
Installing
- Install in reverse order of removal.
Connector Assignments
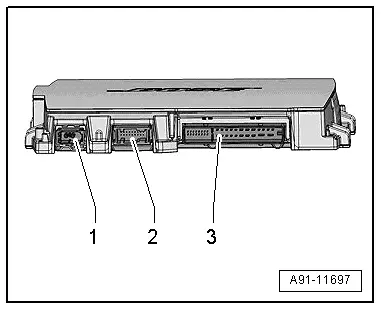
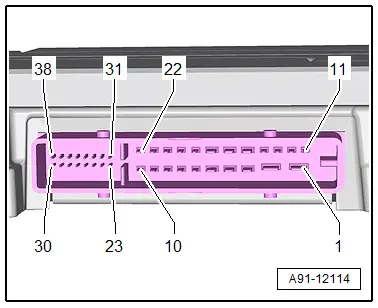
Digital Sound System Control Module -J525-
1 - MOST Bus
2 - not installed
3 - 38-Pin Connector -T38-
1 - MOST bus
1 - Output
2 - Input
3 - 38-Pin Connector -T38-
1 - Terminal 30
2 - Terminal 31
3 - Right Front Bass Speaker -R23- (+)
4 - Left Front Bass Speaker -R21- (+)
5 - Subwoofer -R211- (-)
6 - Not Assigned
7 - Left Rear Speaker (-)
8 - Right Rear Speaker (+)
9 - Not Assigned
10 - Center Speaker -R208- (+)
11 - Not Assigned
12 - Not Assigned
13 - Not Assigned
14 - Not Assigned
15 - Right Front Bass Speaker -R23- (-)
16 - Left Front Bass Speaker -R21- (+)
17 - Subwoofer -R211- (+)
18 - Not Assigned
19 - Left Rear Speaker (+)
20 - Right Rear Speaker (-)
21 - Not Assigned
22 - Center Speaker -R208- (-)
23 - Not Assigned
24 - Not Assigned
25 - Ring-break Diagnostic Cable
26 - Not Assigned
27 - Not Assigned
28 - Ground shielding from Microphone Unit In Front Roof Module -R164-, Interior Microphone -R74-
29 - Microphone Unit in Front Roof Module -R164-, Interior Microphone -R74- (-)
30 - Microphone Unit in Front Roof Module -R164-, Interior Microphone -R74- (+)
31 - Left Front Speaker (+)
32 - Left Front Speaker (+)
33 - Right Front Speaker (-)
34 - Right Front Speaker (-)
35 - Right Rear Speaker -R5- (+)
36 - Right Rear Speaker -R5- (-)
37 - Left Rear Speaker -R4- (+)
38 - Left Rear Speaker -R4- (-)
READ NEXT:
 Overview - Antenna Systems
The antenna system consists of the Roof Antenna -R216- and
the window antenna.
Roof Antenna -R216-
GPS Antenna -R50-, only on 7T2, 7T6 and 7Q4
Telephone Antenna -R65-, only on 9ZF and 9ZW
S
Antenna Amplifier, Removing and Installing
Antenna Amplifier -R24-, Removing and Installing
The Antenna Amplifier -R24- is located on the upper left of
the rear lid.
Removing
- Turn off the ignition and all electrical equipment and
SEE MORE:
Suspension Strut and Upper Control Arm
Overview - Suspension Strut and Upper Control Arm
1 - Shock Absorber
On vehicles with electronically controlled damping, perform the
function "Adapt the control position" with the Vehicle Diagnostic
Tester.
If the control position was reprogrammed and if the vehicle has lane
Settings
Applies to: vehicles with navigation system
You can adjust the navigation system settings in
the instrument cluster and in the MMI display separately. The settings depend on
the country
and vehicle equipment.
Accessing settings
Applies to: MMI: Select on the home screen:
NAVIGATION > .
Acces
