Audi Q3: Front Parking Aid Sensor, Removing and Installing
Front Parking Aid Sensors, Removing and Installing, through MY 2014
Right/Left Front Parking Aid Sensor -G252-/-G255-
Special tools and workshop equipment required
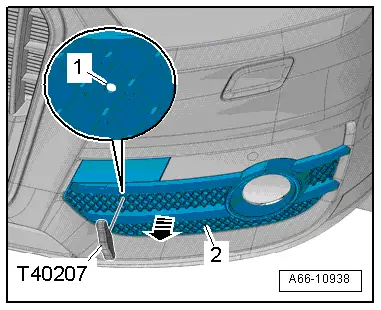
- Hook Tool -T40207-
Removing
- Insert the Hook Tool -T40207- in the opening -1- and remove the lower air intake grille -2- from the bumper cover in direction of -arrow-.
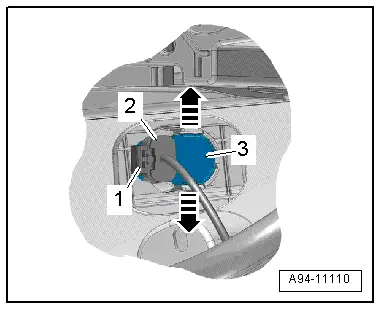
- Reach through the opening in the bumper cover and expand both tabs in direction of -arrows- while pushing the sensor -3- from the outside toward the inside at the same time.
 Note
Note
When the sensor cannot be removed as described, the fog lamp must be removed additionally. Refer to → Chapter "Fog Lamp, Removing and Installing".
- Disconnect the connector -2- by sliding the retainer -1- back and pressing the release down.
Right/Left Front Center Parking Aid Sensor -G253-/-G254-:
License Plate Sensor:
- Remove the lock carrier cover. Refer to → Body Exterior; Rep. Gr.63; Front Bumper; Attachment, Removing and Installing.
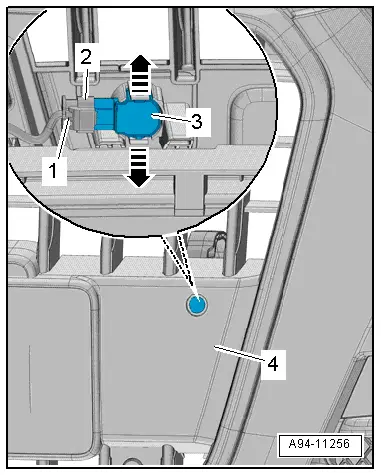
- Reach through the opening between the lock carrier and bumper cover and expand both tabs in direction of -arrows- while at the same time removing the sensor -3- from the outside toward the inside out of the mounting -4-.
- Disconnect the connector -2- by sliding the retainer -1- back and pressing the release down.
Radiator Grille Sensor:
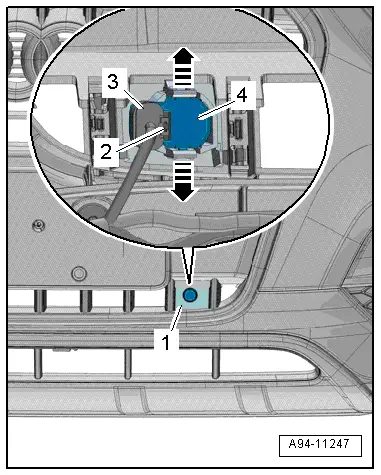
- Reach through the openings in the radiator grille and expand both tabs in direction of -arrows- while at the same time removing the sensor -4- from the outside toward the inside out of the mounting -1-.
- Disconnect the connector -3- by sliding the retainer -2- back and pressing the release down.
Installing
Install in reverse order of removal.
Front Parking Aid Sensor, Removing and Installing, from MY 2015
Removing
Right/Left Front Parking Aid Sensor -G252-/-G255-
- Remove the front wheel spoiler. Refer to → Body Exterior; Rep. Gr.66; Wheel Housing Liner; Front Wheel Housing Liner, Removing and Installing.
- Reach through the opening and push both tabs to the side -arrows- while pushing the sensor -3- from the outside toward the inside at the same time.
- Disconnect the connector -2- by sliding the retainer -1- back and pressing the release down.

Right/Left Front Center Parking Aid Sensor -G253-/-G254-:
- Remove the reinforcement brace. Refer to → Body Exterior; Rep. Gr.66; Radiator Grille/Front Trim; Radiator Grille, Removing and Installing.
- Disconnect the connector -2- by sliding the retainer -1- back and pressing the release down.
- Press both tabs to the side -arrows- and at the same time, press the sensor -3- from the outside toward the inside.
Installing
Install in reverse order of removal.

Rear Parking Aid Sensor, Removing and Installing
Removing
Outer Sensors:
- Reach behind the opening in the bumper cover and expand both tabs in direction of -arrows- while pushing the sensor -3- from the outside toward the inside at the same time.
- Disconnect the connector -2- by sliding the retainer -1- back and pressing the release down.
 Note
Note
If the sensor cannot be removed as described then the rear bumper cover must be removed. Refer to → Body Exterior; Rep. Gr.63; Rear Bumper, Bumper Cover, Removing and Installing.
Inner Sensor:
- For vehicles with a trailer hitch remove the cover, reach behind the bumper cover and expand both tabs in direction of -arrows- while pushing the sensor -3- from the outside toward the inside at the same time.
- Guide the sensor behind the impact member and disconnect the connector -2-, by sliding the retainer -1- back and pressing the release down.

 Note
Note
If the sensor cannot be removed as described then the rear bumper cover must be removed. Refer to → Body Exterior; Rep. Gr.63; Rear Bumper, Bumper Cover, Removing and Installing.
Installing
Install in reverse order of removal. Note the following:
Inner Sensor:
- Install the rear bumper cover. Refer to → Body Exterior; Rep. Gr.63; Rear Bumper; Bumper Cover, Removing and Installing.
If the bumper cover was removed, the Lane Change Assistance Control Module -J769-/Lane Change Assistance Control Module 2 -J770- must be calibrated again. Refer to → Chapter "Lane Change Assistance, Calibrating".

READ NEXT:
 Parallel Parking Assist
Overview - Parallel Parking Assist
1 - Parallel Parking Assistance Button -E581-
Overview. Refer to
→ Chapter "Component Location Overview - Instrument Panel Controls".
2&
Automatic Headlamp Range Control
Overview - Automatic Head Lamp Range Control
1 - Left Front Level Control System Sensor -G78-
Component location: on the left front control arm
Removing and installing. Refer to
â
SEE MORE:
Checking the engine oil level
The engine oil dipstick varies depending on the
engine type.
Fig. 148 Oil dipstick (example): checking the engine oil level
Observe the safety precautions.
Park the vehicle on a level surface.
Shut the engine off when it is warm.
Wait approximately five minutes so that the engine
oil can flow
Driver Side Airbag
Overview - Driver Side Airbag
1 - Locking Bracket
Use a T25 TORX screwdriver, approximately 100 mm long
2 - Steering Column Electronics Control Module -J527-
With Airbag Spiral Spring/Return Spring with Slip Ring -F138- and
Steering Angle Sensor -G85-
Removing a
