Audi Q3: Midrange Speaker Trim, Removing and Installing
Special tools and workshop equipment required
- Wedge Set -T10383-
Removing
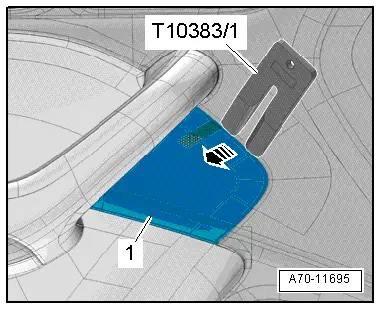
- Pry out the speaker trim -1- along the door trim seam -arrow- using the Wedge -T10383/1- and remove it.
Installing
Install in reverse order of removal.
Installation notes, for example tightening specifications, replacing components. Refer to → Chapter "Overview - Front Door Trim Panel".
Treble Speaker Trim, Removing and Installing
Special tools and workshop equipment required
- Wedge Set -T10383-
Removing
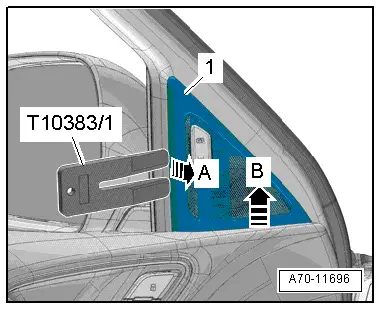
- Pry out the speaker trim -1- along the window frame trim panel seam -arrow- using the Wedge -T10383/1- and remove it.
- Pull the speaker trim from the door trim panel -arrow B- and remove.
Installing
Install in reverse order of removal.
Installation notes, for example tightening specifications, replacing components. Refer to → Chapter "Overview - Front Door Trim Panel".
Bass Speaker Trim, Removing and Installing
Special tools and workshop equipment required
- Wedge Set -T10383-
Removing
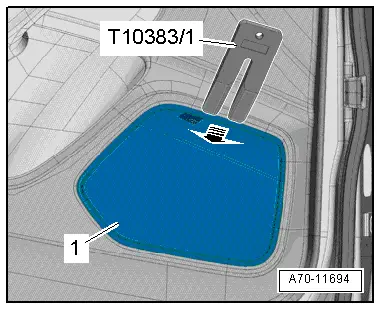
- Pry out the speaker trim -1- along the door trim seam -arrow- using the Wedge -T10383/1- and remove it.
- Versions with a Driver/Front Passenger Door Ambient Lighting Bulb -L164-/-L165-: disconnect the connector.
Installing
Install in reverse order of removal.
Installation notes, for example tightening specifications, replacing components. Refer to → Chapter "Overview - Front Door Trim Panel".
Trim Molding, Removing and Installing
Special tools and workshop equipment required
- Wedge Set -T10383-
Removing
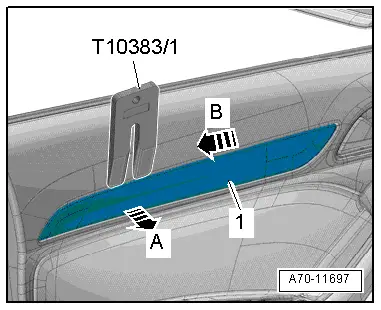
- Carefully pry the trim molding -1- out of the door trim panel along the seam using the Wedge Set -T10383/1--A arrow-.
- Slightly raise the trim molding and slide rearward -arrow B- so that the trim panel hooks on the inside can be released from the cut-out of the door trim.
Installing
Install in reverse order of removal.
Installation notes, for example tightening specifications, replacing components. Refer to → Chapter "Overview - Front Door Trim Panel".