Audi Q3: Overview - Battery
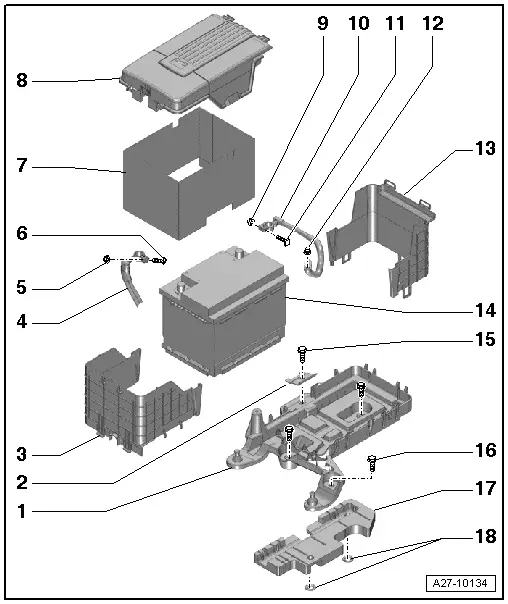
Overview - Battery, Engine Compartment Battery Version 1

1 - Battery Tray
- Removing and installing. Refer to → Chapter "Battery Tray, Removing and Installing, Version 1".
2 - Retaining Bracket
- There are different versions. Refer to the Parts Catalog.
3 - Front Battery Trim Panel
4 - Positive Cable
- Disconnecting and connecting. Refer to → Chapter "Battery in Engine Compartment, Removing and Installing, Version 1".
5 - Nut
- 5.4 Nm
6 - Bolt
7 - Heat Protection Sleeve
- There are different versions. Refer to the Parts Catalog.
8 - Battery Cover
9 - Nut
- 5.4 Nm
10 - Ground Cable
- Disconnecting and connecting. Refer to → Chapter "Battery in Engine Compartment, Disconnecting and Connecting".
Vehicles with a start/Stop System
- With Battery Monitoring Control Module -J367-
- Removing and installing. Refer to → Chapter "Ground Cable with Battery Monitoring Control Module -J367-, Removing and Installing, Engine Compartment Battery Version 1".
11 - Bolt
12 - Nut
- 20 Nm
13 - Rear Battery Trim Panel
14 - Battery
- Removing and installing. Refer to → Chapter "Battery in Engine Compartment, Removing and Installing, Version 1".
15 - Bolt
- 22 Nm
16 - Bolt
- 9 Nm
17 - Heat Shield
18 - Lock Washer
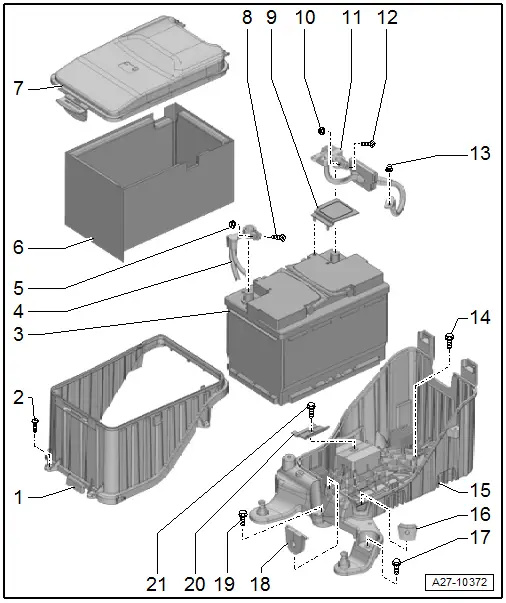
Overview - Battery, Engine Compartment Battery Version 2

1 - Front Battery Trim Panel
2 - Bolt
- 3 Nm
- Quantity: 4
3 - Battery
- Removing and installing. Refer to → Chapter "Battery in Engine Compartment, Removing and Installing, Version 2".
4 - Positive Cable
- Disconnecting and connecting. Refer to → Chapter "Battery in Engine Compartment, Removing and Installing, Version 2".
5 - Nut
- 5.4 Nm
6 - Heat Protection Sleeve
7 - Battery Cover
8 - Bolt
9 - Negative Terminal Cover
10 - Nut
- 5.4 Nm
11 - Ground Cable
- With Battery Monitoring Control Module -J367-
- Disconnecting and connecting. Refer to → Chapter "Battery in Engine Compartment, Disconnecting and Connecting".
- Removing and installing. Refer to → Chapter "Ground Cable with Battery Monitoring Control Module -J367-, Removing and Installing, Engine Compartment Battery Version 2".
12 - Bolt
13 - Nut
- 20 Nm
14 - Bolt
- 9 Nm
15 - Battery Tray
- With the rear battery trim panel
- Removing and installing. Refer to → Chapter "Battery Tray, Removing and Installing, Version 2".
16 - Grommet
- For the positive cable from the engine compartment E-box
17 - Bolt
- 9 Nm
18 - Grommet
- For the positive cable to the starter
19 - Bolt
- 9 Nm
20 - Retaining Bracket
21 - Bolt
- 20 Nm
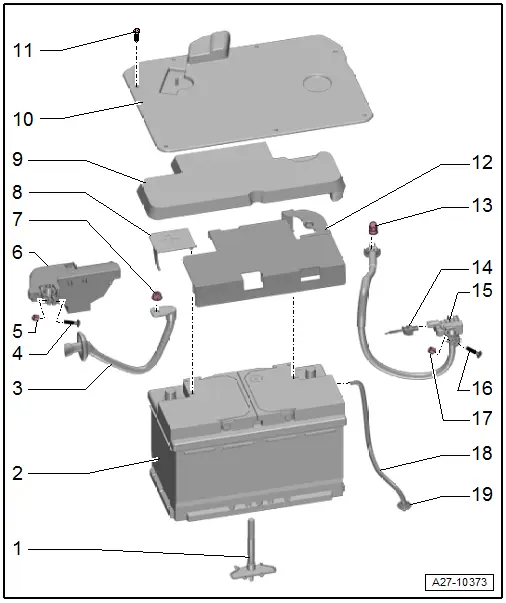
Overview - Battery, Battery in Luggage Compartment

1 - Battery Bracket
- 10 Nm
- With integrated threaded pin
2 - Battery
- Removing and installing. Refer to → Chapter "Battery in Luggage Compartment, Removing and Installing".
3 - Positive Cable
- To engine
4 - Bolt
5 - Nut
- 6 Nm
6 - Main Fuse Box
- In rear right of luggage compartment on battery
- Disconnecting and connecting. Refer to → Chapter "Battery in Luggage Compartment, Disconnecting and Connecting".
7 - Nut
- 20 Nm
8 - Positive Terminal Cover
9 - Battery Heat Shield
10 - Battery Cover
11 - Bolt
- 2 Nm
- Quantity: 7
12 - Negative Terminal Cover
13 - Nut
- 20 Nm
14 - Electrical Wire
- For the Battery Monitoring Control Module -J367-
- Follow the sequence when connecting the ground cable.
15 - Ground Cable
- With Battery Monitoring Control Module -J367-
- Disconnecting and connecting. Refer to → Chapter "Battery in Luggage Compartment, Disconnecting and Connecting".
- Removing and installing. Refer to → Chapter "Ground Cable with Battery Monitoring Control Module - J367-, Removing and Installing, Battery in the Luggage Compartment".
16 - Bolt
17 - Nut
- 6 Nm
18 - Hose for the Central Venting System
19 - Grommet
- For the hose for the central venting system

