Audi Q3: Overview - Door
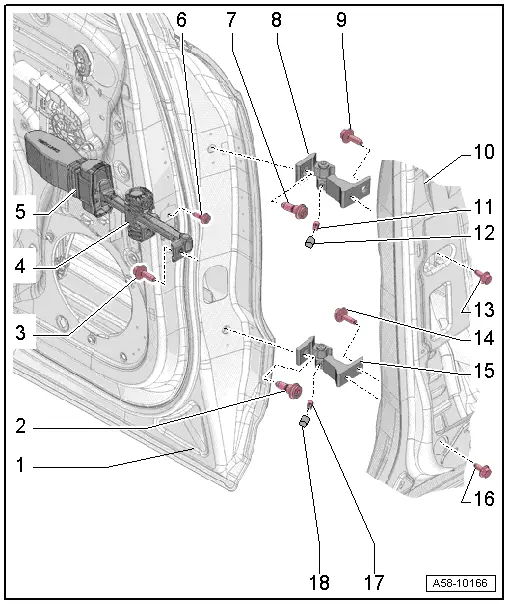
1 - Door
- Removing and installing. Refer to → Chapter "Door, Removing and Installing".
2 - Bolt
- 45 Nm
 Note
Note
- The bolt is a fitting bolt so it is generally not necessary to adjust the door using it.
- If it is necessary to make an adjustment using these bolts, the bolt can be replaced with one of the same length and strength category.
3 - Bolt
- 33 Nm
4 - Door Arrester
- Removing and installing. Refer to → Chapter "Door Arrester, Removing and Installing".
5 - Cap
- For the door arrester
- Observe installation direction
6 - Bolt
- 8 Nm
- Quantity: 2
7 - Bolt
- 45 Nm
 Note
Note
- The bolt is a fitting bolt so it is generally not necessary to adjust the door using it.
- If it is necessary to make an adjustment using these bolts, the bolt can be replaced with one of the same length and strength category.
8 - Upper Door Hinge
9 - Bolt
- 32 Nm
10 - B-Pillar
11 - Stud Bolt
- 23 Nm
12 - Cap
- Place on the stud bolt
13 - Bolt
- 32 Nm
14 - Bolt
- 32 Nm
15 - Lower Door Hinge
16 - Bolt
- 32 Nm
17 - Stud Bolt
- 23 Nm
18 - Cap
- Place on the stud bolt
Overview - Door Seals
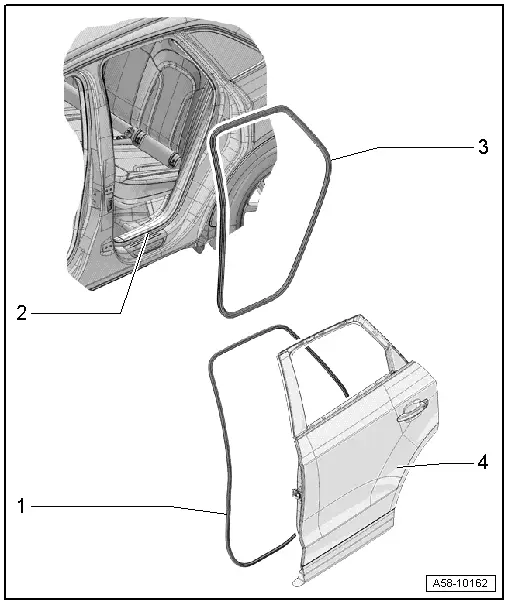
1 - Outer Door Seal
- Removing and installing. Refer to → Chapter "Outer Door Seal, Removing and Installing".
2 - Body
3 - Inner Door Seal
- Removing and installing. Refer to → Chapter "Inner Door Seal, Removing and Installing".
4 - Door
READ NEXT:
 Door, Removing and Installing
Removing
- Disconnect the door connector from the B-pillar. Refer to
→ Electrical Equipment; Rep. Gr.97; Connectors.
Note
Secure the B-pillar in the area of the door
Door, Adjusting
Special tools and workshop equipment
required
Gauge - Gap Adjustment -3371-
Door Adjustment Template -T40038 /16-
Check the Height Adjustment using the Door Adjustment
Template -T40038 /1
Inner Door Seal, Removing and Installing
Removing
- Remove the rear sill panel strip. Refer to
→ Body Interior; Rep. Gr.70; Passenger Compartment Trim; Sill
Panel Strip, Removing and Installing.
- Remove the u
SEE MORE:
Audi pre sense basic
Applies to: vehicles with Audi pre sense basic
Audi pre sense basic is automatically active at
speeds of approximately 20 mph (30 km/h) and
higher. Audi pre sense basic can trigger the Audi
pre sense preemptive safety measures during
emergency braking and dangerous braking maneuvers
as well as in un
Audi connect vehicle control services
Services
Applies to: vehicles with Audi connect vehicle control
Using Audi connect vehicle control services, you
can perform tasks such as viewing data about
your vehicle or control vehicle functions remotely.
You can view and use services available for your
vehicle at my.audi.com or through the my
© 2019-2025 Copyright www.auq3.net
