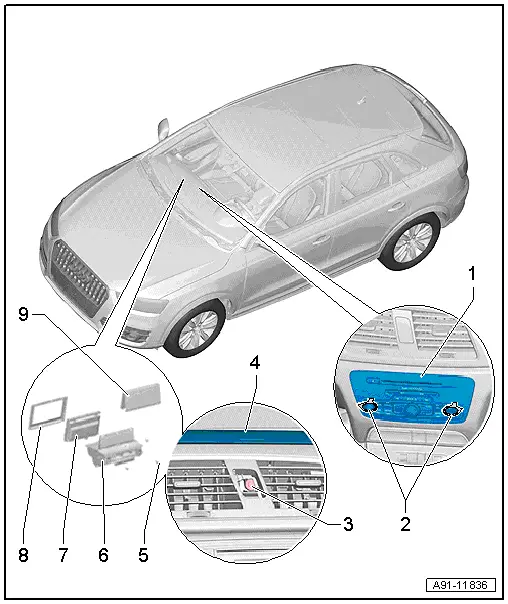
Audi Q3: Overview - Radio Components
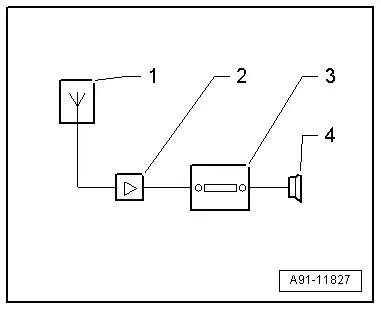
Overview - Radio, Radio Chorus, CAN, 8UA
- Radio with integrated CD player
- Sound system: basic, 8RE
Optional
- Sound system: basic plus, 8RX
- Cell Phone Preparation Preliminary Setup
The connection to other vehicle systems takes place via the Infotainment CAN bus and the Data Bus On Board Diagnostic Interface -J533-.
1 - Radio Antenna 2 -R93- inside the rear window
2 - Antenna Amplifier -R24- behind the left upper rear lid trim panel
3 - Radio -R- in the instrument panel
4 - Sound Systems
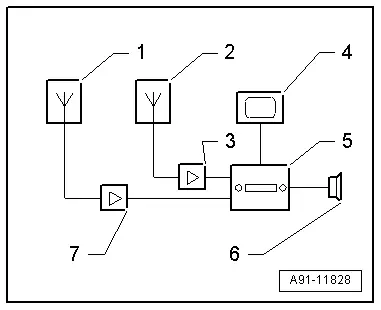
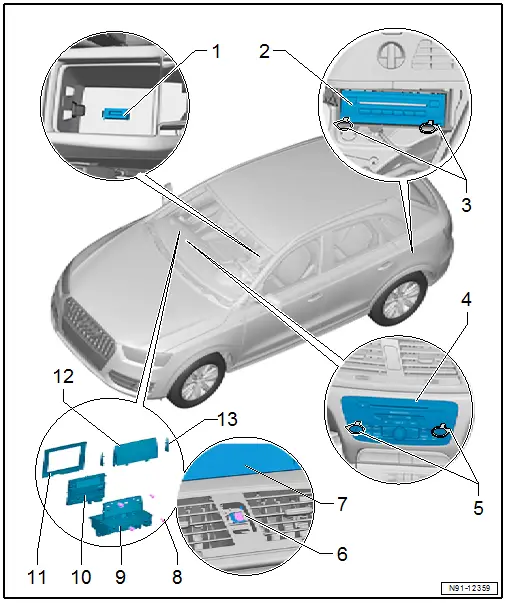
Overview - Radio, Radio Concert RMC, CAN, 8AL, 8DS
- Radio with integrated CD player
- Front Information Display Control Head -J685- in center of the instrument panel
- Sound systems: basic/basic plus/standard, 8RE/8RX/9VD
- SD Card Reader
Optional
- External Audio Source Connection -R199- (AUX IN jack) in the center console storage compartment, UF2
- Cell phone preparation preliminary setup
The connection to other vehicle systems takes place via the Infotainment CAN bus and the Data Bus On Board Diagnostic Interface -J533-.
1 - Radio Antenna 2 -R93- inside the (rear window)
2 - Antenna -R11- (rear window)
3 - Antenna Amplifier 3 -R112- behind the left rear lid trim panel at the bottom
4 - Front Information Display Control Head -J685- in center of the instrument panel
5 - Radio -R- in the instrument panel
6 - Sound systems
7 - Antenna Amplifier -R24- behind the left upper rear lid trim panel
Overview - Radio, Radio Concert RMC, MOST, 8AJ
- Information Electronics Control Module 1 -J794- with CD player/SD memory card reader integrated in the instrument panel.
- Integrated control
- Integrated Radio -R-
- Front Information Display Control Head -J685- in center of the instrument panel
- External Audio Source Connection -R199- (AUX IN jack) in the center console storage compartment, UF2
- Sound system: basic plus/Standard/BOSE 8RX/9VD/9VK
Optional
- CD Changer -R41- in the left rear of the luggage compartment, 7A2
- External Audio Source Connection -R199- (AMI) in the glove compartment, UF7
- Digital Sound System Control Module -J525- (Sound System ) in the right rear of the luggage compartment under the luggage compartment floor covering.
- Cell phone preparation, 9ZF
- Bluetooth Hands-Free Calling, 9ZX
- Multifunction Steering Wheel
- AMI online (Wi-Fi), UE2
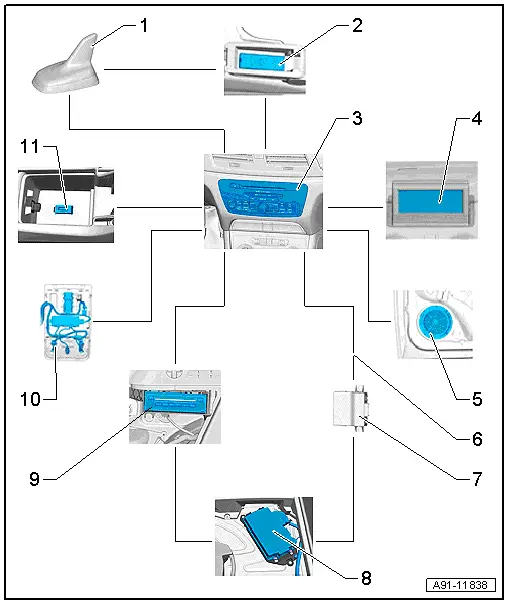
1 - Roof Antenna -R216-
2 - Telephone Baseplate -R126-
- Inside the center console storage compartment
3 - Information Electronics Control Module 1 -J794-
- Inside the instrument panel
4 - Front Information Display Control Head -J685-
- In center of the instrument panel
5 - Sound Systems
6 - MOST Bus
7 - Data Bus On Board Diagnostic Interface -J533-
- Behind the driver side left compartment
8 - Digital Sound System Control Module -J525- (Sound System BOSE)
- In the light of the luggage compartment under the luggage compartment floor covering
9 - CD Changer -R41-
- In the luggage compartment at the left behind the door
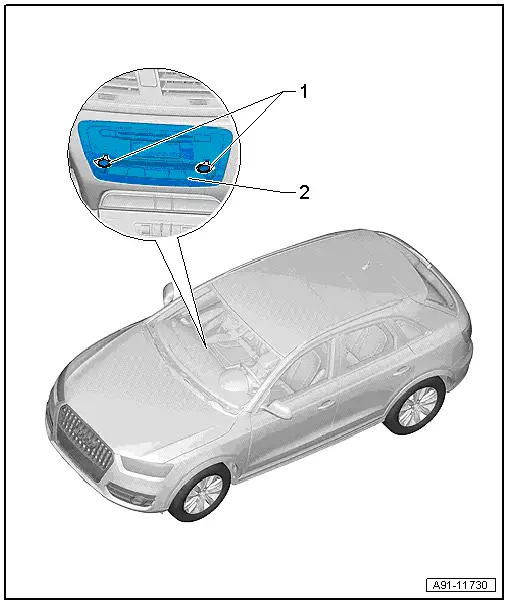
10 - Microphone Unit in Front Roof Module -R164- (Telephone Microphone -R38-)
- In the Front Interior Lamp -W1-
11 - External Audio Source Connection -R199- (AMI)
- Inside the center console storage compartment
Perform the Fault Finding with the Vehicle Diagnostic Tester.
Overview - Radio
Overview - Radio, Radio Chorus, (CAN), 8UA
1 - Radio -R-
- Chorus connector assignment. Refer to → Chapter "Connector Assignments, Radio Chorus, 8UA".
- Removing and installing. Refer to → Chapter "Radio, Removing and Installing, Radio Chorus, 8UA".
2 - Radio Removal Tool -T10057-
Overview - Radio, Radio Concert RMC, (CAN), 8AL
1 - Radio -R-
- Concert connector assignment
- Removing and installing. Refer to → Chapter "Radio, Removing and Installing, Radio Concert, 8AJ, 8DY".
2 - Radio Removal Tool -T10057-
3 - Bolt
- 3 Nm
4 - Display Support
- Removing and installing. Refer to → Chapter "Infotainment System Display, Removing and Installing".
5 - Bolt
- 2 Nm
- Quantity: 4
6 - Display Support
- Removing and installing. Refer to → Chapter "Infotainment System Display, Removing and Installing".
7 - Front Information Display Control Head -J685-
- Connector assignment. Refer to → Chapter "Front Information Display Control Head -J685-".
- Removing and installing. Refer to → Chapter "Infotainment System Display, Removing and Installing".
8 - Front Trim
- Clipped in the display
- Removing and installing. Refer to → Chapter "Infotainment System Display, Removing and Installing".
9 - Rear Trim
- Clipped to the display support
- Removing and installing. Refer to → Chapter "Infotainment System Display, Removing and Installing".
Overview - Radio, Radio Concert RMC, (MOST), 8DY
1 - External Audio Source Connection -R199-
- Connector assignment. Refer to → Chapter "Connector Assignments, AMI, MOST".
- Removing and installing. Refer to → Chapter "External Audio Source Connection -R199-, Removing and Installing, AMI".
2 - CD Changer -R41-
- Connector assignment. Refer to → Chapter "Connector Assignments".
- Removing and installing. Refer to → Chapter "CD Changer, Removing and Installing".
3 - Radio Removal Tool -T10057-
4 - Information Electronics Control Module 1 -J794-
- Connector assignment concert. Refer to → Chapter "Radio Concert, Connector Assignments, RMC, 8Al, 8AJ, 8DY".
- Removing and installing. Refer to → Chapter "Radio, Removing and Installing, Radio Concert, 8AJ, 8DY".
5 - Radio Removal Tool -T10057-
6 - Bolt
- 3 Nm
7 - Display Support
- Removing and installing. Refer to → Chapter "Infotainment System Display, Removing and Installing".
8 - Bolt
- 2 Nm
- Quantity: 4
9 - Display Support
- Removing and installing. Refer to → Chapter "Infotainment System Display, Removing and Installing".
10 - Front Information Display Control Head -J685-
- Connector assignment. Refer to → Chapter "Front Information Display Control Head -J685-".
- Removing and installing. Refer to → Chapter "Infotainment System Display, Removing and Installing".
11 - Front Trim
- Clipped in the display
- Removing and installing. Refer to → Chapter "Infotainment System Display, Removing and Installing".
12 - Rear Trim
- Clipped to the display support
- Removing and installing. Refer to → Chapter "Infotainment System Display, Removing and Installing".
13 - Side Trim
- Left and right
- Clipped to rear trim
- Removing and installing. Refer to → Chapter "Infotainment System Display, Removing and Installing".
READ NEXT:
 Radio, Removing and Installing
Radio, Removing and Installing, Radio Chorus, 8UA
The Radio -R- is located in the instrument panel.
Note
If replacing the control module, select the "Replace control
module" function for
Connector Assignments, Radio Chorus, 8UA
Radio -R-
1 - Connector AM/FM1 from the Antenna Amplifier -R24- (Radio
Antenna 2 -R93-)
2 - Connection block with four multi-pin connectors
Note
Unlist
DVD/CD Changer
CD Changer, Removing and Installing
The CD Changer -R41- is behind the left luggage compartment
trim panel.
Note
If replacing the control module, select the "Replace control
module" fu
SEE MORE:
Battery, Disconnecting and Connecting
Battery in Engine Compartment, Disconnecting and Connecting
Caution
Accident risk.
When working on pyrotechnic components (such as
airbags and belt tensioners), the battery must be
disconnected with the ignition switched on.
Disconnecting
- Turn off the ignition.
- Vehi
Front Brake Rotor, Removing and Installing
Brake Rotor, Removing and Installing, 1LJ, 1ZD Brakes
Removing
- Remove the affected brake caliper, refer to
→ Chapter "Brake Caliper, Removing and Installing, 1LJ, 1ZD
Brakes".
- Remove bolt -3- and remove the
brake rotor.
Installing
Install in reverse order of remova
