Audi Q3: Radio, Removing and Installing
Radio, Removing and Installing, Radio Chorus, 8UA
The Radio -R- is located in the instrument panel.
 Note
Note
If replacing the control module, select the "Replace control module" function for the corresponding control module on the Vehicle Diagnostic Tester.
Removing
- Move the selector lever to "S" or all the way to the rear on a manual transmission vehicle.
- Turn off the ignition and all electrical equipment and remove the ignition key.
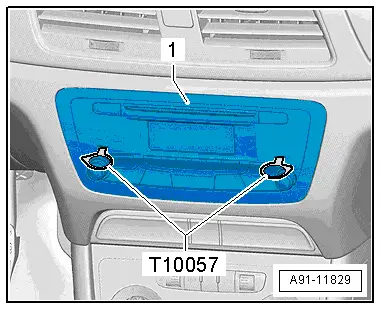
- Insert the two clips on the Radio Removal Tool -T10057- in the release slits on the Radio -R--1- until they engage. The points on the grip eyes face outward.
- Pull the Radio -R--1- out of the instrument panel with the Radio Removal Tool -T10057-.
- Unlock and disconnect the connectors on the Radio - R-.
- Remove the Radio Removal Tool -T10057-. To do this, press the release tabs on the Radio -R-.
Installing
- Install in reverse order of removal. Note the following:
- Connect all the connectors.
- Push the Radio -R- into the instrument panel until it locks in place.
Radio, Removing and Installing, Radio Concert, 8AJ, 8DY
The Radio -R- is located in the instrument panel.
 Note
Note
If replacing the control module, select the "Replace control module" function for the corresponding control module on the Vehicle Diagnostic Tester.
Removing
- Move the selector lever to "S" or all the way to the rear on a manual transmission vehicle.
- Turn off the ignition and all electrical equipment and remove the ignition key.
- Insert the two clips on the Radio Removal Tool -T10057- in the release slits on the Radio -R--1- until they engage. The points on the grip eyes face outward.
- Pull the Radio -R--1- out of the instrument panel with the Radio Removal Tool -T10057-.
- Unlock and disconnect the connectors on the Radio - R-.
- Remove the Radio Removal Tool -T10057-. To do this, press the release tabs on the Radio -R-.
Installing
- Install in reverse order of removal. Note the following:
- Connect all the connectors.
- Push the Radio -R- into the instrument panel until it locks in place.

Radio, Removing and Installing, Radio MMI, 8YQ
The Radio -R- Is located in the left of the luggage compartment under the door.
 Note
Note
If replacing the control module, select the "Replace control module" function for the corresponding control module on the Vehicle Diagnostic Tester.
Special tools and workshop equipment required
- Fiber-Optic Repair Set - Connector Protective Caps -VAS6223/9-.
Removing
- Turn off the ignition and all electrical equipment and remove the ignition key.
- Remove the cover from the left of the luggage compartment and remove the luggage compartment floor covering.
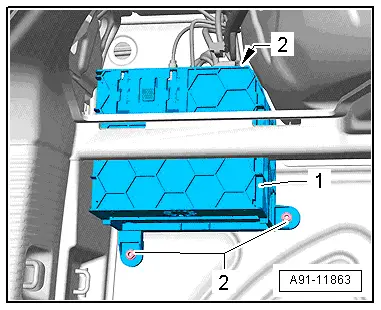
In order to be able to remove Radio -R-, the control module mount must be removed first.
- Remove the bolts -2- from the bracket -1-.
- Pivot the bracket -1- in the luggage compartment until the front side of the Radio -R- and TV Tuner -R78- are reachable.
- Release and disconnect all connectors from the Radio -R- and TV Tuner -R78-.
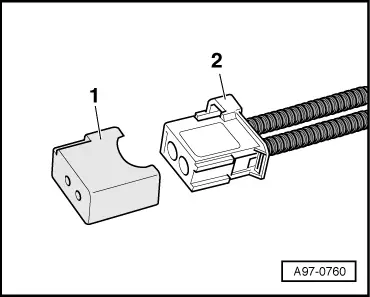
- Insert the Fiber-Optic Repair Set - Connector Protective Caps -VAS6223/9--1- onto the MOST bus connector -2-.
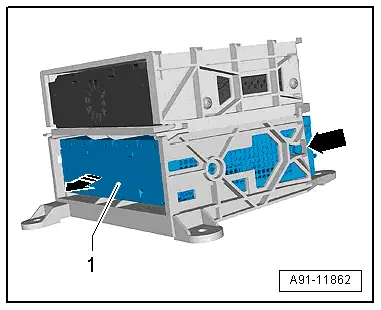
- Push the left and right spring clips -arrows- on the Radio -R--1-.
- Remove the Radio -R--1- rearward from the bracket -arrow-.
Installing
- Install in reverse order of removal.