Audi Q3: Steering Column Electronics Control Module -J527-, Removing and Installing
Steering Column Electronics Control Module -J527-, Removing and Installing, with Mechanical Ignition Lock
The Airbag Spiral Spring/Return Spring with Slip Ring -F138- and the Steering Angle Sensor -G85- are integrated in the Steering Column Electronics Control Module -J527-.
- If replacing the control module, select the "Replace Control Module" function Vehicle Diagnostic Tester.
Removing
 Note
Note
Steering must be in center position (wheels in straight ahead position) when removing and installing coil connector with slip ring.
- Adjust steering wheel downward and to rear as far as possible, use entire adjustment range of steering column adjustment for this.
- Remove the driver airbag. Refer to → Body Interior; Rep. Gr.69; Driver Side Airbag; Airbag Unit with Igniter, Removing and Installing.
- Removing the steering wheel. Refer to → Suspension, Axles, Steering; Rep. Gr.48; Steering Wheel; Steering Wheel, Removing and Installing.
- Remove the trim for the steering column switch module. Refer to → Body Interior; Rep. Gr.68; Storage Compartments/Covers; Overview - Steering Column Trim Panel.
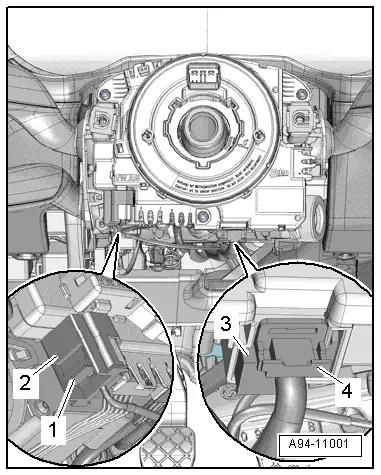
- Disconnect the connector -3- by removing the connector lock -4- and pressing the release downward.
 WARNING
Risk of destroying electronic components with static discharge.
Before disconnecting connector, discharge static electricity from your body by touching an electrically grounded vehicle component such as the door latch striker pin.
- Remove the connector lock -1- and press down and disconnect the connector -2-.
- Release the connectors -1, 3, 4, and 5- to do this position the screwdriver -7- on the hooks -6-, as shown in the illustration and carefully release the connectors.
- Remove the bolts in direction of -arrows-.

- Remove the Steering Column Electronics Control Module -J527--2- from the steering column switch module.
Installing
Install in reverse order of removal. Note the following:
- Make sure that all connectors are installed securely.
- Install the trim for the steering column switch module. Refer to → Body Interior; Rep. Gr.68; Storage Compartments/Covers; Overview - Steering Column Trim Panel.
- Install the steering wheel. Refer to → Suspension, Wheels, Steering; Rep. Gr.48; Steering Wheel; Steering Wheel, Removing and Installing.
- Install the driver airbag. Refer to → Body Interior; Rep. Gr.69; Driver Side Airbag; Airbag Unit with Igniter, Removing and Installing.
- After replacing the return spring with slip ring adapt the Steering Angle Sensor -G85- in the "Guided Functions" mode. Refer to Vehicle Diagnostic Tester.

Steering Column Electronics Control Module -J527-, Removing and Installing, with Electronic Ignition Lock
The Airbag Spiral Spring/Return Spring with Slip Ring -F138- and the Steering Angle Sensor -G85- are integrated in the Steering Column Electronics Control Module -J527-.
- If replacing the control module, select the "Replace Control Module" function Vehicle Diagnostic Tester.
Removing
 Note
Note
Steering must be in center position (wheels in straight ahead position) when removing and installing coil connector with slip ring.
- Adjust steering wheel downward and to rear as far as possible, use entire adjustment range of steering column adjustment for this.
- Remove the driver airbag. Refer to → Body Interior; Rep. Gr.69; Driver Side Airbag; Airbag Unit with Igniter, Removing and Installing.
- Removing the steering wheel. Refer to → Suspension, Axles, Steering; Rep. Gr.48; Steering Wheel; Steering Wheel, Removing and Installing.
- Remove the trim for the steering column switch module. Refer to → Body Interior; Rep. Gr.68; Storage Compartments/Covers; Overview - Steering Column Trim Panel.
- Disconnect the connector -3- by removing the connector lock -4- and pressing the release downward.
 WARNING
Risk of destroying electronic components with static discharge.
Before disconnecting connector, discharge static electricity from your body by touching an electrically grounded vehicle component such as the door latch striker pin.
- Remove the connector lock -1- and press down and disconnect the connector -2-.
- Release the connectors -1, 3, 4, and 5- to do this position the screwdriver -7- on the hooks -6-, as shown in the illustration and carefully release the connectors.
- Remove the bolts -arrows-.
- Remove the Steering Column Electronics Control Module -J527--2- from the steering column switch module.
Installing
Install in reverse order of removal. Note the following:
- Make sure that all connectors are installed securely.
- Install the trim for the steering column switch module. Refer to → Body Interior; Rep. Gr.68; Storage Compartments/Covers; Overview - Steering Column Trim Panel.
- Install the steering wheel. Refer to → Suspension, Wheels, Steering; Rep. Gr.48; Steering Wheel; Steering Wheel, Removing and Installing.
- Install the driver airbag. Refer to → Body Interior; Rep. Gr.69; Driver Side Airbag; Airbag Unit with Igniter, Removing and Installing.
- After replacing the return spring with slip ring adapt the Steering Angle Sensor -G85- in the "Guided Functions" mode. Refer to Vehicle Diagnostic Tester.

Steering Column Combination Switch, Removing and Installing
Removing
- Remove the steering column switch module. Refer to → Chapter "Steering Column Switch Module, Removing and Installing, with Mechanical Ignition Lock".
- Remove the Steering Column Electronics Control Module -J527-. Refer to → Chapter "Steering Column Electronics Control Module -J527-, Removing and Installing, with Mechanical Ignition Lock".
- Remove the Turn Signal Switch -E2-, Cruise Control Switch -E45-, and Windshield Wiper Intermittent Mode Switch -E22-.
Installing
Install in reverse order of removal. Note the following:
- Install the Steering Column Electronics Control Module -J527-. Refer to → Chapter "Steering Column Electronics Control Module -J527-, Removing and Installing, with Mechanical Ignition Lock".
- Install the steering column switch module. Refer to → Chapter "Steering Column Switch Module, Removing and Installing, with Mechanical Ignition Lock".
READ NEXT:
 Steering Column Electronics Control Module Connector Assignment
Steering Column Electronics Control Module -J527- Connector Assignment,
with Mechanical Ignition Lock
The Steering Column Electronics Control Module -J527- is
part of the complete system "stee
Overview - Parking Aid
In the Front of the Vehicle
1 - Right Front Parking Aid Sensor -G252-
In the front bumper cover
Removing and installing. Refer to
→ Chapter "Front Parking Aid Sensor, Remov
Parking Aid Control Module -J446-, Removing and Installing
Note
On vehicles with parallel parking assist the Parallel
Parking Assistance Control Module -J791- is integrated in the
Parking Aid Control Module -J446-.
- If replacing the contr
SEE MORE:
Deformation Element
Overview - Deformation Element
1 - Nut
25 Nm
Quantity: 3
2 - Lower Deformation Element
Component location: under the instrument panel on the driver side
Removing and installing. Refer to
→ Chapter "Lower Deformation Element, Removing and Installing
Connector Assignments, MMI Navigation Plus
Information Electronics Control Module 1 -J794-
1 - GSM connection from Roof Antenna -R216-
2 - 4-Pin Connector -T4u- to the External Audio Source
Connection -R199-/Internet Access Control Module -J666-
3 - 4-Pin Connector -T4al- to the Front Info
