Audi Q3: Overview - Parking Aid
In the Front of the Vehicle
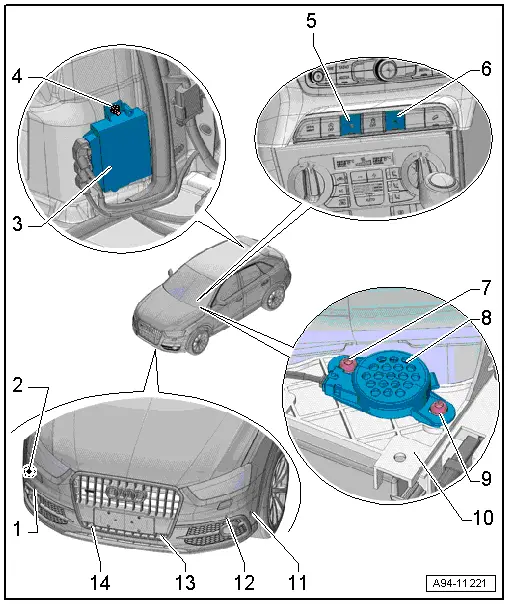
1 - Right Front Parking Aid Sensor -G252-
- In the front bumper cover
- Removing and installing. Refer to → Chapter "Front Parking Aid Sensor, Removing and Installing".
2 - Right Front Parallel Parking Assistance Sensor -G569-
- Overview. Refer to → Chapter "Overview - Parallel Parking Assist".
3 - Parking Aid Control Module -J446-/Parallel Parking Assistance Control Module -J791-
- Removing and installing. Refer to → Chapter "Parking Aid Control Module -J446-, Removing and Installing".
4 - Nut
- 3 Nm
- Quantity: 2
5 - Parallel Parking Assistance Button -E581-
- Component location overview. Refer to → Chapter "Component Location Overview - Instrument Panel Controls".
6 - Parking Aid Button -E266-
- Only for 8-channel parking aid
- Component location overview. Refer to → Chapter "Component Location Overview - Instrument Panel Controls".
7 - Expanding Clip
8 - Front Parking Aid Warning Buzzer -H22-
- Only for 8-channel parking aid
- On the central tube for the instrument panel behind the driver side storage compartment
- Removing and installing. Refer to → Chapter "Front Parking Aid Warning Buzzer -H22-, Removing and Installing".
9 - Expanding Clip
10 - Mount
- For the relay and fuse panel control module
11 - Left Front Parallel Parking Assistance Sensor -G568-
- Overview. Refer to → Chapter "Overview - Parallel Parking Assist".
12 - Left Front Parking Aid Sensor -G255-
- In the front bumper cover
- Removing and installing. Refer to → Chapter "Front Parking Aid Sensor, Removing and Installing".
13 - Left Front Center Parking Aid Sensor -G254-
- Inside the radiator grille
- Removing and installing. Refer to → Chapter "Front Parking Aid Sensor, Removing and Installing".
14 - Right Front Center Parking Aid Sensor -G253-
- Inside the radiator grille
- Removing and installing. Refer to → Chapter "Front Parking Aid Sensor, Removing and Installing".
In the Rear of the Vehicle

1 - Parking Aid Control Module -J446-/Parallel Parking Assistance Control Module -J791-
- Removing and installing. Refer to → Chapter "Parking Aid Control Module -J446-, Removing and Installing".
2 - Nut
- Quantity: 2
- Tightening specification. Refer to → Chapter "Overview - Parking Aid".
3 - Left Rear Center Parking Aid Sensor -G204-
- Removing and installing. Refer to → Chapter "Rear Parking Aid Sensor, Removing and Installing".
4 - Left Rear Parking Aid Sensor -G203-
- Removing and installing. Refer to → Chapter "Rear Parking Aid Sensor, Removing and Installing".
5 - Left Rear Parallel Parking Assistance Sensor -G716-
- Overview. Refer to → Chapter "Overview - Parallel Parking Assist".
6 - Right Rear Parallel Parking Assistance Sensor -G717-
- Overview. Refer to → Chapter "Overview - Parallel Parking Assist".
7 - Right Rear Parking Aid Sensor -G206-
- Removing and installing. Refer to → Chapter "Rear Parking Aid Sensor, Removing and Installing".
8 - Right Rear Center Parking Aid Sensor -G205-
- Removing and installing. Refer to → Chapter "Rear Parking Aid Sensor, Removing and Installing".
9 - Expanding Clip
10 - Rear Parking Aid Warning Buzzer -H15-
- Removing and installing. Refer to → Chapter "Rear Parking Aid Warning Buzzer -H15-, Removing and Installing".
11 - Expanding Clip
READ NEXT:
 Parking Aid Control Module -J446-, Removing and Installing
Note
On vehicles with parallel parking assist the Parallel
Parking Assistance Control Module -J791- is integrated in the
Parking Aid Control Module -J446-.
- If replacing the contr
Front Parking Aid Sensor, Removing and Installing
Front Parking Aid Sensors, Removing and Installing, through MY 2014
Right/Left Front Parking Aid Sensor -G252-/-G255-
Special tools and workshop equipment
required
Hook Tool -T40207-
Removi
Parallel Parking Assist
Overview - Parallel Parking Assist
1 - Parallel Parking Assistance Button -E581-
Overview. Refer to
→ Chapter "Component Location Overview - Instrument Panel Controls".
2&
SEE MORE:
Overview - Wheel Bearing
Overview - Wheel Bearing, Vehicles with FWD
1 - Cover
2 - Bracket
3 - Bolt
50 Nm + 45º
Always replace if removed
4 - Coupling Rod
5 - Bolt
90 Nm + 45º
Always replace if removed
Follow the tightening sequence. Refer to
6&n
Tires, Mounting, Run-Flat Tires
Caution
It is mandatory for run-flat tires to have a tire
pressure monitoring system in the vehicle.
- Coat rim flanges, tire beads and inside of upper tire beads
thoroughly with tire mounting paste.
WARNING
The minimum mounting temperature for a tire may not
be be
