Audi Q3: Overview - Wheel Bearing
Overview - Wheel Bearing, Vehicles with FWD
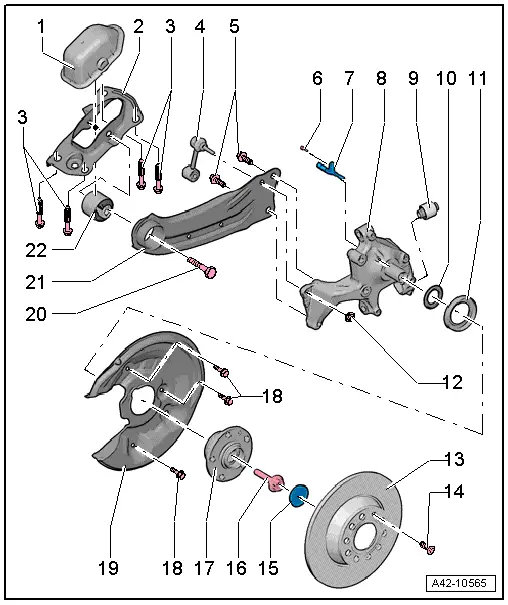
1 - Cover
2 - Bracket
3 - Bolt
- 50 Nm + 45º
- Always replace if removed
4 - Coupling Rod
5 - Bolt
- 90 Nm + 45º
- Always replace if removed
- Follow the tightening sequence. Refer to
6 - Bolt
- Tightening specification. Refer to → Brake System; Rep. Gr.45; Sensors; Overview - Rear Axle Speed Sensor.
7 - Left Rear ABS Wheel Speed Sensor -G46-
- Removing and installing. Refer to → Brake System; Rep. Gr.45; Sensors; Right/Left Rear ABS Wheel Speed Sensor G44/G46, Removing and Installing.
8 - Wheel Bearing Housing
- Removing and installing. Refer to → Chapter "Wheel Bearing Housing, Removing and Installing, FWD Vehicles".
9 - Bonded Rubber Bushing
- Replacing. Refer to → Chapter "Wheel Bearing Housing Bonded Rubber Bushing, Replacing, FWD Vehicles".
10 - Washer
- Installed depending on the market. For allocation. Refer to the Parts Catalog
11 - Wheel Bearing Seal
- Installed depending on the market. For allocation. Refer to the Parts Catalog
- Note the installed position. Refer to
12 - Nut
- 45 Nm
- Always replace if removed
13 - Brake Rotor
14 - Bolt
- Tightening specification. Refer to → Brake System; Rep. Gr.46; Rear Brakes; Overview - Rear Brakes.
15 - Dust Cap
- Always replace if removed
- Removing and Installing. Refer to → Chapter "Wheel Bearing Unit, FWD, Removing and Installing".
- A perfect seal is only achieved using a new dust cap.
16 - Bolt
- 200 Nm + 180º
- Always replace if removed
- Clean the threads in the stub axle with a thread tap first.
17 - Wheel Hub with Wheel Bearing
- The wheel bearing and wheel hub are installed together in a housing.
- This wheel bearing/wheel bearing unit is maintenance and adjustment free. Adjusting or servicing is not possible!
- Removing and installing. Refer to → Chapter "Wheel Bearing Unit, FWD, Removing and Installing".
18 - Bolt
- Tightening specification. Refer to → Brake System; Rep. Gr.46; Rear Brakes; Overview - Rear Brakes.
19 - Brake Shield
20 - Bolt
- 90 Nm + 90º
- Always replace if removed
21 - Trailing Arm
- Removing and installing. Refer to → Chapter "Trailing Arm with Mounting Bracket, Removing and Installing, FWD Vehicles".
- Servicing. Refer to → Chapter "Trailing Arm, Servicing, FWD Vehicles".
22 - Bonded Rubber Bushing
- Replacing. Refer to → Chapter "Trailing Arm, Servicing, FWD Vehicles".
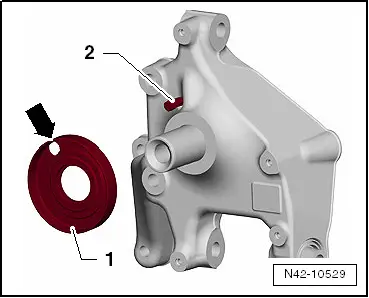
Wheel Bearing Seal Installation Position
 Note
Note
When installing the front wheel bearing seal -1-, make sure the hole -arrow- is installed at the center of the speed sensor -2-.
Overview - Wheel Bearing, Vehicles with AWD

1 - Cover
2 - Bracket
3 - Bolt
- 50 Nm + 45º
- Always replace if removed
4 - Coupling Rod
5 - Bolt
- 90 Nm + 45º
- Always replace if removed
- Follow the tightening sequence. Refer to
6 - Bolt
- 70 Nm + 90º
- Always replace if removed
7 - Drive Axle
- Do not let the drive axle hang down. The inner joint could be damaged if it is bent too far.
8 - Bolt
- Tightening specification. Refer to → Brake System; Rep. Gr.45; Sensors; Overview - Rear Axle Speed Sensor.
9 - Left Rear ABS Wheel Speed Sensor -G46-
- Removing and installing. Refer to → Brake System; Rep. Gr.45; Sensors; Right/Left Rear ABS Wheel Speed Sensor G44/G46, Removing and Installing.
10 - Bonded Rubber Bushing
- Replacing. Refer to → Chapter "Wheel Bearing Housing Bonded Rubber Bushing, Replacing, AWD Vehicles".
11 - Wheel Bearing Housing
- Removing and installing. Refer to → Chapter "Wheel Bearing Housing, Removing and Installing, AWD Vehicles".
12 - Nut
- 40 Nm
- Always replace if removed
13 - Brake Rotor
14 - Bolt
- Tightening specification. Refer to → Brake System; Rep. Gr.46; Rear Brakes; Overview - Rear Brakes.
15 - Bolt
- 200 Nm + 180º
- Always replace if removed
- Loosening and tightening → Chapter "Drive Axle Threaded Connection, Loosening and Tightening"
- Before installing, clean the threads in the CV joint with a tap.
16 - Wheel Bearing Unit
- Removing and installing. Refer to → Chapter "Wheel Bearing Unit, AWD, Removing and Installing".
- The wheel bearing unit is maintenance free and has zero play. Adjusting or servicing is not possible!
17 - Bolt
- Tightening specification. Refer to → Brake System; Rep. Gr.46; Rear Brakes; Overview - Rear Brakes.
18 - Brake Shield
19 - Bolt
- 90 Nm + 90º
- Always replace if removed
20 - Trailing Arm
- Removing and installing. Refer to → Chapter "Trailing Arm with Mounting Bracket, Removing and Installing, AWD Vehicles".
21 - Bonded Rubber Bushing
- Replacing.
READ NEXT:
 Wheel Bearing Housing, Removing and Installing
Wheel Bearing Housing, Removing and Installing, FWD Vehicles
Special tools and workshop equipment
required
Torque Wrench 1332 40-200Nm -VAG1332-
Removing
- Measure dimension from cente
Wheel Bearing Unit, Removing and Installing
Wheel Bearing Unit, FWD, Removing and Installing
Special tools and workshop equipment
required
Puller - Grease Cap -VW637/2-
Camshaft Installer Kit - Sleeve -3241/4- from the Seal
Installer
Wheel Bearing Housing Bonded Rubber Bushing, Replacing
Wheel Bearing Housing Bonded Rubber Bushing, Replacing, FWD Vehicles
Special tools and workshop equipment
required
Bearing Installer - Control Arm -3346-
Bearing Installer - Carrier Bearing -
SEE MORE:
Suspension
Adaptive dampers
Applies to: vehicles with suspension control
The adaptive dampers are an electronically-controlled
damping system. The firmness of the suspension
will adapt to the driving conditions and
the driving situation. The settings depend on the
selected Audi drive select mode.
Ground cleara
Securing child safety seats belt
Observe the safety precautions. The
front passenger's seat is a dangerous location for
a child, even with an advanced airbag system. If
exceptional circumstances require the child safety
seat to be placed on the front passenger's
seat, then the front passenger's airbag must be
deactivated.
Securing
