Audi Q3: Wheel Bearing Unit, Removing and Installing
Wheel Bearing Unit, FWD, Removing and Installing
Special tools and workshop equipment required
- Puller - Grease Cap -VW637/2-
- Camshaft Installer Kit - Sleeve -3241/4- from the Seal Installer - Camshaft Installer Kit -3241-
- Torque Wrench 1332 40-200Nm -VAG1332-
- Torque Wrench -VAG1410-
- Socket - Xzn 18 -T10162-
Removing
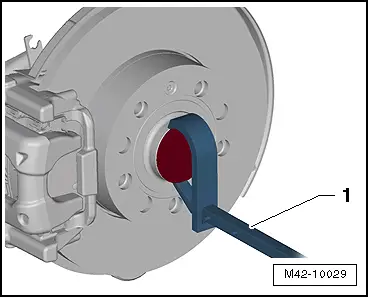
- Loosen the dust cap from seat by tapping lightly on claw of Puller - Grease Cap -VW637/2--1-.
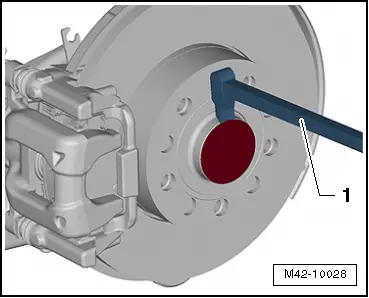
- Remove the dust cap using the Puller - Grease Cap -VW637/2--1-.
- Remove the brake caliper with the brake carrier and secure it to the body using wire. Refer to → Brake System; Rep. Gr.46; Rear Brakes; Brake Caliper, Removing and Installing.
 Note
Note
Do not allow brake caliper to hang from brake line.
- Remove the Phillips head bolt for the brake rotor and then remove the brake rotor.
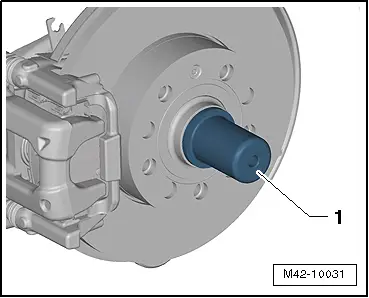
- Remove the internal multipoint bolt with the Socket - Xzn 18 -T10162-.
- Remove the wheel bearing unit from the axle stub.
 Caution
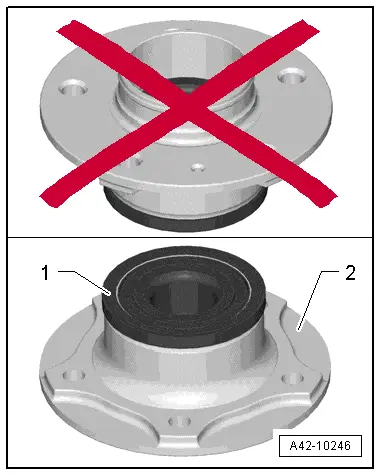
Avoid contaminating with dirt and damaging the seal when setting down/storing.
The wheel bearing -1- must always face up.
- Always set the wheel bearing unit down on the wheel hub -2-.
Installing
Installation is reverse of removal, noting the following:
- Carefully slide wheel hub/wheel bearing unit onto the axle stub.
Make sure that wheel hubs/wheel bearing unit does not tilt!
- Tighten using a new internal multipoint bolt.
 Note
Note
- First tighten the bolt to the given tightening specification using the torque wrench.
- Use a rigid wrench to apply additional torque angle.
- Install the new dust cap with the Seal Installer - Camshaft Installer Kit - Sleeve -3241/4--1-
 Note
Note
- Always replace dust caps.
- Damaged dust caps allow moisture to enter. Therefore, always use the tool shown.
Install in reverse order of removal.
- Install the brake caliper. Refer to → Brake System; Rep. Gr.46; Rear Brakes; Brake Caliper, Removing and Installing.
Wheel Bearing Unit, AWD, Removing and Installing
Special tools and workshop equipment required
- Torque Wrench 1332 40-200Nm -VAG1332-
- Torque Wrench 1410 -VAG1410-
Removing
- Measure dimension from center of wheel to lower edge of wheel housing. Refer to → Chapter "Wheel Bearing in Curb Weight, Lifting Vehicles with Coil Spring".
- Loosen the outer drive axle threaded connection. Refer to → Chapter "Drive Axle Threaded Connection, Loosening and Tightening".
- Remove the coil spring. Refer to → Chapter "Spring, Removing and Installing".
- Remove the drive axle. Refer to → Chapter "Drive Axle, Removing and Installing".
- Remove the brake caliper with the brake carrier and secure it to the body using wire. Refer to → Brake System; Rep. Gr.46; Rear Brakes; Brake Caliper, Removing and Installing.
 Note
Note
Do not let the brake caliper hang on the brake hose - risk of damage.
- Remove the Phillips head bolt for the brake rotor and then remove the brake rotor.
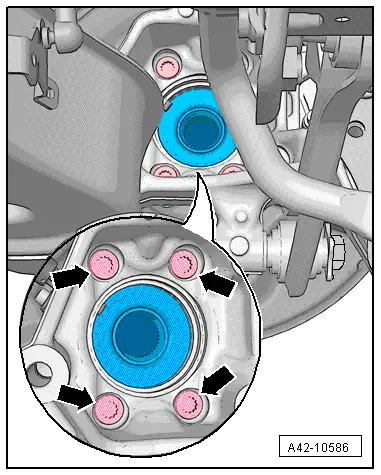
- Remove the bolts -arrows-.
- Remove wheel bearing unit from wheel bearing housing.
 Caution
Avoid contaminating with dirt and damaging the seal when setting down/storing.
READ NEXT:
 Wheel Bearing Housing Bonded Rubber Bushing, Replacing
Wheel Bearing Housing Bonded Rubber Bushing, Replacing, FWD Vehicles
Special tools and workshop equipment
required
Bearing Installer - Control Arm -3346-
Bearing Installer - Carrier Bearing -
Trailing Arm with Mounting Bracket, Removing and Installing
Trailing Arm with Mounting Bracket, Removing and Installing, FWD Vehicles
Special tools and workshop equipment
required
Torque Wrench 1332 40-200Nm -VAG1332-
Engine/Gearbox Jack Adapter - Whe
Trailing Arm, Servicing
Trailing Arm, Servicing, FWD Vehicles
Special tools and workshop equipment
required
Press Plate -VW401-
Press Plate -VW402-
Front Subframe Mount Kit -3372-
Hydraulic Press - Bushing Assem
SEE MORE:
Front Exterior Door Handle Switch, Removing and Installing
Removing
- Remove the exterior door handle. Refer to
→ Body Exterior; Rep. Gr.57; Door Components; Door Handle,
Removing and Installing.
Note
Ignore -1 and 2-.
- Release the retaining tabs in direction of
-A arrows- and remove the connector
-3-.
- C
RSQ3 Spoiler-Lower Section, Removing and Installing
Removing
- Remove the lower radiator grille. Refer to
→ Chapter "Radiator Grille, Removing and Installing, Audi RS Q3
through MY 2014".
- Remove the bolt -arrow-.
- Release the catches -1- and
remove the spoiler lower section -3-
forward from the bumper cover -2-.
