Audi Q3: Trailing Arm with Mounting Bracket, Removing and Installing
Trailing Arm with Mounting Bracket, Removing and Installing, FWD Vehicles
Special tools and workshop equipment required
- Torque Wrench 1332 40-200Nm -VAG1332-
- Engine/Gearbox Jack Adapter - Wheel Hub Support -T10149-
- Engine and Gearbox Jack -VAS6931-
Removing
- Remove the coil spring. Refer to → Chapter "Spring, Removing and Installing".
- Disconnect the connector -1- on the electromechanical parking brake motor from the brake caliper.
- Remove the bracket -2- by pressing out the rivet inner pins -arrows-.

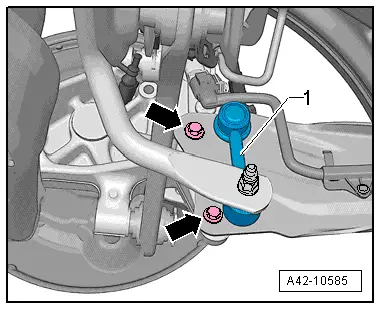
- Remove the coupling rod -1- from trailing arm.
- Remove bolts -arrows-.
- Remove the underbody trim panel. Refer to → Body Exterior; Rep. Gr.66; Underbody Panel; Underbody Trim Panels, Removing and Installing.
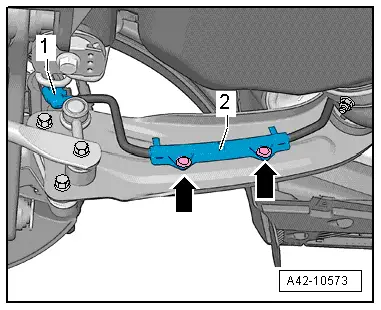
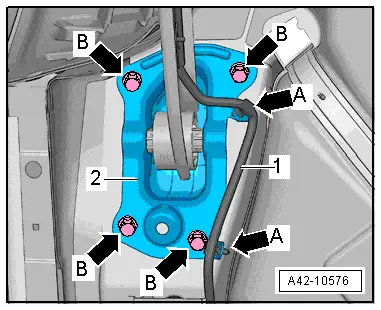
- Remove the wire -1- on the bracket -A arrows-.
- Mark the installation position of the bracket -2- on the body.
- Remove the bolts -B arrows-.
- Remove the trailing arm with mounting bracket.
If the trailing arm is being replaced, the mounting bracket must be removed from trailing arm.

Installation position of mounting bracket to trailing arm must then be adjusted.
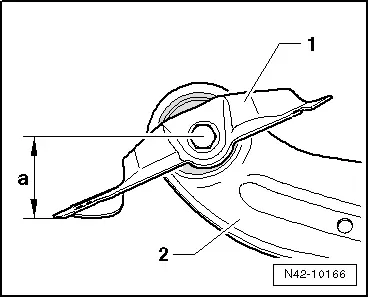
- Clamp the trailing arm in the vise so that the mounting bracket -1- touches the vise -arrow-.
- Remove the bolt -2-.
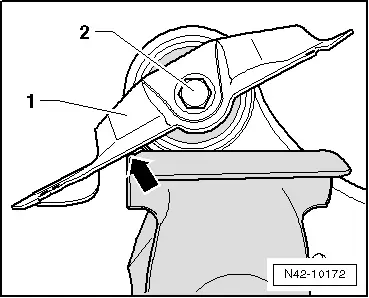
Determining installation position of mounting bracket relative to trailing arm
Dimension -a- is 57.5 +-1 mm.
1 - Bracket
2 - Trailing Arm
- When dimension -a- has been adjusted, tighten bolt.

Installing
Installation is reverse of removal, noting the following:
Threaded connector: trailing arm/wheel bearing housing
Threaded connection of trailing link/wheel bearing housing must only be tightened when all other components (spring and strut always) of the respective wheel suspension have been already assembled. To tighten, suspension must be unloaded. Only now do the trailing link and wheel bearing housing move into the position required -arrows-.

Always perform the following work in the sequence given!
- Install the trailing arm and mounting bracket with the bolts -arrows- on the wheel bearing housing, but do not yet tighten.
- Insert the coupling rod -1- into the trailing arm, but do not tighten the nut yet.
- Raise the suspension using Engine and Gearbox Jack -VAS6931- and Engine/Gearbox Jack Adapter - Wheel Hub Support -T10149- until the mounting bracket contacts the body.

- Tighten the bolts -B arrows- on old impression.
- Secure the wire -1- on the bracket -A arrow-.
- Lower the suspension again using Engine and Gearbox Jack -VAS6931- and remove Engine/Gearbox Jack Adapter - Wheel Hub Support -T10149- from wheel hub.
- Install the coil spring. Refer to → Chapter "Spring, Removing and Installing".

- Tighten the bolts -arrows- for trailing arm to tightening specification, while observing the required position of components. Refer to → Fig. "Threaded connector: trailing arm/wheel bearing housing".
- Tighten coupling rod nut -1- on trailing arm.

- Install the bracket -2- by pressing in the rivet inner pins -arrows-.
- Connect the connector -1- on the electromechanical parking brake motor to the brake caliper.
- An axle alignment may be required. Refer to → Chapter "Evaluating Need for Axle Alignment".
Trailing Arm with Mounting Bracket, Removing and Installing, AWD Vehicles
Special tools and workshop equipment required
- Press Plate -VW401-
- Press Plate -VW402-
- Front Subframe Mount Kit -3372-
- Hydraulic Press - Bushing Assembly Tool Kit -T10230-
Removing
- Remove the coil spring. Refer to → Chapter "Spring, Removing and Installing".
- Disconnect the connector -1- on the electromechanical parking brake motor from the brake caliper.
- Remove the bracket -2- by pressing out the rivet inner pins -arrows-.

- Remove the coupling rod -1- from trailing arm.
- Remove bolts -arrows-.
- Remove the underbody trim panel. Refer to → Body Exterior; Rep. Gr.66; Underbody Panel; Underbody Trim Panels, Removing and Installing.

- Remove the wire -1- on the bracket -A arrows-.
- Mark the installation position of the bracket -2- on the body.
- Remove the bolts -B arrows-.
- Remove the trailing arm with mounting bracket.
If the trailing arm is being replaced, the mounting bracket must be removed from trailing arm.
Installation position of mounting bracket to trailing arm must then be adjusted.
- Clamp the trailing arm in the vise so that the mounting bracket -1- touches the vise -arrow-.
- Remove the bolt -2-.

Determining installation position of mounting bracket relative to trailing arm
Dimension -a- is 57.5 +-1 mm.
1 - Bracket
2 - Trailing Arm
- When dimension -a- has been adjusted, tighten bolt.
Installing
Installation is reverse of removal, noting the following:
Threaded connector: trailing arm/wheel bearing housing
Threaded connection of trailing link/wheel bearing housing must only be tightened when all other components (spring and strut always) of the respective wheel suspension have been already assembled. To tighten, suspension must be unloaded. Only now do the trailing link and wheel bearing housing move into the position required -arrows-.

Always perform the following work in the sequence given!
- Install the trailing arm and mounting bracket with the bolts -arrows- on the wheel bearing housing, but do not yet tighten.
- Insert the coupling rod -1- into the trailing arm, but do not tighten the nut yet.
- Raise the suspension using Engine and Gearbox Jack -VAS6931- and Engine/Gearbox Jack Adapter - Wheel Hub Support -T10149- until the mounting bracket contacts the body.

- Tighten the bolts -B arrows- on old impression.
- Lower the suspension again using Engine and Gearbox Jack -VAS6931- and remove Engine/Gearbox Jack Adapter - Wheel Hub Support -T10149- from wheel hub.
- Install the coil spring. Refer to → Chapter "Spring, Removing and Installing".

- Tighten the bolts -arrows- for trailing arm to tightening specification, while observing the required position of components. Refer to → Fig. "Threaded connector: trailing arm/wheel bearing housing".
- Tighten coupling rod nut -1- on trailing arm.
- Install the coil spring. Refer to → Chapter "Spring, Removing and Installing".
- An axle alignment may be required. Refer to → Chapter "Evaluating Need for Axle Alignment".

READ NEXT:
 Trailing Arm, Servicing
Trailing Arm, Servicing, FWD Vehicles
Special tools and workshop equipment
required
Press Plate -VW401-
Press Plate -VW402-
Front Subframe Mount Kit -3372-
Hydraulic Press - Bushing Assem
Overview - Drive Axle
Overview - Drive Axle, Drive Axle with 100 mm Inner CV Joint
Note
Grease joint again when replacing protective joint boot.
1 - Outer CV Joint
Replace only as complete unit
Drive Axle, Removing and Installing
Removing
- Measure dimension from center of wheel to lower edge of
wheel housing. Refer to
→ Chapter "Wheel Bearing in Curb Weight, Lifting Vehicles with
Coil Spring".
- Loose
SEE MORE:
Tires with Emergency Running Characteristics, Repairing
General Information
Caution
Examining damaged tires should only be performed by
trained personnel.
WARNING
Run-flat tires must be replaced after they have gone
flat.
Pay close attention to the installation
instructions.
- The wheel must be inspected before
A/C Compressor, Removing and Installing on Bracket
A/C Compressor, Removing and Installing from Bracket, 4-Cylinder Engine
Note
The Air Conditioning (A/C) compressor can be removed and
installed at the bracket without opening the refrigerant lines.
In the following, removal and installation of compressor is
described for a vehicl
