Audi Q3: Wheel Bearing Housing, Removing and Installing
Wheel Bearing Housing, Removing and Installing, FWD Vehicles
Special tools and workshop equipment required
- Torque Wrench 1332 40-200Nm -VAG1332-
Removing
- Measure dimension from center of wheel to lower edge of wheel housing. Refer to → Chapter "Wheel Bearing in Curb Weight, Lifting Vehicles with Coil Spring".
Vehicles with level control system sensor
- Remove the bolts -lower arrows-.
Continuation for all vehicles
- Remove the coil spring. Refer to → Chapter "Spring, Removing and Installing".
- Remove the ABS speed sensor from the wheel bearing housing. Refer to → Brake System; Rep. Gr.45; Sensors; Right/Left Rear ABS Wheel Speed Sensor G44/G46, Removing and Installing.
- Remove the brake shield. Refer to → Brake System; Rep. Gr.46; Rear Brakes; Brake Shield, Removing and Installing.
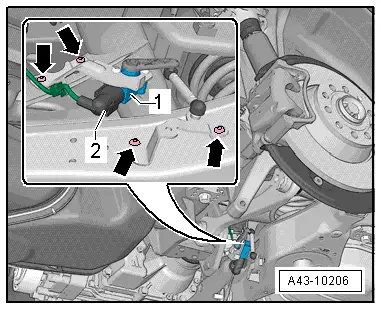
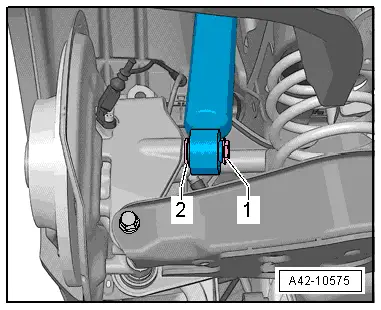
- Remove the bolt -1- and the washer -2-.

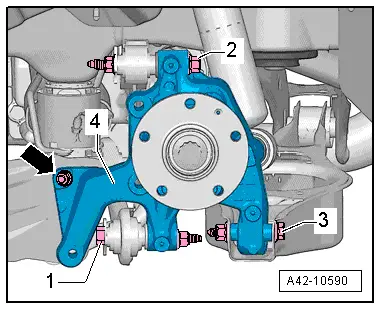
- Remove bolt for tie rod -1-, upper control arm -2- and lower control arm -3- from wheel bearing housing -4-.
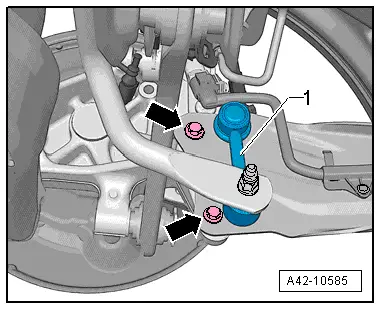
- Remove the coupling rod -arrow- from the wheel bearing housing.
- Remove the coupling rod from the trailing arm -1-.

- Hold wheel bearing housing tightly and remove the bolts -arrows-.
- Pull coupling rod -1- out of trailing arm.
- Remove the wheel bearing housing.

Installing
Installation is reverse of removal, noting the following:
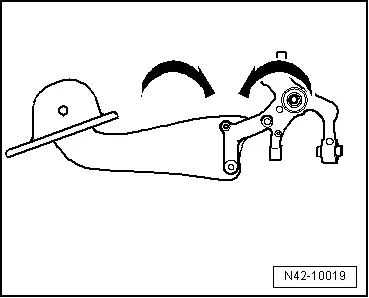
Threaded connection of trailing link/wheel bearing housing must only be tightened when all other components (spring and strut always) of the respective wheel suspension have been already assembled. To tighten, suspension must be unloaded. Only now do the trailing link and wheel bearing housing move into the position required -arrows-.
Always perform the following work in the sequence given!
- Install the bolt for tie rod -1-, upper control arm -2- and lower control arm -3- hand-tight.

- Hand-tighten the coupling rod -arrow- to wheel bearing housing -4-.

- Install the bolts -arrows- and insert the coupling rod -1- into trailing arm.
- Tighten the bolt -1- with the washer -2-.

Bolting at wheel bearing housing may occur only when the dimension "a" has been obtained! Refer to → Chapter "Wheel Bearing in Curb Weight, Lifting Vehicles with Coil Spring".
- Install the coil spring. Refer to → Chapter "Spring, Removing and Installing".
- Tighten the bolt for tie rod -1-, upper control arm -2- and lower control arm -3-.
- Tighten the coupling rod nut -arrow-.

 Note
Note
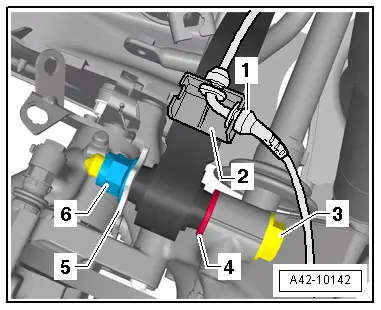
The washer -5- must be installed so that there is a gap between the washer and the brake shield.
- Tighten the bolts -arrows-.
Install in reverse order of removal while noting the following:
- Install the brake caliper. Refer to → Brake System; Rep. Gr.46; Rear Brakes; Brake Caliper, Removing and Installing.
- An axle alignment may be required. Refer to → Chapter "Evaluating Need for Axle Alignment".
- On vehicles with electronically controlled damping, perform the function "Adapt the control position" with the Vehicle Diagnosis Tester.
- If the control position was reprogrammed and if the vehicle has lane assist, then it will then be necessary to calibrate the driver assistance systems front camera. Refer to → Chapter "Driver Assistance Systems Front Camera, Calibrating".
- On vehicles with level control system sensor, perform headlamp basic setting. Refer to → Electrical Equipment; Rep. Gr.94; Headlamp, Adjusting.

Wheel Bearing Housing, Removing and Installing, AWD Vehicles
Special tools and workshop equipment required
- Torque Wrench 1332 40-200Nm -VAG1332-
Removing
- Measure dimension from center of wheel to lower edge of wheel housing. Refer to → Chapter "Wheel Bearing in Curb Weight, Lifting Vehicles with Coil Spring".
- Loosen the outer drive axle threaded connection. Refer to → Chapter "Drive Axle Threaded Connection, Loosening and Tightening".
Vehicles with level control system sensor
- Remove the bolts -lower arrows-.
Continuation for all vehicles
- Remove the coil spring. Refer to → Chapter "Spring, Removing and Installing".
- Remove the brake shield. Refer to → Brake System; Rep. Gr.46; Rear Brakes; Brake Shield, Removing and Installing.
- Remove the ABS speed sensor from the wheel bearing housing. Refer to → Brake System; Rep. Gr.45; Sensors; Right/Left Rear ABS Wheel Speed Sensor G44/G46, Removing and Installing.

- Remove the bolt -1- and the washer -2-.

- Remove bolt for tie rod -1-, upper control arm -2- and lower control arm -3- from wheel bearing housing -4-.
- Remove the coupling rod from the wheel bearing housing -arrow-.

- Pull coupling rod -1- out of trailing arm.
- Hold wheel bearing housing tightly and remove the bolts -arrows-.
- Remove the wheel bearing housing.
Installing
Installation is reverse of removal, noting the following:
Threaded connection of trailing link/wheel bearing housing must only be tightened when all other components (spring and strut always) of the respective wheel suspension have been already assembled. To tighten, suspension must be unloaded. Only now do the trailing link and wheel bearing housing move into the position required -arrows-.

Always perform the following work in the sequence given!
- Install the bolt for tie rod -1-, upper control arm -2- and lower control arm -3- hand-tight.

- Hand-tighten the coupling rod -arrow- to wheel bearing housing -4-.

- Install the bolts -arrows- and insert the coupling rod -1- into trailing arm.
- Tighten the bolt -1- with the washer -2-.
Bolting at wheel bearing housing may occur only when the dimension "a" has been obtained! Refer to → Chapter "Wheel Bearing in Curb Weight, Lifting Vehicles with Coil Spring".
- Install the coil spring. Refer to → Chapter "Spring, Removing and Installing".
- Tighten the bolt for tie rod -1-, upper control arm -2- and lower control arm -3-.
- Tighten the nut -arrow- for the coupling rods.
 Note
Note
The washer -5- must be installed so that there is a gap between the washer and the brake shield.

- Tighten the bolts -arrows-.
Install in reverse order of removal, note the following:
- Install the brake caliper. Refer to → Brake System; Rep. Gr.46; Rear Brakes; Brake Caliper, Removing and Installing.
- An axle alignment may be required. Refer to → Chapter "Evaluating Need for Axle Alignment".
- On vehicles with electronically controlled damping, perform the function "Adapt the control position" with the Vehicle Diagnosis Tester.
- If the control position was reprogrammed and if the vehicle has lane assist, then it will then be necessary to calibrate the driver assistance systems front camera. Refer to → Chapter "Driver Assistance Systems Front Camera, Calibrating".
- On vehicles with level control system sensor, perform headlamp basic setting. Refer to → Electrical Equipment; Rep. Gr.94; Headlamp, Adjusting.

READ NEXT:
 Wheel Bearing Unit, Removing and Installing
Wheel Bearing Unit, FWD, Removing and Installing
Special tools and workshop equipment
required
Puller - Grease Cap -VW637/2-
Camshaft Installer Kit - Sleeve -3241/4- from the Seal
Installer
Wheel Bearing Housing Bonded Rubber Bushing, Replacing
Wheel Bearing Housing Bonded Rubber Bushing, Replacing, FWD Vehicles
Special tools and workshop equipment
required
Bearing Installer - Control Arm -3346-
Bearing Installer - Carrier Bearing -
Trailing Arm with Mounting Bracket, Removing and Installing
Trailing Arm with Mounting Bracket, Removing and Installing, FWD Vehicles
Special tools and workshop equipment
required
Torque Wrench 1332 40-200Nm -VAG1332-
Engine/Gearbox Jack Adapter - Whe
SEE MORE:
E-Box, Removing and Installing
Removing
- Remove the relay and fuse panel and move them to the side
with the wires still connected. Refer to
→ Chapter "Relay and Fuse Panel B -SB- in the E-Box, Removing
and Installing".
- Release the retaining tabs in direction of
-arrows-.
- If equipped, push the
Driver/Front Passenger Door Warning Lamp -W30-/-W36-, Removing and
Installing
Removing
- Press the tab -1- with a
flat-blade screwdriver and remove the door warning lamp
-2-.
- Disconnect the connector -3-.
- Carefully pry out the cover over the lamp in direction of
-arrow-.
- Remove the bulb -1- from the
socket -2- on the back of the door
