Audi Q3: Parking Aid Control Module -J446-, Removing and Installing
 Note
Note
On vehicles with parallel parking assist the Parallel Parking Assistance Control Module -J791- is integrated in the Parking Aid Control Module -J446-.
- If replacing the control module, select the "Replace Control Module" function Vehicle Diagnostic Tester.
Removing
- Remove the luggage compartment right side trim panel cover.
- Remove the vehicle tools.
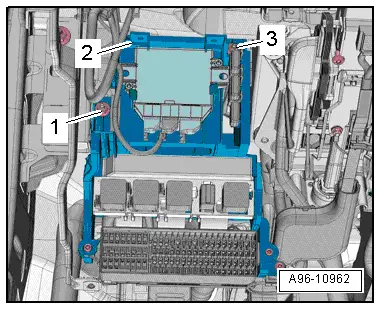
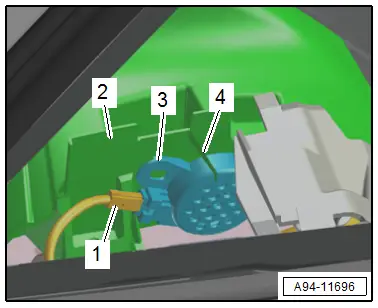
- Remove the nuts -1 and 3-.
- Remove the tool kit mount -2-.
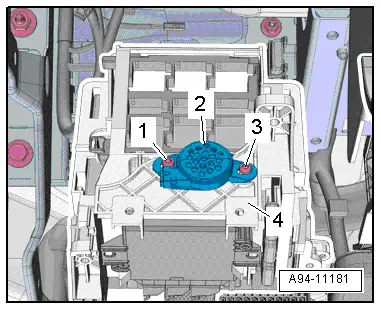
- Remove the nuts -arrows-.
- Remove the control module -4-.
- Disconnect the connectors -1, 2 and 3-.
Installing
Install in reverse order of removal.

Front Parking Aid Warning Buzzer -H22-, Removing and Installing
Removing
- Remove the driver side instrument panel cover. Refer to → Body Interior; Rep. Gr.68; Storage Compartments/Covers; Driver Side Instrument Panel Cover, Removing and Installing.
- Remove the instrument cluster. Refer to → Chapter "Instrument Cluster with Instrument Cluster Control Module -J285-, Removing and Installing".
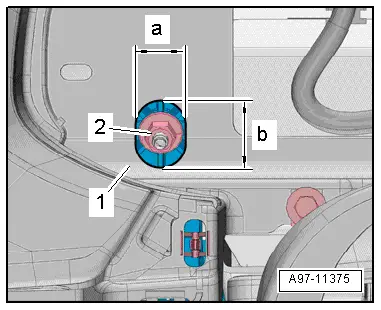
- To reach the upper nut -2- from the mount for the control modules, relay and fuse panel, drill an oblong hole into the instrument cluster mount -1- as shown.
- Dimension -a- = 22 mm.
- Dimension -b- = 23 mm.
 Note
Note
Illustrated without the instrument panel.
- Remove the nuts -1 and 3-.
- Disconnect the connector from the buzzer.
- Disengage the mount -2- for the control module, relay and fuse panel from the instrument panel central tube.
- Remove the bolts -1 and 3-.
- Remove the buzzer -2- with expanding clip from the mount -4-.
Installing
Install in reverse order of removal. Note the following:
- Install the instrument cluster. Refer to → Chapter "Instrument Cluster with Instrument Cluster Control Module -J285-, Removing and Installing".
- Install the mount for the control module, relay and fuse panel. Refer to → Chapter "Relay/Fuse Carrier Mount with Vehicle Electrical System Control Module -J519-, Removing and Installing".
Rear Parking Aid Warning Buzzer -H15-, Removing and Installing
Removing
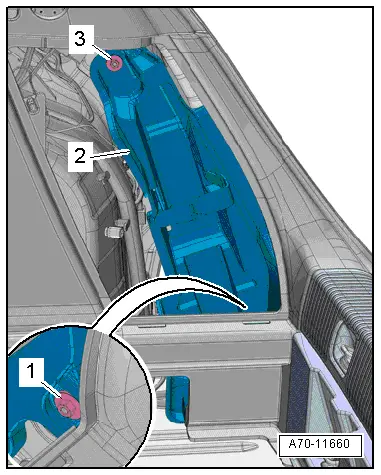
- Remove the cover for the right rear seat belt guide. Refer to → Body Interior; Rep. Gr.70; Passenger Compartment Trim; Overview - C-Pillar Trim Panel.
- Release the retainer -4- upward.
- Remove the rear parking aid warning buzzer -3- from the mount inside the seat belt guide -2-.
- Disconnect the connector -1-.
Installing
Install in reverse order of removal.
READ NEXT:
 Front Parking Aid Sensor, Removing and Installing
Front Parking Aid Sensors, Removing and Installing, through MY 2014
Right/Left Front Parking Aid Sensor -G252-/-G255-
Special tools and workshop equipment
required
Hook Tool -T40207-
Removi
Parallel Parking Assist
Overview - Parallel Parking Assist
1 - Parallel Parking Assistance Button -E581-
Overview. Refer to
→ Chapter "Component Location Overview - Instrument Panel Controls".
2&
Automatic Headlamp Range Control
Overview - Automatic Head Lamp Range Control
1 - Left Front Level Control System Sensor -G78-
Component location: on the left front control arm
Removing and installing. Refer to
â
SEE MORE:
Component Location Overview - Passenger Compartment Trim
1 - Cover
Overview. Refer to
→ Chapter "Overview - C-Pillar Trim Panel".
2 - Rear Sill Panel Strip
Overview. Refer to
→ Chapter "Overview - Rear Sill Panel Strip".
3 - Lower B-Pillar Trim Panel
Overview. Refer to
→ Chapter
Windshield Washer System
Overview - Windshield Washer System
Overview - Windshield Washer System, through MY 2014
1 - Washer Fluid Reservoir
Removing and installing. Refer to
→ Chapter "Windshield Washer Fluid Reservoir, Removing and Installing".
2 - Nut
8 Nm
Quantity: 2
