Audi Q3: Overview - Sound System
The following systems are offered:
- 8RE - Basic sound system, Radio CAN.
- 8RX - Basic plus sound system, Radio CAN /MMI
- 9VD - Audi Sound system.
- 9VK - Sound system Premium, BOSE Surround Sound.
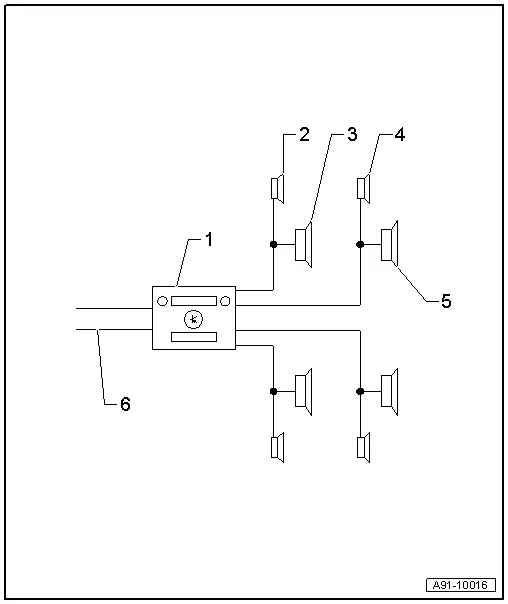
8RE - Basic Sound System, Radio CAN
- Two speakers in the left and right front doors

1 - Radio -R- in the instrument panel
2 - Left Front Treble Speaker -R20-/Right Front Treble Speaker -R22-
- In the top of the front doors
3 - Left Front Mid-Bass Speaker -R101-/Right Front Mid-Bass Speaker -R102-
- At bottom in front doors
4 - CAN bus, Infotainment
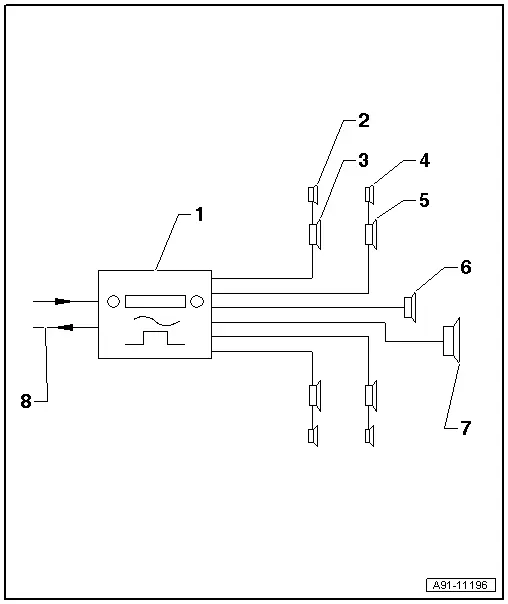
8RX - Basic Plus Sound System, Radio CAN
- Two speakers in the left and right front doors
- Two speakers in the left and right rear doors
8RX - Basic Sound System, MMI
- Two speakers in the left and right front doors
- Two speakers in the left and right rear doors
1 - Radio -R-
- In the instrument panel/in the left of the luggage compartment behind the door
2 - Left Front Treble Speaker -R20-/Right Front Treble Speaker -R22-
- In the top of the front doors
3 - Left Front Mid-Bass Speaker -R101-/Right Front Mid-Bass Speaker -R102-
- At bottom in front doors
4 - Left Rear Treble Speaker -R14-/Right Rear Treble Speaker -R16-
- At top in rear doors
5 - Left Rear Mid-Bass Speaker -R159-/Right Rear Mid-Bass Speaker -R160-
- At bottom in rear doors
6 - CAN bus, Infotainment/MOST bus
9VD - Audi Sound System
- Two speakers in the left and right front doors
- One speaker in the center of the instrument panel
- Two speakers in the left and right rear doors
- Subwoofer -R211- in the spare tire well
1 - Radio -R- for MMI Navigation Plus
- Information Electronics Control Module 1 -J794- for concert MOST
2 - Left Front Treble Speaker -R20-/Right Front Treble Speaker -R22-
- In the top of the front doors
3 - Left Front Mid-Bass Speaker -R101-/Right Front Mid-Bass Speaker -R102-
- At bottom in front doors
4 - Left Rear Treble Speaker -R14-/Right Rear Treble Speaker -R16-
- At top in rear doors
5 - Left Rear Mid/Low Range Speaker -R159-/Right Rear Mid/Low Range Speaker -R160-
- At bottom in rear doors
6 - Center Speaker -R208-
- In the Instrument Panel Center
7 - Subwoofer -R211-
- In the Spare Tire Well
8 - MOST Bus
9VK - Sound System Premium, BOSE Surround Sound
- Three speakers in the left and right front doors
- One speaker in the center of the instrument panel
- Two speakers in the left and right rear doors
- One speaker in the left and right D-pillars
- Subwoofer -R211- in the spare tire well
- Digital Sound System Control Module -J525- in the right rear of the luggage compartment under the luggage compartment floor covering.
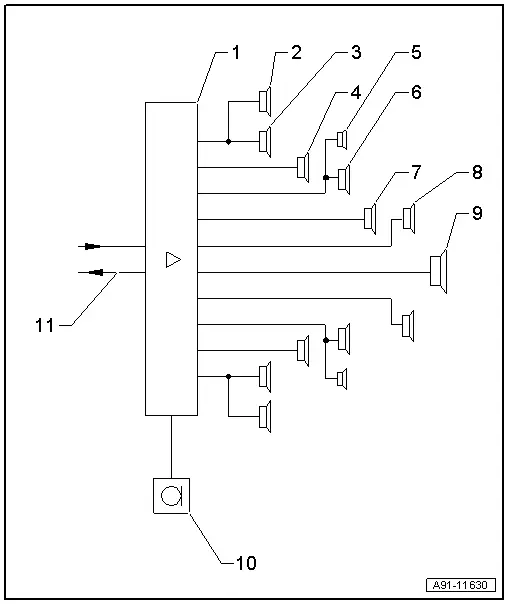
1 - Digital Sound System Control Module -J525-
- In the right rear of the luggage compartment under the luggage compartment floor covering.
2 - Left Front Treble Speaker -R20-/Right Front Treble Speaker -R22-
- In the top of the front doors
3 - Left Front Midrange Speaker -R103-/Right Front Midrange Speaker -R104-
- In the Center of the Front Doors
4 - Left Front Bass Speaker -R21-/Right Front Bass Speaker -R23-
- At in the Front Doors at The Bottom
5 - Left Rear Treble Speaker -R14-/Right Rear Treble Speaker -R16-
- At top in rear doors
6 - Left Rear Mid-Bass Speaker -R159-/Right Rear Mid-Bass Speaker -R160-
- At bottom in rear doors
7 - Center Speaker -R208-
- In the Instrument Panel Center
8 - Left Rear Speaker -R4-/Right Rear Speaker -R5-
- In the D-Pillar Trim Panel
9 - Subwoofer -R211-
- In the Spare Tire Well
10 - Microphone Unit In Front Roof Module -R164- (Interior Microphone -R74-)
- In the Front Interior Lamp -W1-
11 - MOST Bus
Notes on MOST bus
The optical Data bus "MOST bus" is used in addition to the CAN bus.
A fiber-optic cable is used as a "connecting cable". Fiber optic cables are routed inside corrugated tubes for protection.
Replace the complete fiber optic cable if possible.
Make sure that the face surfaces of the connectors do not become soiled.
If disconnecting the connectors: Attach the Fiber-Optic Repair Set - Connector Protective Caps -VAS6223/9-.
When routing fiber optic cables, make sure not to go below the minimum bending radius of 25 mm. Do not crush or kink fiber optic cables.
Repairing fiber-optic cables. Refer to → Electrical Equipment General Information; Rep. Gr.97; Fiber-Optic Cable.
Component Location Overview - Sound System
1 - Left Front Treble Speaker -R20-/Right Front Treble Speaker -R22-
- Removing and installing. Refer to → Chapter "Left/Right Front Treble Speaker -R20-/-R22-, Removing and Installing".
2 - Left Front Mid-Bass Speaker -R101-/Left Front Bass Speaker -R21-/Right Front Mid-Bass Speaker -R102-/Right Front Bass Speaker -R23-
- Removing and installing. Refer to → Chapter "Mid Bass Speaker/Front Bass Speaker, Removing and Installing".
3 - Bolt
- 3 Nm
- Quantity: 3
4 - Telephone Microphone -R38-
- Overview. Refer to → Chapter "Overview - Microphone Unit".
- Removing and installing. Refer to → Chapter "Microphone Unit in Front Roof Module -R164-, Removing and Installing".
5 - 4-Pin Connector -T4bg-
6 - Front Interior Lamp -W1-
- Refer to → Electrical Equipment; Rep. Gr.96; Lamps; Component Location Overview - Roof Trim Panel Lamps
7 - Interior Microphone -R74-
- Overview. Refer to → Chapter "Overview - Microphone Unit".
- Removing and installing. Refer to → Chapter "Microphone Unit in Front Roof Module -R164-, Removing and Installing".
8 - Left Rear Treble Speaker -R14-/Right Rear Treble Speaker -R16-
- Removing and installing. Refer to → Chapter "Left/Right Rear Treble Speaker -R14-/-R16-, Removing and Installing".
9 - Bolt
- 3 Nm
10 - Left Rear Speaker -R4-/Right Rear Speaker -R5-
- Removing and installing. Refer to → Chapter "Effects Speaker, Removing and Installing".
11 - Digital Sound System Control Module -J525-
- Connector assignment. Refer to → Chapter "Connector Assignments".
- Removing and installing. Refer to → Chapter "Control Module/Digital Sound System Amplifier, Removing and Installing".
12 - Bolt
- 3 Nm
- Quantity: 2
13 - Bolt
- 3 Nm
14 - Subwoofer -R211-
- Removing and installing. Refer to → Chapter "Subwoofer -R211-, Removing and Installing".
15 - Bolt
- 3 Nm
- Quantity: 3
16 - Left Rear Mid-Bass Speaker -R159-/Right Rear Mid-Bass Speaker -R160-
- Removing and installing. Refer to → Chapter "Rear Mid-Bass Speaker, Removing and Installing".
17 - Left Front Midrange Speaker -R103-/Right Front Midrange Speaker -R104-
- Removing and installing. Refer to → Chapter "Front Midrange Speaker, Removing and Installing".
18 - Bolt
- 4 Nm
- Quantity: 2
19 - Bolt
- 2 Nm
- Quantity: 2
20 - Center Speaker -R208-
- Removing and installing. Refer to → Chapter "Center Speaker, Removing and Installing".
READ NEXT:
 Control Module/Digital Sound System Amplifier, Removing and Installing
The Digital Sound System Control Module -J525- in the right
rear of the luggage compartment under the luggage compartment
floor covering.
Note
If replacing the control module, select th
Front Midrange Speaker, Removing and Installing
Mid Bass Speaker/Front Bass Speaker, Removing and Installing
The Left Front Mid-Bass Speaker -R101-/Right Front Mid-Bass
Speaker - R102-/Left Front Bass Speaker -R21-/Right Front Bass
Speaker -R2
SEE MORE:
General Information
Vehicles with a High Voltage System (Hybrid Vehicles)
Extremely Dangerous Due to High-Voltage
The high-voltage system is under high-voltage. Death or serious
bodily injury by electric shock.
- Individuals with electronic/medical life- and health sustaining
machines in or on their person
General, Technical data
Identification
Brake PR Numbers
The PR number on the vehicle data label describes which
brake system is installed in the vehicle.
Example of a Vehicle Data Sticker:
A - Front Brakes (example)
B - Rear Brakes (example)
Allocation, refer to the Parts Catalog.
The table
