Audi Q3: Roof Antenna, Removing and Installing
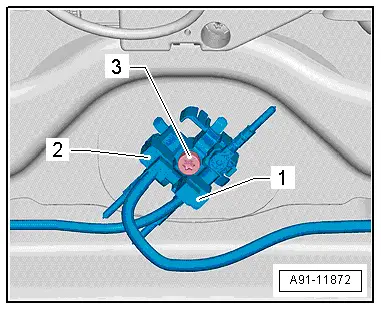
The Roof Antenna -R216- has up to three connectors.
The antenna wires are connected directly to the base of the Roof Antenna -R216-.
The headliner must be lowered in order to remove the Roof Antenna -R216-.
Removing
- Turn off the ignition and all electrical equipment and remove the ignition key.
- Remove the headliner. Refer to → Body Interior; Rep. Gr.70; Roof Trim Panels; Headliner, Removing and Installing.
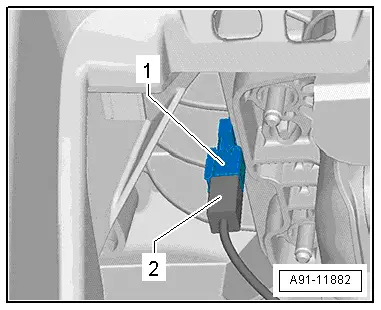
- Release and disconnect the connectors -1 and 2- from the antenna wires.
- Remove the bolt -3- and the retaining spring.
- Remove the Roof Antenna -R216- upward from the roof.
Installing
- Place the Roof Antenna -R216- on the roof and press down on it until it latches.
- Tighten the pre-mounted bolt to the given tightening specification.
- Perform the rest of the installation in reverse order.
Windshield Antenna Suppression Filter -C18-, Removing and Installing
The Windshield Antenna Suppression Filter -C18- is located behind the right D-pillar trim panel.
Removing
- Turn off the ignition and all electrical equipment and remove the ignition key.
- Remove the D-pillar trim panel. Refer to → Body Interior; Rep. Gr.70; Passenger Compartment Trim Panel; D-Pillar Trim, Removing and Installing.
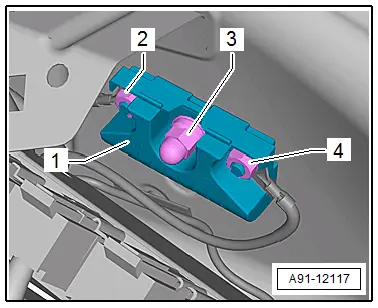
- Remove the nuts -2 and 4- from the Windshield Antenna Suppression Filter -C18--1-.
- Disconnect the wires on the Windshield Antenna Suppression Filter -C18--1-.
- Remove the nut -3- and then remove the Windshield Antenna Suppression Filter -C18--1- from the D-pillar.
Installing
- Install in reverse order of removal.
Traffic Data Antenna, Removing and Installing
The Traffic Data Antenna -R173- is located at the top of the windshield on the left side.
Removing
- Turn off the ignition and all electrical equipment and remove the ignition key.
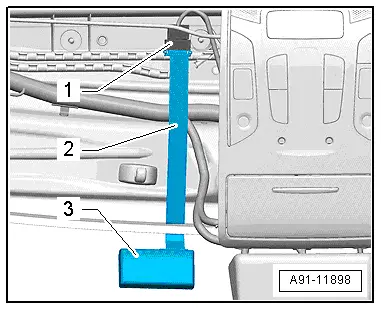
The connectors -1- for the Traffic Data Antenna -R173--3- are located on the roof crossmember, behind the left sun visor. The flat band cable -2- is routed on the roof crossmember. The headliner must be removed in order to remove the flat band cable.
- Remove the headliner. Refer to → Body Interior; Rep. Gr.70; Roof Trim Panels; Headliner, Removing and Installing.
- Disconnect the connector -1-.
Traffic Data Antenna -R173- removal:

A safety piece -2- secures the Traffic Data Antenna -R173--1- to its bracket -3-. The bracket is glued to the windshield -3-.
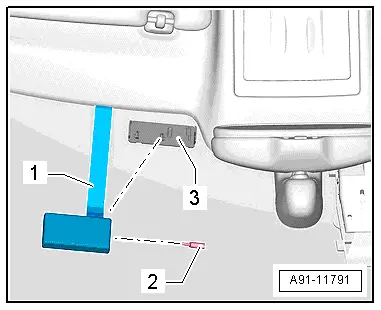
- Remove the safety piece -2- with a small screwdriver.
- Remove the Traffic Data Antenna -R173--1- from the bracket -3-.
Installing
- Install in reverse order of removal.

Internet Antenna -R266-, Removing and Installing
The Internet Antenna -R266- (WLAN-Antenna) is located under the glove compartment on the air duct channel.
Removing
- Turn off the ignition and all electrical equipment and remove the ignition key.
- Remove the glove compartment. Refer to → Body Interior; Rep. Gr.68; Storage Compartment/Covers; Glove Compartment, Removing and Installing.
The Internet Antenna -R266- is attached to the air duct channel.
- Disconnect the connector -2- from the Internet Antenna -R266--1-.
- Loosen the Internet Antenna -R266--1- from the remaining adhesive with a small screwdriver.
Installing
- Always use isopropanol to clean the remaining adhesive off of the air duct channel.
- Remove the protective film from the adhesive surface of the Internet Antenna -R266-.
- Press the Internet Antenna -R266--1- against the adhesive surface on the air duct channel and hold it for about 10 seconds.
- Perform the rest of the installation in reverse order.
READ NEXT:
 Antenna Amplifier Connector Assignments
Antenna Amplifier 4 -R113-
1 - Window antenna connection, Digital Radio Antenna -R183-
2 - DAB connection to the Radio -R-
3 - Not Assigned
Window Antenna Connector
Overview - Radio Components
Overview - Radio, Radio Chorus, CAN, 8UA
Radio with integrated CD player
Sound system: basic, 8RE
Optional
Sound system: basic plus, 8RX
Cell Phone Preparation Preliminary Setup
The
SEE MORE:
Settings
Telephone settings
Applies to: vehicles with telephone
Applies to: MMI: Select on the home screen:
PHONE > .
The following options may be possible, depending
on your mobile device:
Decline with text message
Edit voicemail number
Switching between two mobile devices
Requirement: phone 1 an
Control Module and Hydraulic Unit
Overview - Control Module and Hydraulic Unit
1 - Brake Booster
Removing and installing, refer to
→ Chapter "Brake Booster, Removing and Installing".
2 - Brake Line
Master brake cylinder/primary piston circuit to hydraulic control
unit
Identification: 6.
