Audi Q3: Water Drain Hoses
Overview - Water Drain Hoses

1 - Front Water Drain Hose
- Removing and installing. Refer to → Chapter "Water Drain Hoses, Removing and Installing".
- Cleaning, refer to → Chapter "Water Drain Hoses, Cleaning"
2 - Panorama Sunroof
3 - Rear Water Drain Hose
- Removing and installing. Refer to → Chapter "Rear Water Drain Hose, Removing and Installing".
- Cleaning. refer to → Chapter "Water Drain Hoses, Cleaning"
4 - Plugs
- Only on vehicles without panorama roof.
5 - Grommet
- Press completely in the body flange.
Water Drain Hoses, Cleaning
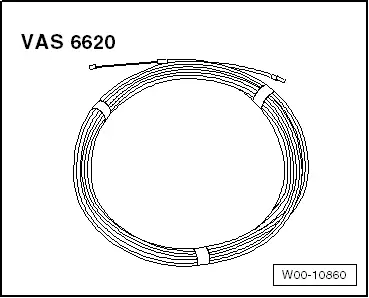
Special tools and workshop equipment required
- Drain Snake -VAS6620-
 Note
Note
Use for cleaning the water drain hoses.
Front Water Drain Hose
- Cleaning takes place from the panorama sunroof opening.
Rear Water Drain Hose
- Cleaning is performed at lower end of hose.
 Note
Note
To do this, either remove the wheel housing liner or move it to the side. Refer to → Chapter "Rear Wheel Housing Liner, Removing and Installing".
Water Drain Hoses, Removing and Installing
Front Water Drain Hose, Removing and Installing
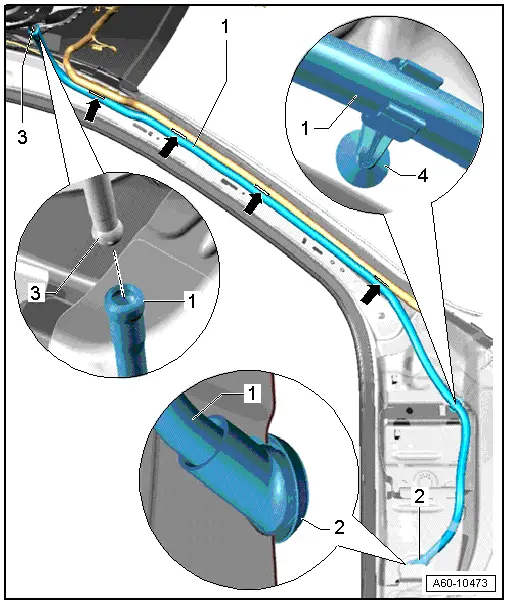
1 - Front Water Drain Hose
- Removing:
- Remove the trim on the A-pillar. Refer to → Body Interior; Rep. Gr.70; Interior Trim; A-pillar Trim Removing and Installing.
- Remove the water drain hose from the connection -3-.
- Unclip the four water drain hoses -arrows- and pull from the bracket -4-.
- Remove the grommet at the bottom of the A-pillar -2- and pull the water drain hose downward out of the A-pillar.
- Installing:
- Install the hose back into the A-pillar from the bottom.
- Push it upward as illustrated, pull it out and attach it to the Panorama sunroof connection.
- Push the water drain hose in the clips -arrows- and push in the bracket -4-.
2 - Grommet
- The grommet is firmly attached to the water drain hose and must be pressed fully into A-pillar at the bottom.
3 - Front Connection for Water Drain
- Push the hose all the way onto the end piece when installing.
4 - Bracket
Rear Water Drain Hose, Removing and Installing
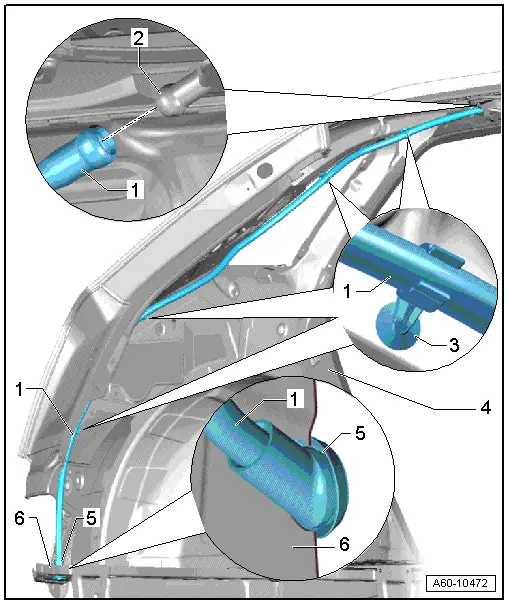
1 - Rear Water Drain Hose
- Removing:
- Remove the trim on the D-pillar. Refer to → Body Interior; Rep. Gr.70; Interior Trim; D-Pillar Trim Panel Removing and Installing.
- Remove the rear wheel housing liner. Refer to → Chapter "Rear Wheel Housing Liner, Removing and Installing".
- Open the bracket -3- and remove the water drain hose from the connection -2-.
- Remove the grommet -4- at the top of the wheel housing and remove the water drain hose downward.
- Installing:
- Push the hose back into the wheel housing from the bottom.
- Insert the hose from the bottom, as illustrated, and pull it upward along the D-pillar until the end of the hose is sticking out of the Panorama sunroof.
- Secure the water drain hose with the bracket.
- Install the rear grommet into the wheel housing.
2 - Water Drain Rear Connection
3 - Bracket
4 - Grommet
- Must be pushed completely into the wheel housing
5 - Wheel Housing
Special Tools
Special tools and workshop equipment required
- Roller -3356-
- Drain Snake - VAS6620-
READ NEXT:
 Overview - Front Bumper Cover
Overview - Bumper Cover, Audi Q3 through MY 2014
1 - Bumper Cover Lower Section
Removing and installing. Refer to
→ Chapter "Bumper Cover Lower Section, Removing and Installi
Front Bumper Cover, Removing and Installing
Bumper Cover, Removing and Installing
Removing
- Remove the front wheel spoiler. Refer to
→ Chapter "Front Wheel Spoiler, Removing and Installing".
- Remove the front wheel housi
SEE MORE:
Entering a destination
Intelligent search for navigation destinations
Applies to: vehicles with navigation system
Using the intelligent search, you can enter the
data for a navigation destination in any order all
at once (for example, 5th Avenue New York).
Likewise, you can search for points of interest,
contacts, previo
Distance warning
Description
Applies to: vehicles with distance warning
Fig. 106 Instrument cluster: display of the current distance
Fig. 107 Instrument cluster: distance warning
General information
At speeds above approximately 40 mph (65
km/h), this function measures the distance to
the vehicle ahead as time. If
