Audi Q3: Overview - Front Bumper Cover
Overview - Bumper Cover, Audi Q3 through MY 2014
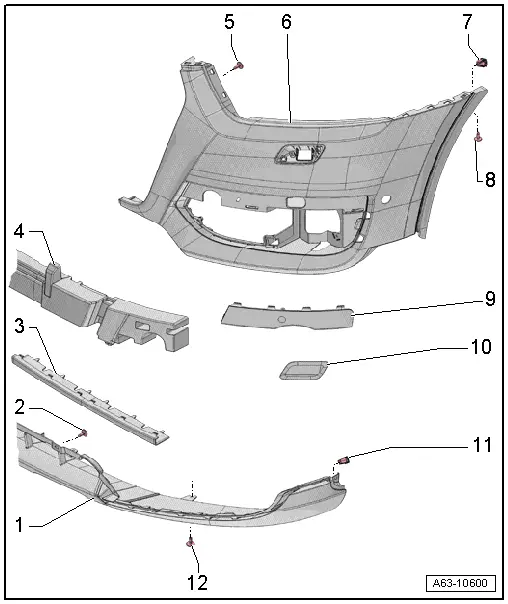
1 - Bumper Cover Lower Section
- Removing and installing. Refer to → Chapter "Bumper Cover Lower Section, Removing and Installing, Audi Q3".
2 - Bolt
- 2 Nm
- Quantity: 6
3 - Bumper Cover Center Part
- Removing and installing. Refer to → Chapter "Bumper Cover Center Part, Removing and Installing".
4 - Molded Foam Part
- Removing and installing. Refer to → Chapter "Molded Foam Part, Removing and Installing, Audi Q3 through MY 2014".
5 - Bolt
- 2 Nm
- Quantity: 8
6 - Bumper Cover Outer Panel
- Removing and installing. Refer to → Chapter "Bumper Cover, Removing and Installing".
- Bumper cove outer panel, removing and installing. Refer to → Chapter "Bumper Cover Outer Panel, Removing and Installing, Audi Q3".
7 - Clip Nut
- Quantity: 2
8 - Bolt
- 2 Nm
9 - Trim
- For the air intake grille
- Removing and installing. Refer to → Chapter "Air Intake Grille Trim, Removing and Installing".
10 - Spray Nozzle Cover
- For the headlamp washer system
- Removing and installing. Refer to → Chapter "Headlamp Washer System Spray Nozzle Cover, Removing and Installing".
11 - Clip Nut
- Quantity: 2
12 - Bolt
- 2.5 Nm
- Quantity: 4
Overview - Bumper Cover, Audi Q3 from MY 2015
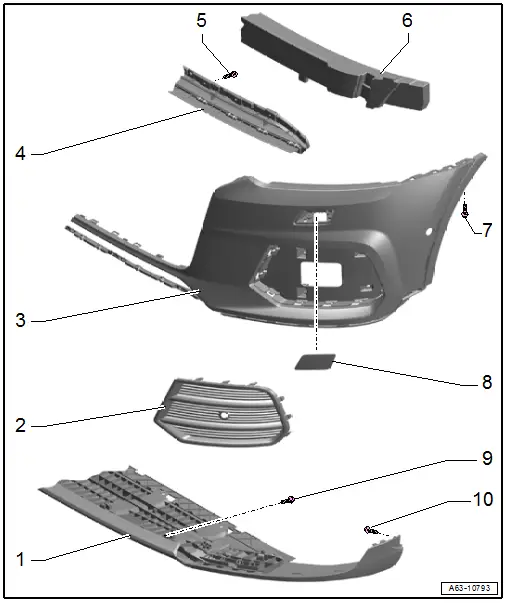
1 - Bumper Cover Lower Section
- Removing and installing. Refer to → Chapter "Bumper Cover Lower Section, Removing and Installing, Audi Q3 from MY 2015".
2 - Air Intake Grille
- Removing and installing. Refer to → Chapter "Air Intake Grille, Removing and Installing, Vehicles from MY 2015".
3 - Bumper Cover
- Removing and installing. Refer to → Chapter "Bumper Cover, Removing and Installing".
4 - Center Grille
- Removing and installing. Refer to → Chapter "Center Grille, Removing and Installing, Audi Q3 from MY 2015".
5 - Bolt
- 2 Nm
- Quantity: 14
6 - Molded Foam Part
- Removing and installing. Refer to → Chapter "Molded Foam Part, Removing and Installing, Audi Q3 from MY 2015".
7 - Bolt
- 2 Nm
8 - Spray Nozzle Cover
- For the headlamp washer system
- Removing and installing. Refer to → Chapter "Headlamp Washer System Spray Nozzle Cover, Removing and Installing".
9 - Bolt
- 2 Nm
- Quantity: 4
10 - Bolt
- 2 Nm
Overview - Bumper Cover, Audi Q3 Offroad
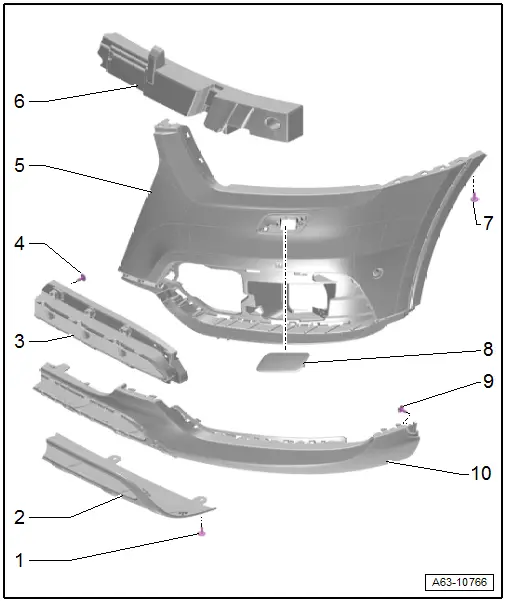
1 - Bolt
- 2.5 Nm
- Quantity: 4
2 - Impact Guard
- Removing and installing. Refer to → Chapter "Impact Guard, Removing and Installing, Audi Q3 Offroad".
3 - Center grille
- Removing and installing:
- Audi offroad. Refer to → Chapter "Center Grille. Removing and Installing, Audi Q3 Offroad".
- Audi S-line. Refer to → Chapter "Center Grille, Removing and Installing, Audi Q3 S Line through MY 2014".
4 - Bolt
- 2 Nm
- Quantity: 16
5 - Bumper cover outer panel
- Removing and installing. Refer to → Chapter "Bumper Cover, Removing and Installing".
- Bumper cove outer panel, removing and installing. Refer to → Chapter "Bumper Cover Outer Panel, Removing and Installing, Audi Q3".
6 - Molded Foam Part
- Removing and installing. Refer to → Chapter "Molded Foam Part, Removing and Installing, Audi Q3 through MY 2014".
7 - Bolt
- 2 Nm
8 - Spray Nozzle Cover
- For the headlamp washer system
- Removing and installing. Refer to → Chapter "Headlamp Washer System Spray Nozzle Cover, Removing and Installing".
9 - Bolt
- 2 Nm
10 - Bumper Cover Lower Section
- Removing and installing. Refer to → Chapter "Bumper Cover Lower Section, Removing and Installing, Audi Q3 Offraod".
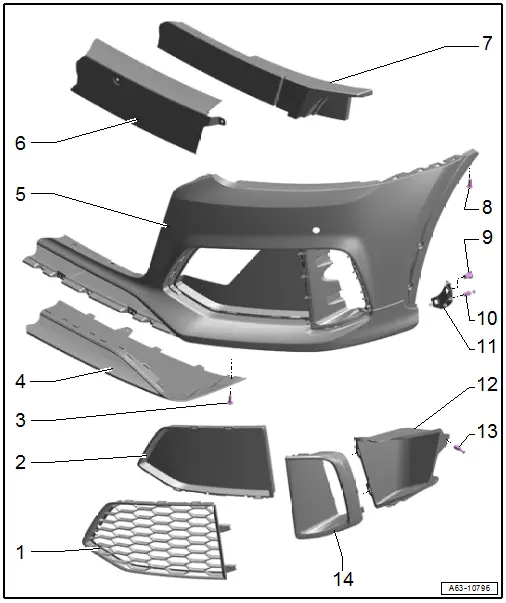
Overview - Bumper Cover, Audi RS Q3 through MY 2014
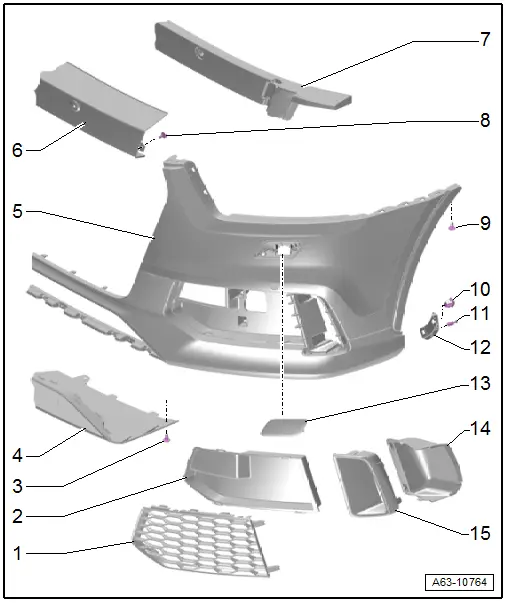
1 - Air Intake Grille
- Removing and installing. Refer to → Chapter "Air Intake Grille, Removing and Installing, Audi RS Q3".
2 - Trim
- For the air intake grille
3 - Bolt
- 2.5 Nm
- Quantity: 2
4 - Spoiler Lower Section
- Removing and installing. Refer to → Chapter "RSQ3 Spoiler-Lower Section, Removing and Installing".
5 - Bumper Cover
- Removing and installing. Refer to → Chapter "Bumper Cover, Removing and Installing".
6 - Mount
- For molded foam part
- Removing and installing. Refer to → Chapter "Molded Foam Part Mount, Removing and Installing, Audi RS Q3 from MY 2015".
7 - Molded Foam Part
- Removing and installing. Refer to → Chapter "Molded Foam Part, Removing and Installing, Audi RS Q3".
8 - Bolt
- 2 Nm
9 - Bolt
- 2 Nm
10 - Clip Nut
- Quantity: 2
11 - Expanding Rivet
- Quantity: 2
12 - Intermediate Piece
- For securing the wheel housing liner
13 - Spray Nozzle Cover
- For the headlamp washer system
- Removing and installing. Refer to → Chapter "Headlamp Washer System Spray Nozzle Cover, Removing and Installing".
14 - Mount
- For the exterior air intake grille
- Removing and installing. Refer to → Chapter "Side Air Intake Trim, Removing and Installing, Audi RS Q3 through MY 2014".
15 - Trim
- For the side air intake grille
- Removing and installing. Refer to → Chapter "Side Air Intake Trim, Removing and Installing, Audi RS Q3 through MY 2014".
Overview - Bumper Cover, Audi RS Q3 from MY 2015
1 - Air Intake Grille
- Removing and installing. Refer to → Chapter "Air Intake Grille, Removing and Installing, Audi RS Q3".
2 - Trim
- For the air intake grille
3 - Bolt
- Quantity: 2
- 2.5 Nm
4 - Spoiler Lower Section
- Removing and installing. Refer to → Chapter "RSQ3 Spoiler-Lower Section, Removing and Installing".
5 - Bumper Cover
- Removing and installing. Refer to → Chapter "Bumper Cover, Removing and Installing".
6 - Mount
- for molded foam part
- Removing and installing. Refer to → Chapter "Molded Foam Part Mount, Removing and Installing, Audi RS Q3 from MY 2015".
7 - Molded Foam Part
- Removing and installing. Refer to → Chapter "Molded Foam Part, Removing and Installing, Audi RS Q3".
8 - Bolt
- 2 Nm
9 - Clip Nut
- Quantity: 2
10 - Expanding Rivet
- Quantity: 2
11 - Intermediate Piece
- For securing the wheel housing liner
12 - Mount
- For the exterior air intake grille
- Removing and installing. Refer to → Chapter "Side Air Intake Trim, Removing and Installing, Audi RS Q3 from MY 2015".
13 - Expanding Rivet
- Quantity: 2
14 - Trim
- For the side air intake grille
- Removing and installing. Refer to → Chapter "Side Air Intake Trim, Removing and Installing, Audi RS Q3 from MY 2015".
Overview - Bumper Cover, Lock Carrier Cover, Air Intake Grille and End Panel
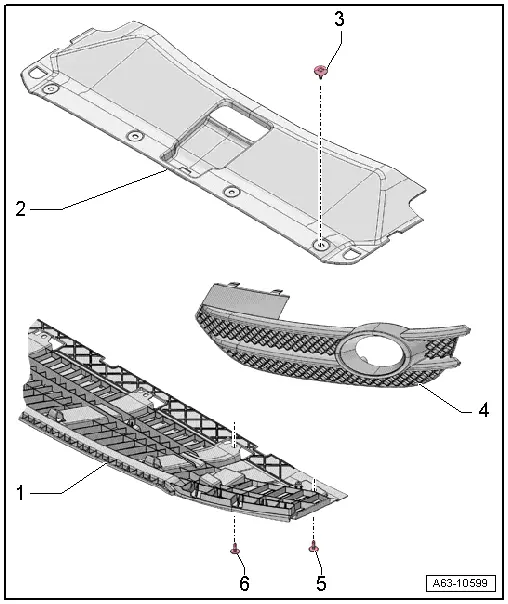
1 - Bumper Cover End Plate
- Removing and installing. Refer to → Chapter "Front Bumper Cover End Plate, Removing and Installing".
2 - Lock Carrier Cover
- There are different versions. Refer to the Parts Catalog.
- Removing and installing:
- through MY 2014. Refer to → Chapter "Lock Carrier Cover, Removing and Installing, Vehicles through MY 2014"
- from MY 2015. Refer to → Chapter "Lock Carrier Cover, Removing and Installing, Vehicles from MY 2015"
3 - Expanding Clip
- Vehicles through MY 2014
- Quantity: 4
4 - Air Intake Grille
- Vehicles through MY 2014
- There are different versions. Refer to the Parts Catalog.
- Removing and installing. Refer to → Chapter "Air Intake Grille, Removing and Installing, Vehicles through MY 2014".
5 - Bolt
- 2.5 Nm
6 - Bolt
- 2.5 Nm
- Quantity: 4
Overview - Impact Member
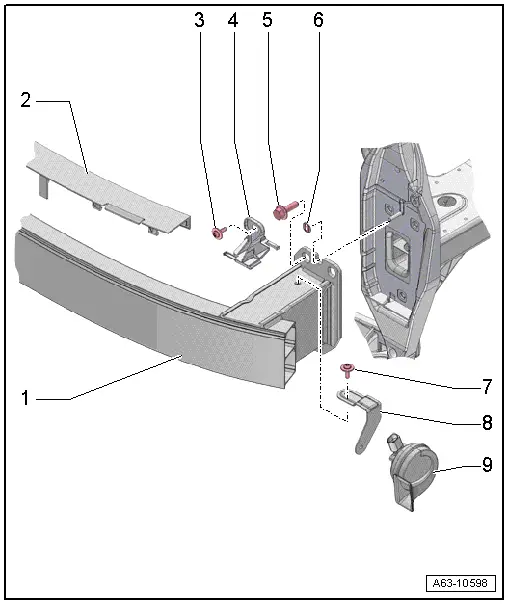
1 - Impact Member
- Removing and installing. Refer to → Chapter "Impact Member, Removing and Installing".
2 - Cover
- Versions. Refer to the Parts Catalog.
- For impact member
3 - Bolt
- 4.5 Nm
4 - Lower Mount Bracket
- For the bumper cover
- Removing and installing. Refer to → Chapter "Bumper Cover Mount Bracket, Removing and Installing".
5 - Bolt
- 55 Nm
- Quantity: 3
6 - Lock Washer
- Secures the lock carrier
7 - Bolt
- Tightening specification. Refer to → Electrical Equipment; Rep. Gr.90; Overview - Horn.
8 - Bracket
- For the signal horn
- Removing and Installing. Refer to → Electrical Equipment; Rep. Gr.90; Horn; High Tone HornH2/Low Tone HornH7 Removing and Installing.
9 - Horn
- Removing and installing. Refer to → Electrical Equipment; Rep. Gr.90; Overview - Horn.
READ NEXT:
 Front Bumper Cover, Removing and Installing
Bumper Cover, Removing and Installing
Removing
- Remove the front wheel spoiler. Refer to
→ Chapter "Front Wheel Spoiler, Removing and Installing".
- Remove the front wheel housi
Lock Carrier Cover, Removing and Installing, Vehicles through MY 2014
Removing
- To remove the expanding clips -arrows-,
push the clamping pin -1- carefully
to dimension -x- until it clicks
into the expanding clip -arrow A-.
Dimension -x- = 5 mm
-&nbs
Center Grille. Removing and Installing, Audi Q3 Offroad
Removing
- Remove the noise insulation. Refer to
→ Chapter "Overview - Noise Insulation".
- Remove the front bumper cover end plate. Refer to
→ Chapter "Front Bumper Cover
SEE MORE:
Windshield Wiper System
Overview - Windshield Wiper System
Overview - Windshield Wiper System
1 - Bolt
Tightening sequence. Refer to → Fig. " Windshield Wiper
Motor -V- - Tightening Specification and Sequence"
2 - Windshield Wiper Motor -V-
With Wiper Motor Control Module -J400-
Steering wheel heating
Switching on and off
Applies to: vehicles with steering wheel heating
Press the button on the
multifunction steering
wheel to switch the steering wheel heating
on and off.
Messages
Applies to: vehicles with steering wheel heating
The following messages may appear depending
on the vehicle equ
