Audi Q3: Windshield Wiper System
Overview - Windshield Wiper System
Overview - Windshield Wiper System
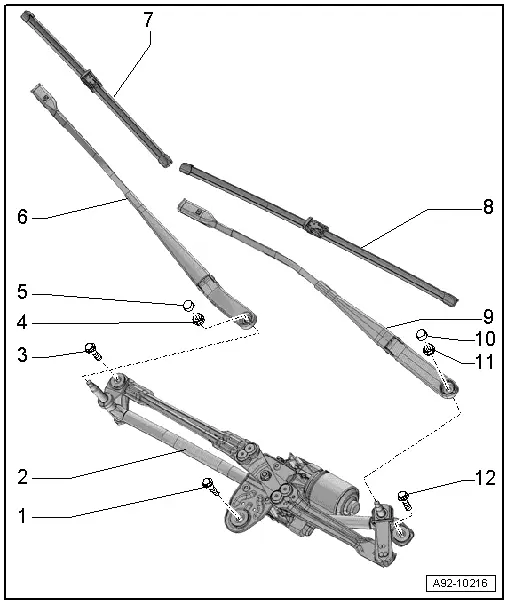
1 - Bolt
- Tightening sequence. Refer to → Fig. " Windshield Wiper Motor -V- - Tightening Specification and Sequence"
2 - Windshield Wiper Motor -V-
- With Wiper Motor Control Module -J400-
- Removing and installing. Refer to → Chapter "Windshield Wiper Motor -V-, Removing and Installing".
3 - Bolt
- Tightening sequence. Refer to → Fig. "Windshield Wiper Motor -V- - Tightening Specification and Sequence"
4 - Nut
- 22 Nm
5 - Cap
6 - Passenger Side Windshield Wiper Arm
- There are different lengths. Refer to the Parts Catalog.
- Removing and installing. Refer to → Chapter "Windshield Wiper Arms, Removing and Installing".
- Adjusting. Refer to → Chapter "Windshield Wiper Arms, Adjusting".
7 - Passenger Side Windshield Wiper Blade
- There are different lengths. Refer to the Parts Catalog.
- Replacing. Refer to → Chapter "Wiper Blade, Removing and Installing".
8 - Driver Side Windshield Wiper Blade
- There are different lengths. Refer to the Parts Catalog.
- Replacing. Refer to → Chapter "Wiper Blade, Removing and Installing".
9 - Driver Side Windshield Wiper Arm
- There are different lengths. Refer to the Parts Catalog.
- Removing and installing. Refer to → Chapter "Windshield Wiper Arms, Removing and Installing".
- Adjusting. Refer to → Chapter "Windshield Wiper Arms, Adjusting".
10 - Cap
11 - Nut
- 22 Nm
12 - Bolt
- Tightening sequence. Refer to → Fig. " Windshield Wiper Motor -V- - Tightening Specification and Sequence"
Windshield Wiper Motor -V- - Tightening Specification and Sequence
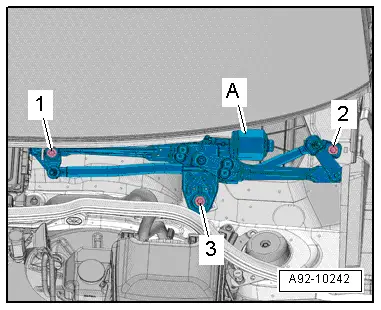
- Tighten the bolts in stages in the sequence shown:

Overview - Windshield Wiper System, Rain/Light Recognition Sensor
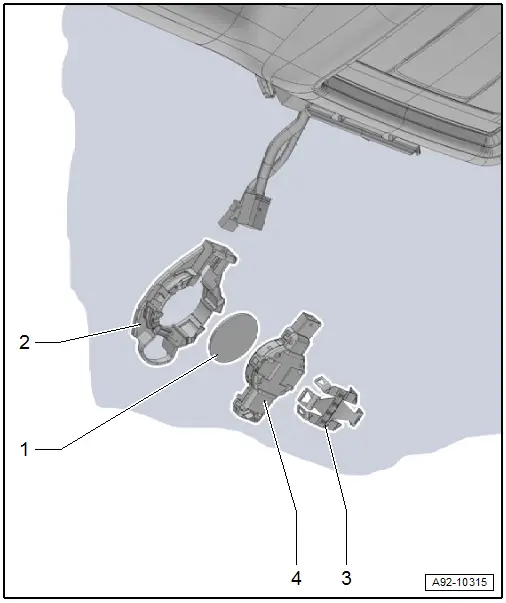
1 - Silicon Pad
- Replace after removal
2 - Retaining Plate
- For Rain/Light Recognition Sensor -G397-
- Attached to the windshield
3 - Clamp
4 - Rain/Light Recognition Sensor -G397-
- Removing and installing. Refer to → Chapter "Rain/Light Recognition Sensor -G397-, Removing and Installing".
- Replacing. Refer to → Chapter "Rain/Light Recognition Sensor -G397-, Replacing".
Wiper, Moving Into Service Position
 Note
Note
If the windshield wiper motor is to be run during the work procedure, the hood must be closed, otherwise the voltage supply of the wiper motor will be interrupted.
- Make sure the wiper blades are not frozen.
- Quickly turn on the ignition and then turn it off again.
- Press the "One-tap wiping" within 10 seconds.
- The windshield wipers run into "Service position".
 Caution
Risk of damaging the hood by running the wipers back in basic position.
- Do not drive a vehicle with windshield wiper arms folded up.
- The windshield wipers automatically go back into their rest position when the wiper switch is activated or when driving faster than six km/h.
Wiper Blade, Removing and Installing
Removing
- Bring the windshield wiper into service position. Refer to → Chapter "Wiper, Moving Into Service Position".
- Lift the wiper arm off the windshield.
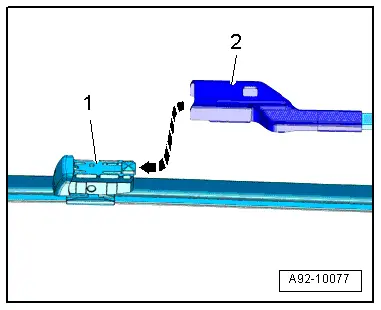
- Press the clip in direction of -arrow A- and remove the wiper blade -1- from the wiper arm -2- in direction of -arrow B-.
- Remove the wiper blade.
Installing
 Caution
There is a risk of damaging the body.
The driver and passenger side wiper blades are different lengths.
Install in reverse order of removal. Note the following:
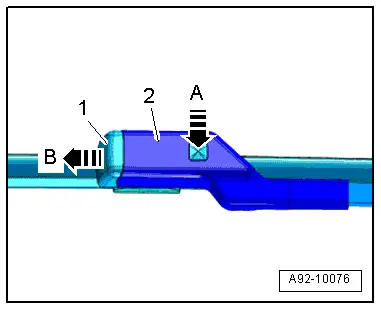
- Guide the wiper blade -1- parallel into the wiper arm -2--arrow-. Slide the wiper blade on until the retaining clips engage in the wiper arm.
- To leave the "Service position", either operate the windshield wiper switch or drive faster than six km/h.
READ NEXT:
 Windshield Wiper Arms, Removing and Installing
Special tools and workshop equipment
required
Puller - Wiper Arm Kit -T10369-
Removing
Note
If the windshield wiper motor is to be run during the work
procedure, the hood must be
Rain/Light Recognition Sensor, Removing and Installing
Rain/Light Recognition Sensor -G397-, Removing and Installing
Special tools and workshop equipment
required
D 009 401 04 -Cleaning Solution-
Removing
- Turn off the ignition.
- V
Windshield Washer System
Overview - Windshield Washer System
Overview - Windshield Washer System, through MY 2014
1 - Washer Fluid Reservoir
Removing and installing. Refer to
→ Chapter "Windshield WSEE MORE:
Start/Stop system
Applies to: vehicles with Start/Stop system
The Start/Stop system can help increase fuel
economy and reduce CO2 emissions. In Start/
Stop mode, the engine shuts off automatically
when stopped, for example at a traffic light.
If certain conditions are met, the engine may
stop before the vehicle has
Overview - Rear Lid
Overview - Rear Lid
1 - Rear Lid
Removing and installing. Refer to
→ Chapter "Rear Lid, Removing and Installing".
Rear Lid Seal, Removing and Installing. Refer to
→ Chapter "Rear Lid Seal, Removing and Installing".
2 - Bolt
12 Nm
3 - 