Audi Q3: Driver Side Airbag Crash Sensor -G179-/ Front Passenger Side Airbag Crash Sensor -G180-, Removing and Installing
Driver/Front Passenger Side Airbag Crash Sensor -G179-/-G180-, Removing and Installing, USA and Canada Market-Specific
Removing
 WARNING
- Follow all safety precautions when working with pyrotechnic components. Refer to → Chapter "Pyrotechnic Components Safety Precautions".
- Follow the safety precautions for front side airbag crash sensors (pressure sensors). Refer to → Chapter "Front Side Airbag Crash Sensors (Pressure Sensors) Safety Precautions".
- Disconnect the battery ground cable with the ignition turned on. Refer to → Electrical Equipment; Rep. Gr.27; Battery; Battery, Disconnecting and Connecting.
- Remove the front door trim panel. Refer to → Chapter "Front Door Trim Panel, Removing and Installing".
 WARNING
Before handling pyrotechnic components (for example, disconnecting the connector), the person handling it must "discharge static electricity". This can be done by touching the door striker, for example.
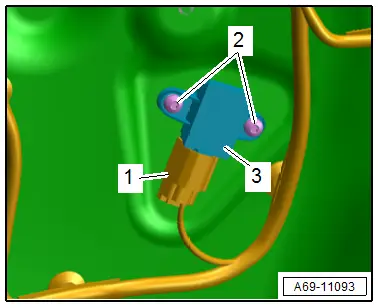
- Disconnect the connector -1- from the crash sensor by removing the connector lock and pressing down.
- Remove the bolts -2- and remove the side airbag crash sensor -3-.

Installing
 WARNING
- Follow all safety precautions when working with pyrotechnic components. Refer to → Chapter "Pyrotechnic Components Safety Precautions".
- Follow the safety precautions for front side airbag crash sensors (pressure sensors). Refer to → Chapter "Front Side Airbag Crash Sensors (Pressure Sensors) Safety Precautions".
- Before handling pyrotechnic components (for example, connecting the connector), the person handling it must "discharge static electricity". This can be done by touching the door striker, for example.
Install in reverse order of removal. Note the following:
 Note
Note
- Make sure the connectors are installed correctly and are secure.
- Make sure the wires do not get caught.
 WARNING
Ignition must be on when connecting battery. If pyrotechnic components (for example, airbag, belt tensioner) are not repaired correctly, they may deploy unintentionally after connecting battery. There must not be anyone inside the vehicle when connecting the battery.
- Connect the battery ground cable with the ignition turned on. Refer to → Electrical Equipment; Rep. Gr.27; Battery; Battery, Disconnecting and Connecting.
 Note
Note
If the Airbag Indicator Lamp -K75- indicates a fault, check the DTC memory, erase it and check it again using the Vehicle Diagnostic Tester → Vehicle diagnostic tester.
Installation notes, for example tightening specifications, replacing components. Refer to → Chapter "Component Location Overview - Airbag Crash Sensors".
Driver/Front Passenger Side Airbag Crash Sensor -G179-/-G180-, Removing and Installing, Not USA and Canada Market-Specific
NOT FOR NORTH AMERICAN MARKET
Removing
 WARNING
- Follow all safety precautions when working with pyrotechnic components. Refer to → Chapter "Pyrotechnic Components Safety Precautions".
- Follow the safety precautions for front side airbag crash sensors (pressure sensors). Refer to → Chapter "Front Side Airbag Crash Sensors (Pressure Sensors) Safety Precautions".
- Disconnect the battery ground cable with the ignition turned on. Refer to → Electrical Equipment; Rep. Gr.27; Battery; Battery, Disconnecting and Connecting.
- Remove the lower B-pillar trim panel. Refer to → Chapter "Lower B-Pillar Trim Panel, Removing and Installing".
 WARNING
Before handling pyrotechnic components (for example, disconnecting the connector), the person handling it must "discharge static electricity". This can be done by touching the door striker, for example.
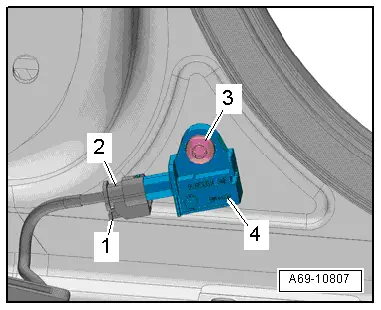
- Pull out connector lock -1- and press down, disconnect harness connector -2- at the crash sensor.
- Remove the bolt -3- and the side airbag crash sensor -4-.
Installing
 WARNING
- Follow all safety precautions when working with pyrotechnic components. Refer to → Chapter "Pyrotechnic Components Safety Precautions".
- Before handling pyrotechnic components (for example, connecting the connector), the person handling it must "discharge static electricity". This can be done by touching the door striker, for example.
Install in reverse order of removal. Note the following:
 Note
Note
- Make sure the connectors are installed correctly and are secure.
- Make sure the wires do not get caught.
 WARNING
Ignition must be on when connecting battery. If pyrotechnic components (for example, airbag, belt tensioner) are not repaired correctly, they may deploy unintentionally after connecting battery. There must not be anyone inside the vehicle when connecting the battery.
- Connect the battery ground cable with the ignition turned on. Refer to → Electrical Equipment; Rep. Gr.27; Battery; Battery, Disconnecting and Connecting.
 Note
Note
If the Airbag Indicator Lamp -K75- indicates a fault, check the DTC memory, erase it and check it again using the Vehicle Diagnostic Tester → Vehicle diagnostic tester.
Installation notes, for example tightening specifications, replacing components. Refer to → Chapter "Component Location Overview - Airbag Crash Sensors".

Driver Side Rear Side Airbag Crash Sensor -G256-/ Passenger Side Rear Side Airbag Crash Sensor-G257-, Removing and Installing
Removing
 WARNING
- Follow all safety precautions when working with pyrotechnic components. Refer to → Chapter "Pyrotechnic Components Safety Precautions".
- Before handling pyrotechnic components (for example, disconnecting the connector), the person handling it must "discharge static electricity". This can be done by touching the door striker, for example.
- Disconnect the battery ground cable with the ignition turned on. Refer to → Electrical Equipment; Rep. Gr.27; Battery; Battery, Disconnecting and Connecting.
- Remove the rear sill panel strip. Refer to → Chapter "Rear Sill Panel Strip, Removing and Installing".
 WARNING
Before handling pyrotechnic components (for example, disconnecting the connector), the person handling it must "discharge static electricity". This can be done by touching the door striker, for example.
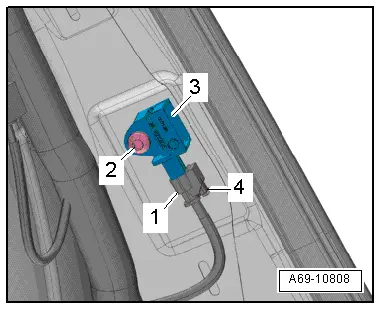
- Pull out connector lock -4- and press down, disconnect harness connector -1- at the crash sensor.
- Remove the screw -2- and the side airbag crash sensors -3-.
Installing
 WARNING
- Follow all safety precautions when working with pyrotechnic components. Refer to → Chapter "Pyrotechnic Components Safety Precautions".
- Before handling pyrotechnic components (for example, connecting the connector), the person handling it must "discharge static electricity". This can be done by touching the door striker, for example.
Install in reverse order of removal. Note the following:
 Note
Note
- Make sure the connectors are installed correctly and are secure.
- Make sure the wires do not get caught.
 WARNING
Ignition must be on when connecting battery. If pyrotechnic components (for example, airbag, belt tensioner) are not repaired correctly, they may deploy unintentionally after connecting battery. There must not be anyone inside the vehicle when connecting the battery.
- Connect the battery ground cable with the ignition turned on. Refer to → Electrical Equipment; Rep. Gr.27; Battery; Battery, Disconnecting and Connecting.
 Note
Note
If the Airbag Indicator Lamp -K75- indicates a fault, check the DTC memory, erase it and check it again using the Vehicle Diagnostic Tester → Vehicle diagnostic tester.
Installation notes, for example tightening specifications, replacing components. Refer to → Chapter "Component Location Overview - Airbag Crash Sensors".


