Audi Q3: Fog Lamp
Overview - Fog Lamps
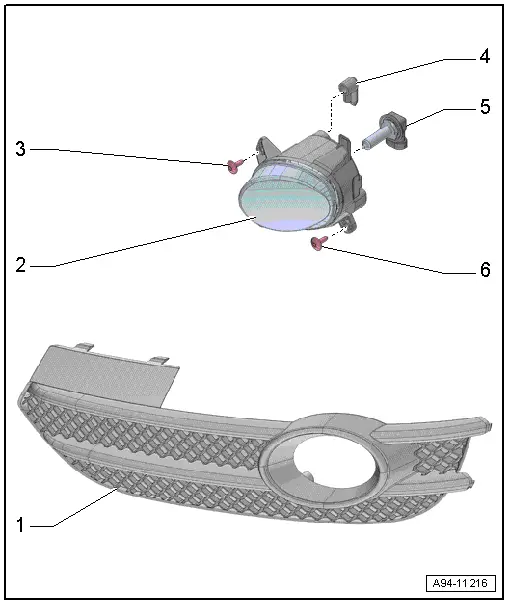
1 - Air Intake Grille
2 - Fog Lamp
- Removing and installing. Refer to → Chapter "Fog Lamp, Removing and Installing".
3 - Bolt
- 4.5 Nm
4 - Ventilation
- For fog lamp
5 - Fog Lamp Bulb
- Left Front Fog Lamp Bulb -L22-
- Right Front Fog Lamp Bulb -L23-
- 12 V, 55 W (H11)
- Removing and installing. Refer to → Chapter "Left/Right Front Fog Lamp Bulb -L22-/-L23-, Removing and Installing".
6 - Bolt
- 4.5 Nm
Fog Lamp, Removing and Installing
Special tools and workshop equipment required
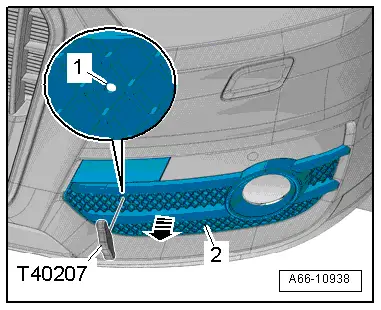
- Hook Tool -T40207-
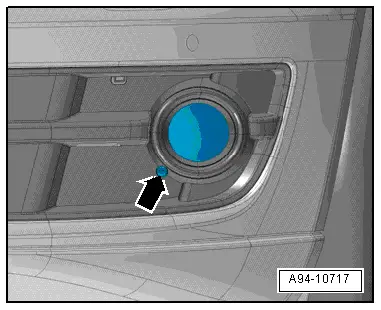
Removing
- Insert the Hook Tool -T40207- in the opening -1- and remove the lower air intake grille -2- from the bumper cover in direction of -arrow-.
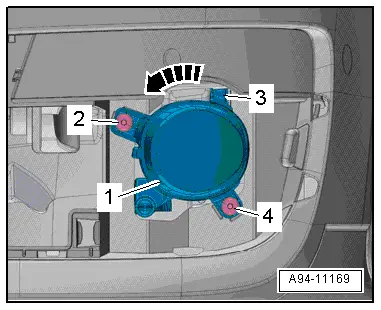
- Remove the bolts -2 and 4-.
- Remove the fog lamp -1-, to do this pivot out the mount -3- on the bumper cover: left counter-clockwise in direction of -arrow- right clockwise.
- Disconnect the connector.
Installing
Install in reverse order of removal. Note the following:
- Adjust the fog lamps. Refer to → Chapter "Fog Lamp, Adjusting".
Left/Right Front Fog Lamp Bulb -L22-/-L23-, Removing and Installing
Removing
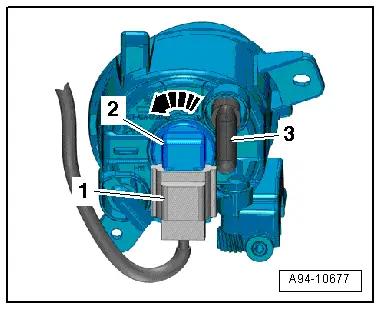
- Remove the fog lamps and disconnect the connector -1-. Refer to → Chapter "Fog Lamp, Removing and Installing".
- Remove the ventilation hose -3- on the left side of the fog lamp.
- Rotate the bulb -2- counterclockwise -arrow- and remove it from the fog lamp housing.
Installing
Install in reverse order of removal. Note the following:
- Insert the new bulb into the housing. Do not touch the glass bulbs with bare hands.
- Rotate the bulb clockwise to secure.
- Mount the ventilation hose on the left side of the fog lamp.
- Install the fog lamp. Refer to → Chapter "Fog Lamp, Removing and Installing".
Fog Lamp, Adjusting
Checking and Adjusting Conditions
- Tire pressure is OK.
- The headlamp lens must be clean and dry.
- The headlamp lens may not be damaged.
- Headlamp-reflector and lamp are OK.
- Roll the vehicle several yards or move it back and forth several times to seat the springs.
- The parking brake must not be engaged so that the vehicle is not under stress.
- The vehicle and headlamp adjusting unit must be on a level surface.
- The headlamp adjusting unit must be aligned to the vehicle. Refer to the Headlamp Adjusting Unit Instructions.
- The inclination dimension is set on the headlamp adjusting unit. Refer to the Headlamp Adjusting Unit Operating Instructions.
- Vehicle load must be created.
Vehicle load on driver's seat in otherwise unloaded vehicle (curb weight).
- One person or 75 kg.
Procedure
- The vehicle must be standing on a flat surface.
- Turn the headlamp switch to "low beam" - not "Auto".
- Pull the headlamp switch to "fog lamp".
- During the program, you will be asked to perform a headlamp adjustment.
Headlamp Adjustment
- To adjust headlamp range, turn the adjusting screw -arrow-.
- Angle dimension: 2%
 Note
Note
- The percentage indicator is based on a 10 meter (32.8 feet) projection distance. At an angle dimension of 2.0%, for example, converts to 20 cm (7.87 in).
- Side adjustment is not intended.
READ NEXT:
 Side Marker Lamp
Overview - Side Marker Lamp
1 - Front Bumper Cover
2 - Rear Side Marker Lamp Bulb
The entire body tail lamp must be replaced if an LED is faulty
Left Rear Side Marker Lam
Exterior Rearview Mirror Lamps
Overview - Exterior Rearview Mirror Lamps
1 - Mirror Glass
2 - Mirror Adjusting Unit Mount
3 - Exterior Rearview Mirror Housing
4 - Exterior Rearview Mirr
Tail Lamps
Overview - Rear Lid Tail Lamps
LED tail lamps have LED bulbs and are integrated in the tail
lamps. The LEDs cannot be replaced; the entire tail lamp must be
replaced.
1 - Tail L
SEE MORE:
Electromechanical parking brake
Operating the parking brake
The electromechanical parking brake is used to
secure the vehicle from rolling away unintentionally.
The switch is located under the
selector lever
in the center console. It turns on when the parking
brake is set. You can release the parking
brake manually or automatic
Safety systems monitoring
The
indicator light in the instrument cluster
monitors the safety systems such as the airbags
(including the control modules, sensor, and wiring)
and the belt tensioners. It turns on when you
switch the ignition on and turns off after several
seconds.
If the indicator light does not turn on when
