Audi Q3: Side Marker Lamp
Overview - Side Marker Lamp
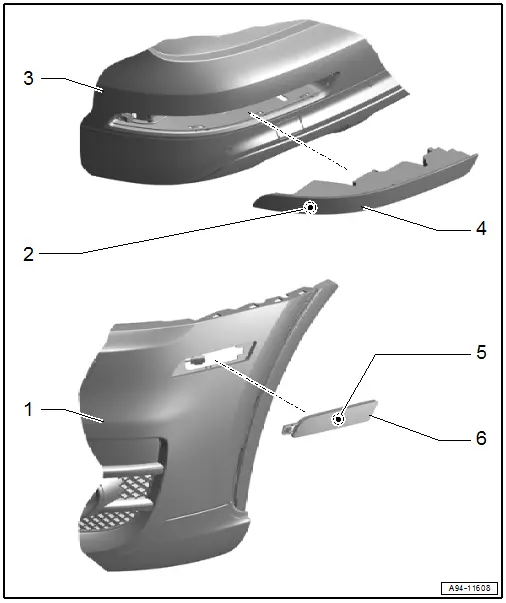
1 - Front Bumper Cover
2 - Rear Side Marker Lamp Bulb
- The entire body tail lamp must be replaced if an LED is faulty
- Left Rear Side Marker Lamp Bulb -M37-, Right Rear Side Marker Lamp Bulb -M38-
- Removing and installing. Refer to → Chapter "Tail Lamp, Removing and Installing".
3 - Rear Bumper Cover
4 - Body Tail Lamp
5 - Front Side Marker Lamp Bulb
- The entire front side marker lamp must be replaced if an LED is faulty
- Left Front Side Marker Lamp Bulb -M33-, Right Front Side Marker Lamp Bulb -M34-
- Removing and installing. Refer to → Chapter "Front Side Marker Lamp, Removing and Installing".
6 - Front Side Marker Lamp
- Removing and installing. Refer to → Chapter "Front Side Marker Lamp, Removing and Installing".
Front Side Marker Lamp, Removing and Installing
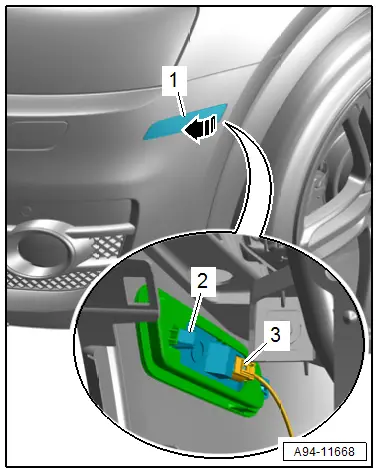
Removing
- Turn the light switch to position "0".
- Loosen the front wheel housing liner in the front area and push it aside. Refer to → Body Exterior; Rep. Gr.66; Wheel Housing Liner; Front Wheel Housing Liner, Removing and Installing.
- Release the retainer -2-, pivot the side marker lamp -1- out of the opening -arrow- and remove it from the mount.
- Disconnect the connector -3-.
Installing
Install in reverse order of removal. Note the following:
- Install the side marker lamp into the opening and lock it on the opposite side.
READ NEXT:
 Exterior Rearview Mirror Lamps
Overview - Exterior Rearview Mirror Lamps
1 - Mirror Glass
2 - Mirror Adjusting Unit Mount
3 - Exterior Rearview Mirror Housing
4 - Exterior Rearview Mirr
Tail Lamps
Overview - Rear Lid Tail Lamps
LED tail lamps have LED bulbs and are integrated in the tail
lamps. The LEDs cannot be replaced; the entire tail lamp must be
replaced.
1 - Tail L
High-Mounted Brake Lamp
Overview - High-Mounted Brake Lamp
1 - High-Mounted Brake Lamp
High-Mounted Brake Lamp Bulb -M25-
Removing and installing. Refer to
→ Chapter "High-Mounted Brake Lamp Bulb,
SEE MORE:
Checking Pressures on Vehicles with Expansion Valve and Receiver/Dryer
(with Internally Regulated Compressor)
General Information
Note
Connect the A/C service station. Refer to
→ Chapter "A/C Service Station, Connecting".
Observe the test requirements. Refer to
→ Chapter "Pressures, Checking".
- With the ignition switched off, check the pressure in the
refrigerant
Front Center Console Storage Compartment, Removing and Installing
Front Storage Compartment, Removing and Installing
Removing
- Remove the center console insert. Refer to
→ Chapter "Center Console Insert, Removing and Installing".
- Release the storage compartment -1-
from the hooks -2- and remove
rearward from the center console mount
-
