Audi Q3: Front Center Console Storage Compartment, Removing and Installing
Front Storage Compartment, Removing and Installing
Removing
- Remove the center console insert. Refer to → Chapter "Center Console Insert, Removing and Installing".
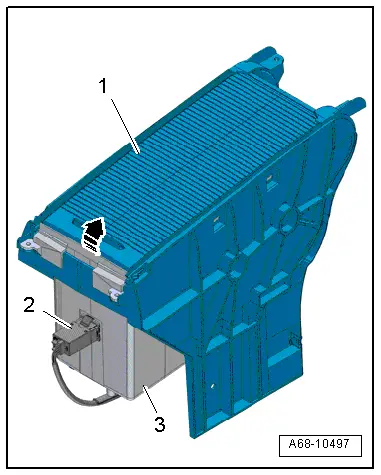
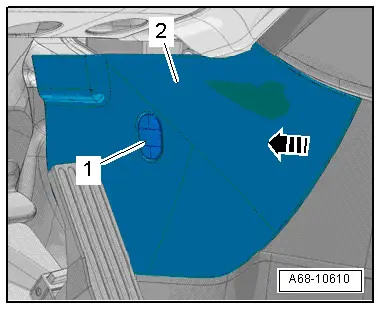
- Release the storage compartment -1- from the hooks -2- and remove rearward from the center console mount -arrow-.
- Versions with Access/Start Authorization Button -E408-: Remove the A/C Control Module -J301-/Climatronic Control Module -J255-. Refer to → Heating, Ventilation, and Air Conditioning; Rep. Gr.87; Display and Control Unit, Removing and Installing.
- Versions with Access/Start Authorization Button -E408-: disconnect the connector.
Installing
Install in reverse order of removal.
Installation notes, for example tightening specifications, replacing components. Refer to → Chapter "Overview - Center Console".
Front Center Console Storage Compartment, Removing and Installing
Removing
- Remove the center console. Refer to → Chapter "Center Console, Removing and Installing".
- Remove the storage compartment masking panel compartment. Refer to → Chapter "Storage Compartment Masking Panel in Center Console, Removing and Installing".
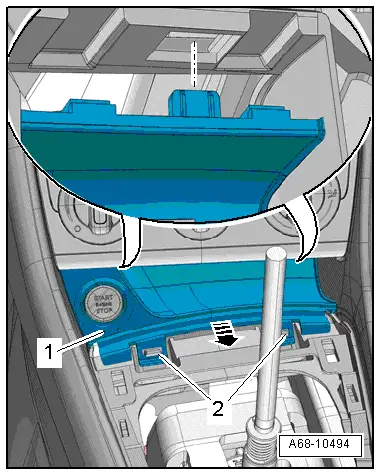
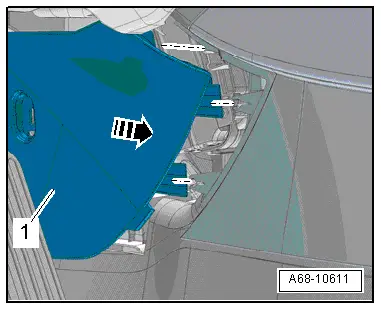
- Open the masking panel -1- and push rearward until stop.
- Versions with External Audio Source Connection -R199-: Remove the External Audio Source Connection -R199--item 2-. Refer to → Communication; Rep. Gr.91; External Multimedia Device Source Connections External Audio Source ConnectionR199 Removing and Installing.
- Remove the storage compartment -3- upward from the masking panel compartment -arrow- and remove.
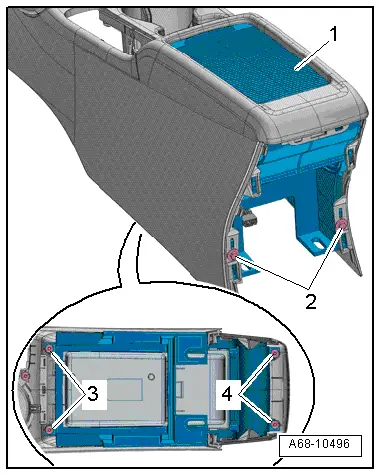
- Vehicles with a front center armrest: remove the front center armrest. Refer to → Chapter "Front Center Armrest, Removing and Installing".
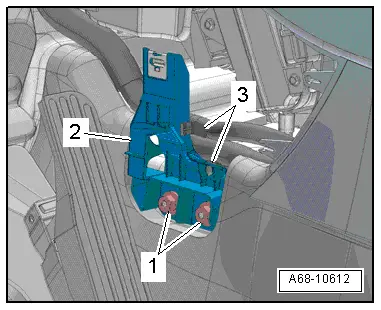
- Remove the screws -2-, -3- and then remove the storage compartment -1- downward.
- Versions with External Audio Source Connection -R199-: Remove the External Audio Source Connection -R199-. Refer to → Communication; Rep. Gr.91; External Multimedia Device Source Connections External Audio Source ConnectionR199 Removing and Installing.
- Versions with Telephone Baseplate -R126-: Remove the Telephone Baseplate -R126-. Refer to → Communication; Rep. Gr.91; Telephone System; Telephone BaseplateR126 Removing and Installing.
Installing
Install in reverse order of removal.
Installation notes, for example tightening specifications, replacing components. Refer to → Chapter "Overview - Center Console".
Storage Compartment Masking Panel in Center Console, Removing and Installing
Removing
- Remove the center console. Refer to → Chapter "Center Console, Removing and Installing".
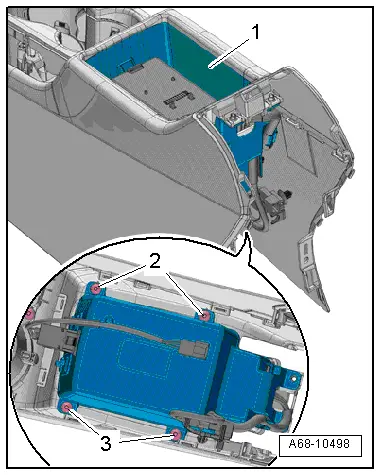
- Remove the bolts -2-.
- Turn the center console.
- Remove the bolts -3- and -4-.
- Remove the masking panel compartment -1- with storage compartment from the center console.
Installing
Install in reverse order of removal.
Installation notes, for example tightening specifications, replacing components. Refer to → Chapter "Overview - Center Console".
Front Footwell Center Console Trim Panel, Removing and Installing
Front Footwell Center Console Trim Panel, Removing and Installing
Removing
- Remove the cap -1- with a screwdriver and remove the bolt in the rear for the footwell trim panel.
- Remove footwell trim panel -2- forward out of the center console -arrow- and remove.
Installing
Install in reverse order of removal. Note the following:
- Engage the rear footwell trim panel -1- in the center console -arrow-.
Installation notes, for example tightening specifications, replacing components. Refer to → Chapter "Overview - Center Console, Footwell Trim Panel".
Front Footwell Center Console Trim Panel Bracket, Removing and Installing
Removing
- Remove the footwell trim panel. Refer to → Chapter "Front Footwell Center Console Trim Panel, Removing and Installing".
- Unclip the clips -3- from the footwell trim panel bracket.
- Push back the carpet in the area of the bolted connections and remove the nuts -1-.
- Remove footwell trim panel bracket -2-.
Installing
Install in reverse order of removal.
Installation notes, for example tightening specifications, replacing components. Refer to → Chapter "Overview - Center Console, Footwell Trim Panel".
READ NEXT:
 Center Console, Removing and Installing
Center Console, Removing and Installing
Removing
- Remove the center console insert. Refer to
→ Chapter "Center Console Insert, Removing and Installing".
- Versions with Access/St
Front Center Armrest
Overview - Front Center Armrest
1 - Front Center Armrest
Removing and installing. Refer to
→ Chapter "Front Center Armrest, Removing and Installing".
2 - Lower C
Overview - Interior Rearview Mirror
Overview - Interior Rearview Mirror, Version 1
1 - Front Cover
For the mirror base
Removing and installing. Refer to
→ Chapter "Interior Rearview Mirror, Removing and Insta
SEE MORE:
Overview - Interior Rearview Mirror
Overview - Interior Rearview Mirror, Version 1
1 - Front Cover
For the mirror base
Removing and installing. Refer to
→ Chapter "Interior Rearview Mirror, Removing and Installing".
2 - Clip
For the interior rearview mirror
There are different versions. R
Heater Core, Removing and Installing
Special tools and workshop equipment
required
Hose Clamps - Up To 25mm -3094-
Engine Bung Set -VAS6122-
Compressed air gun, commercially available
Note
Depending on the engine version to support the engine
coolant pump an After-Run Coolant Pump -V51-/Heater Support Pump
-V
