Audi Q3: Front Center Armrest
Overview - Front Center Armrest
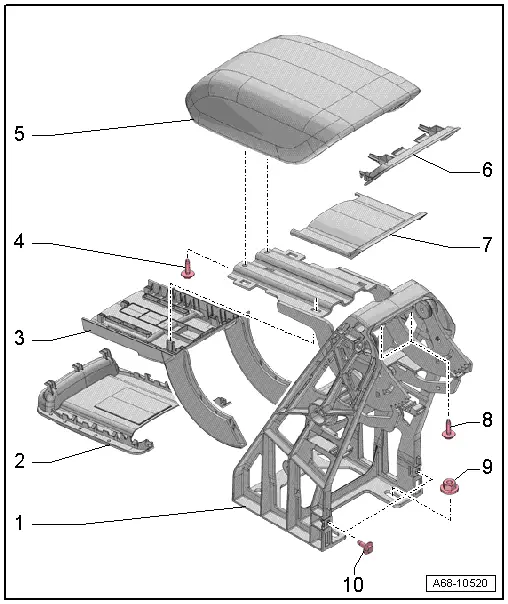
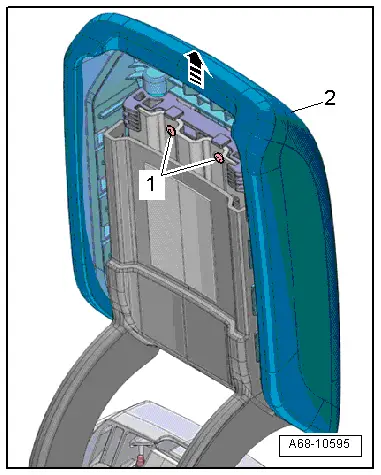
1 - Front Center Armrest
- Removing and installing. Refer to → Chapter "Front Center Armrest, Removing and Installing".
2 - Lower Cover
- For the center armrest cushion
- Engage in the front of the center armrest cushion and press on it until it engages audibly.
3 - Lower Trim Panel
- For the center armrest
- available as a replacement part only with -item 1-
- Clipped in the center armrest
4 - Bolt
- 2.2 Nm
- Quantity: 2
5 - Center Armrest Padding
- Removing and installing. Refer to → Chapter "Center Armrest Upper Section, Removing and Installing".
6 - Rear Cover
- For the center armrest cushion
- available as a replacement part only with -item 5-
- Clipped in the center armrest cushion
7 - Upper Trim Panel
- For the center armrest
- Available as a replacement part only with -item 1-
- Clipped in the center armrest
8 - Bolt
- 3 Nm
- Quantity: 2
9 - Nut
- 10 Nm
- Quantity: 4
10 - Bolt
- 3 Nm
- Quantity: 2
Front Center Armrest, Removing and Installing
Removing
- Move the front seats all the way forward.
- Remove the center console rear cover. Refer to → Chapter "Center Console Rear Trim, Removing and Installing".
- Vehicles with a rear vent: Remove the rear vent air duct. Refer to → Heating, Ventilation, and Air Conditioning; Rep. Gr.87; Air Ducts; Air Distribution Channels, Removing and Installing.
- Versions with Telephone Baseplate -R126-: Disengage the connector from the center armrest and free up the wire.
- Versions with External Audio Source Connection -R199-: disengage the connector on the center armrest and free up the wire.
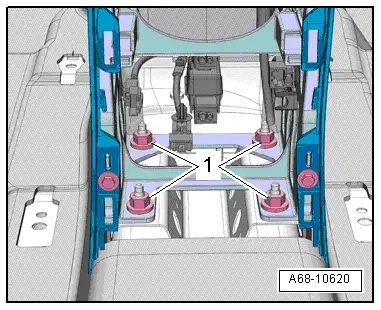
- Remove the center armrest nuts -1-.
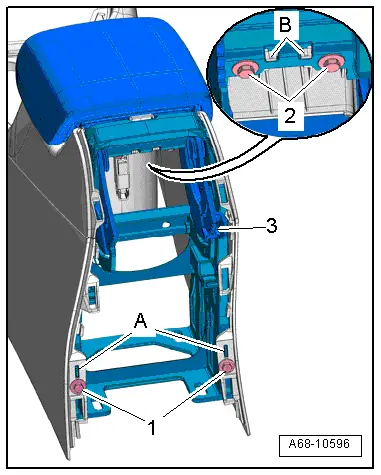
- Remove the bolts -1- and -2-.
- Slightly fold up the center armrest cushion and disengage the center console retaining tabs -B- from the center armrest.
- Push the rear center console on the sides outward from the center armrest by disengaging the center console from the retaining tabs -A-.
- At the same time, tip the center armrest -3- toward the rear at the top to lift it from the threaded pins and remove it to the rear.
Installing
- Insert the center armrest from behind into the center console and onto the threaded pins.
- Make sure that the center armrest and the center console are engaged properly in the retaining tabs -A- and -B-.
Install in reverse order of removal.
Installation notes, for example tightening specifications, replacing components. Refer to → Chapter "Overview - Front Center Armrest".
Center Armrest Upper Section, Removing and Installing
Special tools and workshop equipment required
- Wedge Set -T10383-
Removing
- Carefully unclip the cover -1- starting at the sides from the center armrest cushion using the Wedge -T10383/1--arrows-.
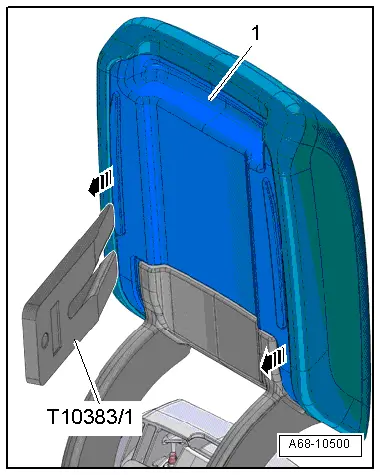
- Remove the screws -1- and remove the center armrest cushion -2- upward from the center armrest -arrow-.
Installing
- Install the center armrest cushion -2- on the center armrest and tighten the screws -1-.
Install in reverse order of removal.
Installation notes, for example tightening specifications, replacing components. Refer to → Chapter "Overview - Front Center Armrest".
READ NEXT:
 Overview - Interior Rearview Mirror
Overview - Interior Rearview Mirror, Version 1
1 - Front Cover
For the mirror base
Removing and installing. Refer to
→ Chapter "Interior Rearview Mirror, Removing and Insta
Interior Rearview Mirror, Removing and Installing
Removing
- Turn interior rearview mirror at the mirror base
-1- counterclockwise
-arrow- as far as the stop and
remove from the retaining plate.
Interior Rearview Mirror without Optional
SEE MORE:
Overview - Door
1 - Door
Removing and installing. Refer to
→ Chapter "Door, Removing and Installing".
2 - Bolt
45 Nm
Note
The bolt is a fitting bolt so it is generally not necessary to
adjust the door using it.
If it is necessary to make an adjustment us
Lane departure warning
General information
Applies to: vehicles with lane departure warning
The lane departure warning can detect lane
marker lines within the limits of the system. If
you are approaching a detected lane marker and
it appears likely that you will leave the lane, the
system can warn you with corrective stee
