Audi Q3: Headlamp, Removing and Installing
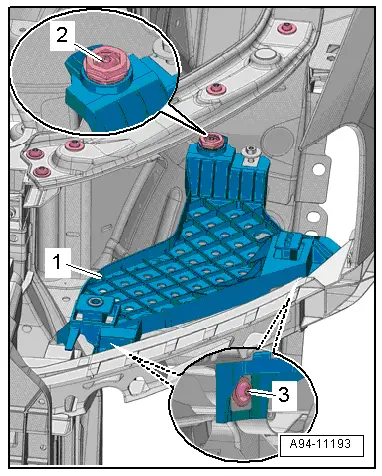
Lower Headlamp Housing Mount, Removing and Installing
Removing
- Remove the headlamp housing. Refer to → Chapter "Headlamp, Removing and Installing".
- Remove the wheel spoiler and the front wheel housing liner. Refer to → Body Exterior; Rep. Gr.66; Wheel Housing Liner; Front Wheel Housing Liner, Removing and Installing.
- On the left side: remove the washer fluid reservoir. Refer to → Chapter "Washer Fluid Reservoir, Removing and Installing".
- Remove the bolts -2 and 3- and remove the lower mount -1-.
Installing
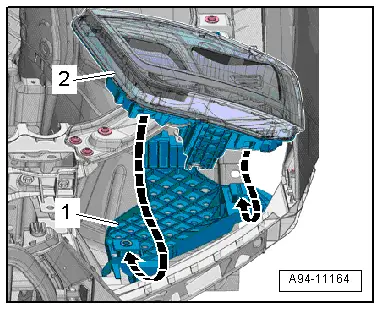
- Install the headlamp housing. Refer to → Chapter "Headlamp, Removing and Installing".
- Align the headlamp housing -1- to match the gap dimensions of the body contour.
- Gap dimension = even gap dimension.
- If necessary, twist the nut -2- to adjust the height.
- Tighten the bolts -3 and 4- while aligning the headlamp housing so that it sits flush with the out edge of the fender.
- Check gap dimensions again, repeat adjustment of gap dimensions if necessary, as described above.
- Adjust the headlamp. Refer to → Chapter "Headlamp, Adjusting".

Headlamp, Removing and Installing, Halogen Headlamps
Removing
- Turn the light switch to position "0".
- Turn off the ignition and all electrical consumers and remove the ignition key.
- Do not press the flasher.
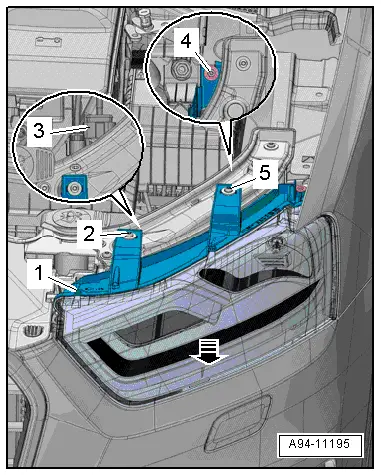
- Disconnect the connector -3-.
- Remove the bolts -2, 4 and 5-.
- Remove the headlamp housing -1- forward in direction of -arrow-.

Installing
Install in reverse order of removal. Note the following:
- Install the headlamp housing -2- in the headlamp housing mount -1- and push rearward until stop.
- The headlamp housing -1- must slide into the mount gently without using force.
- Tighten the bolts -2, 4 and 5-.
- Connect the connector -3-.
Headlamp, Removing and Installing, HID and LED Headlamps
 WARNING
Life-threatening danger due to high voltage.
- When working on the yellow high voltage symbol marked components of the HID headlamp, they must be de-energized.
- Turn off the ignition and all electrical equipment and remove the ignition key.
- Do not operate the flasher.
Removing
- Turn the light switch to position "0".
- Turn off the ignition and all electrical consumers and remove the ignition key.
- Do not press the flasher.
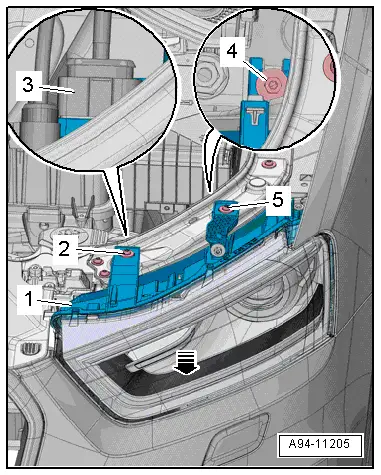
- Disconnect the connector -3-.
- Remove the bolts -2, 4 and 5-.
- Remove the headlamp housing -1- forward -arrow-.

Installing
Install in reverse order of removal. Note the following:
- Install the headlamp housing -2- in the headlamp housing mount -1- and push rearward until stop.
- The headlamp housing -1- must slide into the mount gently without using force.
- Tighten the bolts -2, 4 and 5-.

- Connect the connector -3-.
READ NEXT:
 Headlamp, Adjusting
Headlamp, Adjusting
The following test and adjustment description applies to all
countries.
However, national guidelines or regulations of the country
should be observed.
Halogen Headlamp
HID Headlamp, Adjusting
Checking and Adjusting Conditions
Tire pressure is OK.
The headlamp lens must be clean and dry.
The headlamp lens may not be damaged.
Headlamp reflectors and bulbs are OK.
Vehicle load mus
LED Headlamp, Adjusting
Checking and adjusting conditions
Tire pressure is OK.
The headlamp glass must be clean and dry.
The headlamp glass must not be damaged.
Headlamp reflectors and bulbs are OK.
The vehicle mSEE MORE:
Fuses and bulbs
Fuses
Replacing fuses
Fig. 171 Left side of the engine compartment: fuse cover 1
Fig. 172 Left side of the cockpit: storage compartment
(left-hand drive) 2 or storage compartment (right-hand
drive) 3
Fuses are installed in various locations in your vehicle.
The following information only lists f
Window Regulator Motor, Removing and Installing
Removing
Note
The window regulator motor can be removed or installed with
the motor or door window in any position.
- Remove the front door trim panel. Refer to
→ Body Interior; Rep. Gr.70; Front Door Trim Panels; Front Door
Trim Panel, Removing and Installing.