Audi Q3: Infotainment System Display, Removing and Installing
Infotainment System Display, Removing and Installing
The Front Information Display Control Head -J685- (Display) is located in the center of the instrument panel.
The display and display support are a single unit and are removed together. After its removal the display is removed from the display support.
Special tools and workshop equipment required
- Trim Removal Wedge -3409-
Removing
- Turn off the ignition and all electrical equipment and remove the ignition key.
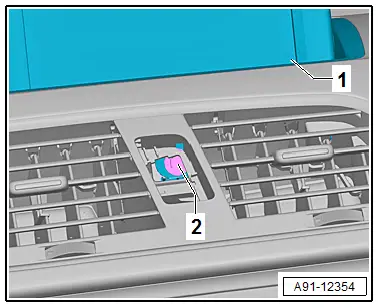
- Remove the instrument panel vent in the center. Refer to → Body Interior; Rep. Gr.70; Instrument Panel; Instrument Panel Vent, Removing and Installing (do not disconnect the connector).
- Remove the display support -1- bolt -2- in the center behind the instrument panel vent.
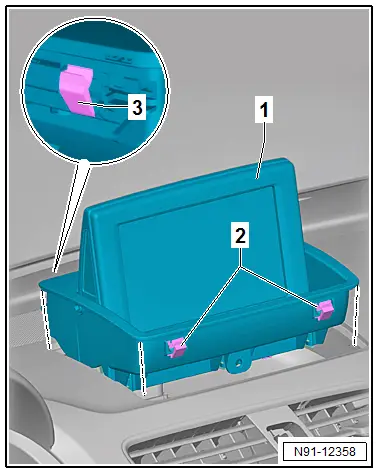
The display support -1- has front -3- and rear -2- spring tabs.
The display with the display support -1- must first be lifted slightly at the rear, so that the spring tabs -2- can release.
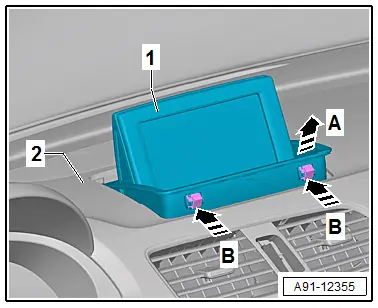
- Pry out the display support -1- slightly at the rear from the instrument panel -2- in direction of the -arrow A- using the Trim Removal Wedge -VAS3409-.
- Push the spring tabs together with a small screwdriver in direction of the-arrow B- and pull the display support -1- toward the rear from the instrument panel -2-.
- Release and disconnect the connector from the display.
- Unclip the display wiring harness on the display support and remove the display support -1-.
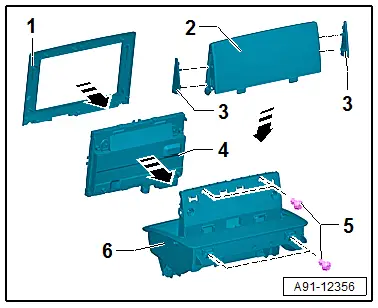
- Unclip the rear trim -2- on the display and remove upward.
- Remove the bolts -5- and then remove the display -4- from the display support -6-.
- Unclip the front trim -1- on the display -4-.
- If necessary, unclip the left and right side trim -3- from the rear trim -2-.
Installing
- Install in reverse order of removal. Note the following:
- Pay special attention to the correct wiring routing of the display-wires.
1 - Display with Display Support
2 - Display Wiring Harness
3 - 8-Pin Display Connector
4 - 4-Pin Display Connector
Information Electronics Control Module 1 -J794-, Removing and Installing
The Information Electronics Control Module 1 -J794- is located inside the instrument panel.
 Note
Note
If replacing the control module, select the "Replace control module" function for the corresponding control module on the Vehicle Diagnostic Tester.
Special tools and workshop equipment required
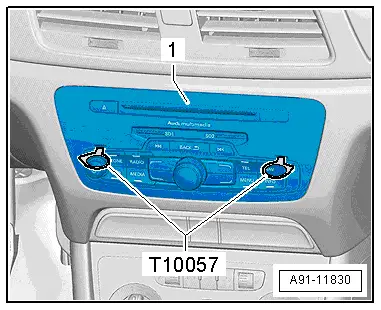
- Radio Removal Tool -T10057-
- Fiber-Optic Repair Set - Connector Protective Caps -VAS6223/9-.
Removing
- Turn off the ignition and all electrical equipment and remove the ignition key.
- Remove any CDs still in the Information Electronics Control Module 1 -J794-.
- Insert the two clips from the Radio Removal Tool -T10057- into the slits in the Information Electronics Control Module 1 -J794--1- until they lock into place. Points on the grip eyelets of tool face outward.
- Pull Information Electronics Control Module 1 -J794--1- out using the handles on the Radio Removal Tool -T10057- from the instrument panel.
- Release and disconnect the connectors from the Information Electronics Control Module 1 -J794-.
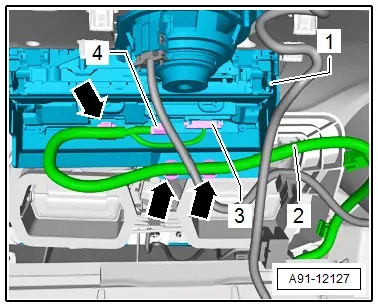
- Insert the Fiber-Optic Repair Set - Connector Protective Caps -VAS6223/9--1- onto the MOST bus connector -2-.
- Press the release tabs on the Information Electronics Control Module 1 -J794- and remove the Radio Removal Tool -T10057-.
Installing
- Install in reverse order of removal. Note the following:
- Connect all the connectors.
- Insert Information Electronics Control Module 1 -J794- into the instrument panel until it locks into place.
READ NEXT:
 Connector Assignments, MMI Navigation Plus
Information Electronics Control Module 1 -J794-
1 - GSM connection from Roof Antenna -R216-
2 - 4-Pin Connector -T4u- to the External Audio Source
Connection -R199-
Overview - Sound System
The following systems are offered:
8RE - Basic sound system, Radio CAN.
8RX - Basic plus sound system, Radio CAN /MMI
9VD - Audi Sound system.
9VK - Sound system Premium, BOSE Surro
SEE MORE:
Fog Lamp
Overview - Fog Lamps
1 - Air Intake Grille
2 - Fog Lamp
Removing and installing. Refer to
→ Chapter "Fog Lamp, Removing and Installing".
3 - Bolt
4.5 Nm
4 - Ventilation
For fog lamp
5 - Fog Lamp Bulb
Left Front F
Advanced airbag system
Fig. 64 Headliner: indicator light to display the
status of the front passenger's airbag
The Advanced Airbag System in your vehicle has
been certified to comply with the requirements
of the United States Federal Motor Vehicle Safety
Standard (FMVSS) 208, as well as Canada Motor
Vehicle Safety Stan
