Audi Q3: Installation Instructions, Run-Flat Tires
Warm up cold tires to the minimum mounting temperature
 Note
Note
This applies also to ultra high performance tires (height-/width ration smaller/same 45% and speed rating symbol larger than/same as V).
 WARNING
The minimum mounting temperature for a tire may not be below 21℃ or above 30℃.
- For injury-free mounting, the upper sidewall and the upper bead inside must be minimum 15º C (59º F).
- The internal temperature is called the core temperature.
- Rubber is a poor heat conductor, and for this reason, a cold tire must be within a temperature-controlled environment for a sufficient amount of time until the inner rubber layers have warmed up to at least 21ºC (70ºF).
- The tire surface temperature during the warm-up phase is not a measure the inside temperature.
- So that the cold tires warm up as quickly as possible, never stack them one on top of the other; store them separated from each other so that the warm air can "circulate" around them.
- Never us a room heater or a hot air gun to warm up tires because the surface temperature will heat up very quickly to a critical temperature.
- To prevent damage, only warm water or warm air (maximum 50º C (32º F) (122º F) ) can be used to warm up a tire!
- If cold tires (below 0º C (32º F) ) are brought into a warm room (above 0º C (32º F) ), a layer of ice will start to form on the tires. This layer of ice means that humidity in the warm air is condensing on the tire.
- Once the layer of ice starts to melt, wipe up the water with a rag so that the warming up process will not be slowed down.
Warm-Up Time:
- Using the example of a room temperature of at least 19º C (66º F) and a tire temperature of 0º C (32º F) or higher, the tires should be stored for at least two hours at least 19º C (66º F).
- If the room temperature is minimum 19º C (66º F) and the tire temperature is below 0º C (32º F) , then the tires should be stored for at least 2.5 hours at a minimum room temperature of 19º C (66º F).
Recommendations:
- If possible, let the tires stand in the workshop for one day before mounting them.
- Store the tires as high as possible on an insulated surface, pallet or something similar.
- Position the tires so that they can be "surrounded" by the warm air.
- Wipe off the sweat.
- Never heat the tires with a room heater or a hot air gun!
 WARNING
The minimum mounting temperature for a tire may not be below 21ºC (70ºF) or above 30℃. (86 ºF)
Pressing Off Tires, Run-Flat Tires
- Release air from tires, unscrew the valve insert to do so.
 Note
Note
- Be careful not to scratch off the glued- on wheel trim on these rims.
- The surface of the wheel trim is very sensitive.
- The rim will have be replaced if the wheel trim is damaged.
- The wheel trim cannot be replaced.

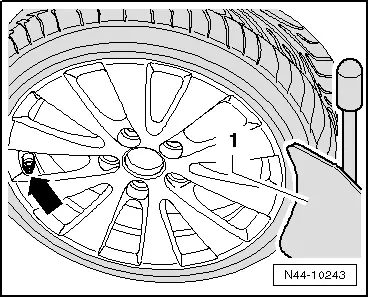
- When pressing off tire on a tire dismounting/mounting machine with press-off blade, always make sure that tire valve/tire pressure sensor -arrow- is located opposite the press-off blade -1-.
Press-off blade must be applied at maximum 2 cm removed from rim flange.
- Remove balancing weights and coarse dirt from disc wheel.

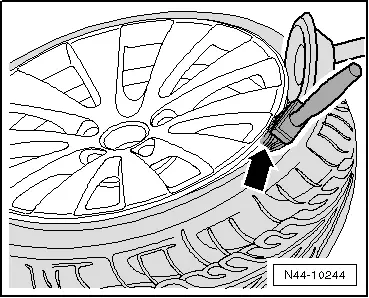
- Press off both tire beads around circumference while thoroughly applying tire mounting paste between tire and rim flange -arrow-.


